
Home>Create & Decorate>DIY & Crafts>DIY Deadlift Platform: Build Your Own Gym Equipment
DIY & Crafts
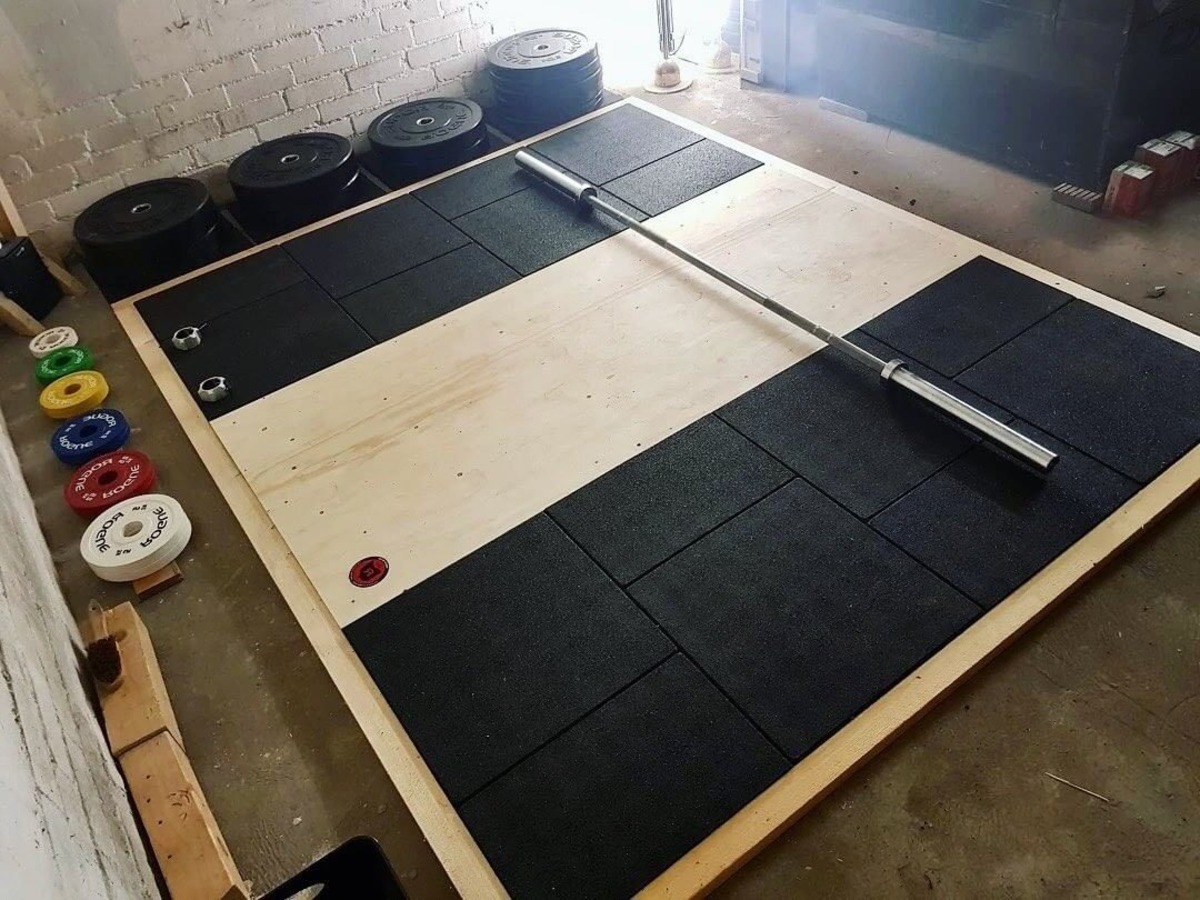
DIY Deadlift Platform: Build Your Own Gym Equipment
Published: June 18, 2024

Senior Editor in Create & Decorate, Kathryn combines traditional craftsmanship with contemporary trends. Her background in textile design and commitment to sustainable crafts inspire both content and community.
Build your own DIY deadlift platform and take your home gym to the next level with this easy and cost-effective DIY project. Perfect for DIY & Crafts enthusiasts!
(Many of the links in this article redirect to a specific reviewed product. Your purchase of these products through affiliate links helps to generate commission for Twigandthistle.com, at no extra cost. Learn more)
Introduction
Are you a fitness enthusiast looking to take your home gym to the next level? Building your own deadlift platform is a fantastic way to enhance your workout space while also saving some cash. Whether you're a seasoned lifter or just starting out, having a dedicated area for deadlifting can make a significant difference in your training routine. In this guide, we'll walk you through the process of creating your very own deadlift platform, providing you with the satisfaction of a DIY project and a sturdy foundation for your weightlifting endeavors. Let's dive in and get those gains!
Benefits of Deadlift Platforms
-
Protects Your Floors: Deadlift platforms act as a protective barrier between your heavy weights and the floor, preventing damage to your home gym or garage floor. This is especially important if you have expensive flooring that you want to keep in top condition.
-
Noise Reduction: The impact of dropping heavy weights can create a lot of noise, which may not be ideal for you or your neighbors. A deadlift platform helps to dampen the sound, making your home gym a more peaceful and enjoyable place to work out.
-
Enhanced Stability: By providing a stable and level surface, a deadlift platform ensures that you can perform your lifts with confidence. This stability is crucial for maintaining proper form and reducing the risk of injury during your workouts.
-
Professional Feel: Creating a dedicated space for deadlifting gives your home gym a professional touch. It not only looks impressive but also sets the stage for a more focused and effective workout.
-
Customization: When you build your own deadlift platform, you have the freedom to customize it to your preferences. Whether it's adding personalized designs, incorporating additional features, or adjusting the size to fit your space, the possibilities for customization are endless.
-
Long-Term Investment: Building a deadlift platform is a long-term investment in your fitness journey. It provides a durable and reliable foundation for your weightlifting activities, ensuring that you can continue to train effectively for years to come.
Now that you understand the benefits of having a deadlift platform, let's move on to the materials you'll need to get started.
Materials Needed
To build your own deadlift platform, you'll need the following materials:
-
Plywood: Two sheets of 4×8 plywood, preferably 3/4 inch thick. This will serve as the main surface of your platform.
-
Rubber Horse Stall Mats: Two heavy-duty rubber stall mats, each measuring 4×6 feet. These will provide the necessary cushioning and protection for your floor and weights.
-
Wood Screws: A box of wood screws, around 2 inches in length, to secure the plywood layers and rubber mats together.
-
Construction Adhesive: A strong construction adhesive to bond the layers of plywood and rubber mats securely.
-
Circular Saw: A circular saw for cutting the plywood to the desired dimensions. If you don't have one, you can usually rent a saw from a local hardware store.
-
Measuring Tape and Pencil: These basic tools will help you accurately measure and mark the plywood and rubber mats for cutting.
-
Drill: A drill will be essential for driving the wood screws into place and assembling the layers.
-
Safety Gear: Don't forget to prioritize safety. Wear protective eyewear and gloves when cutting and assembling the materials.
With these materials in hand, you'll be well-equipped to start building your very own deadlift platform. Now, let's move on to the step-by-step instructions for putting it all together.
Step-by-Step Instructions
-
Measure and Cut the Plywood: Begin by measuring and marking the plywood to the desired dimensions. A standard deadlift platform is typically 8×8 feet, so you'll need to cut the plywood into two 4×8 foot sections. Use a circular saw to make precise cuts, ensuring that the pieces fit together seamlessly.
-
Secure the Layers: Once the plywood is cut, apply a generous amount of construction adhesive to one of the 4×8 sections. Carefully place the second 4×8 section on top, ensuring that the edges align perfectly. Use wood screws to secure the two layers together, creating a sturdy base for your deadlift platform.
-
Cut the Rubber Mats: Next, measure and cut the rubber stall mats to fit the dimensions of the plywood base. You'll need two 4×6 foot sections of rubber matting. A sharp utility knife or a heavy-duty scissors can be used to make the cuts, but ensure that the edges are straight and clean.
-
Attach the Rubber Mats: Apply construction adhesive to the top of the plywood base, then carefully position the rubber mats on top. Press down firmly to ensure a strong bond between the plywood and rubber. Once in place, use wood screws around the perimeter to secure the rubber mats to the plywood base, preventing any shifting during use.
-
Finishing Touches: Inspect the platform for any loose screws or rough edges. Sand down any uneven surfaces and ensure that all screws are flush with the plywood. You can also add a coat of sealant or paint to protect the wood and give your deadlift platform a polished look.
-
Position in Your Gym: With the construction complete, carefully move your newly built deadlift platform to its designated spot in your home gym. Ensure that it's placed on a level surface and that you have ample space around it for your workouts.
By following these step-by-step instructions, you'll have a sturdy and professional-looking deadlift platform ready for action in your home gym. Now, let's explore some tips for customizing your platform to suit your specific needs and preferences.
Tips for Customizing Your Deadlift Platform
-
Personalized Design: Consider adding a personal touch to your deadlift platform by incorporating custom designs or logos. You can use stencils and paint to create a unique aesthetic that reflects your personality and style. Whether it's your favorite sports team's emblem or an inspiring quote, adding a personal touch can make your home gym experience even more enjoyable.
-
Additional Features: Depending on your specific workout needs, you might want to consider adding extra features to your deadlift platform. This could include built-in hooks for storing resistance bands, a chalk bowl for better grip during lifts, or even a small storage compartment for keeping your lifting accessories organized and within reach.
-
Size and Thickness: While the standard size for a deadlift platform is 8×8 feet, you can customize the dimensions to fit your available space. Additionally, you may choose to increase the thickness of the plywood for added durability, especially if you regularly lift extremely heavy weights. Just ensure that any adjustments you make still provide a stable and level surface for your workouts.
-
Color and Finish: Adding a coat of paint or sealant not only protects the wood but also allows you to match the platform to the overall aesthetic of your home gym. Whether you prefer a natural wood finish, a sleek black coating, or a vibrant color that energizes your workout space, the choice is yours. Just make sure to use a durable finish that can withstand the rigors of your training sessions.
-
Modular Additions: If you have a versatile workout routine that includes exercises beyond deadlifting, consider making your platform modular. This could involve creating detachable sections for other exercises such as Olympic lifts or powerlifting movements. By doing so, you can maximize the functionality of your platform and adapt it to various workout styles.
-
Branding and Safety Markings: For a professional touch, you can add safety markings and branding to your deadlift platform. This could include clearly labeled weight load capacities, lifting area boundaries, or even your own gym logo. Not only does this enhance the visual appeal of your platform, but it also serves as a helpful safety reminder during your workouts.
By considering these tips for customizing your deadlift platform, you can create a personalized and functional addition to your home gym that perfectly suits your fitness needs and preferences. Now, with your customized platform in place, you're all set to elevate your weightlifting game and enjoy the benefits of a dedicated space for deadlifting.
Safety Considerations
When building and using your DIY deadlift platform, it's crucial to prioritize safety at every step of the process. Here are some essential safety considerations to keep in mind:
-
Sturdy Construction: Ensure that the platform is securely assembled with the plywood layers and rubber mats firmly bonded together. Double-check the integrity of the wood screws and construction adhesive to prevent any potential hazards during use.
-
Smooth Edges and Surfaces: After construction, thoroughly inspect the platform for any rough or sharp edges. Sand down any uneven surfaces and ensure that the edges are smooth to minimize the risk of cuts or splinters during workouts.
-
Proper Placement: When positioning your deadlift platform in your home gym, make sure it's placed on a level surface. This helps to prevent any wobbling or instability during heavy lifts, reducing the risk of accidents or injuries.
-
Weight Distribution: Be mindful of the weight distribution on the platform. Ensure that the rubber mats are evenly secured to the plywood base, and that the platform can support the maximum weight you intend to lift without any signs of strain or weakness.
-
Personal Protective Equipment: When using your deadlift platform, always wear appropriate footwear and consider using lifting straps or gloves for added grip and protection. Additionally, if you're working with heavy weights, consider using a weightlifting belt to support your lower back and core.
-
Regular Maintenance: Periodically inspect the platform for any signs of wear and tear. Tighten any loose screws, reapply sealant or paint as needed, and replace any damaged rubber mats to maintain the platform's safety and structural integrity over time.
By keeping these safety considerations in mind, you can ensure that your DIY deadlift platform provides a secure and reliable foundation for your weightlifting activities, allowing you to focus on your workouts with peace of mind.
Conclusion
Building your own deadlift platform is a rewarding and practical endeavor that not only enhances your home gym but also provides a dedicated space for one of the most fundamental weightlifting exercises. By following the step-by-step instructions and considering the customization tips, you can create a personalized platform that suits your specific fitness needs and reflects your unique style. With the added benefits of floor protection, noise reduction, and enhanced stability, your DIY deadlift platform is a valuable investment in your fitness journey. Prioritizing safety throughout the construction and use of the platform ensures that you can lift with confidence and focus on achieving your fitness goals. So, roll up your sleeves, gather the materials, and get ready to elevate your weightlifting game with a custom-built deadlift platform that's as sturdy as it is stylish.