
Home>Create & Decorate>DIY & Crafts>DIY: Build Your Own Keyboard – A Step-by-Step Guide
DIY & Crafts
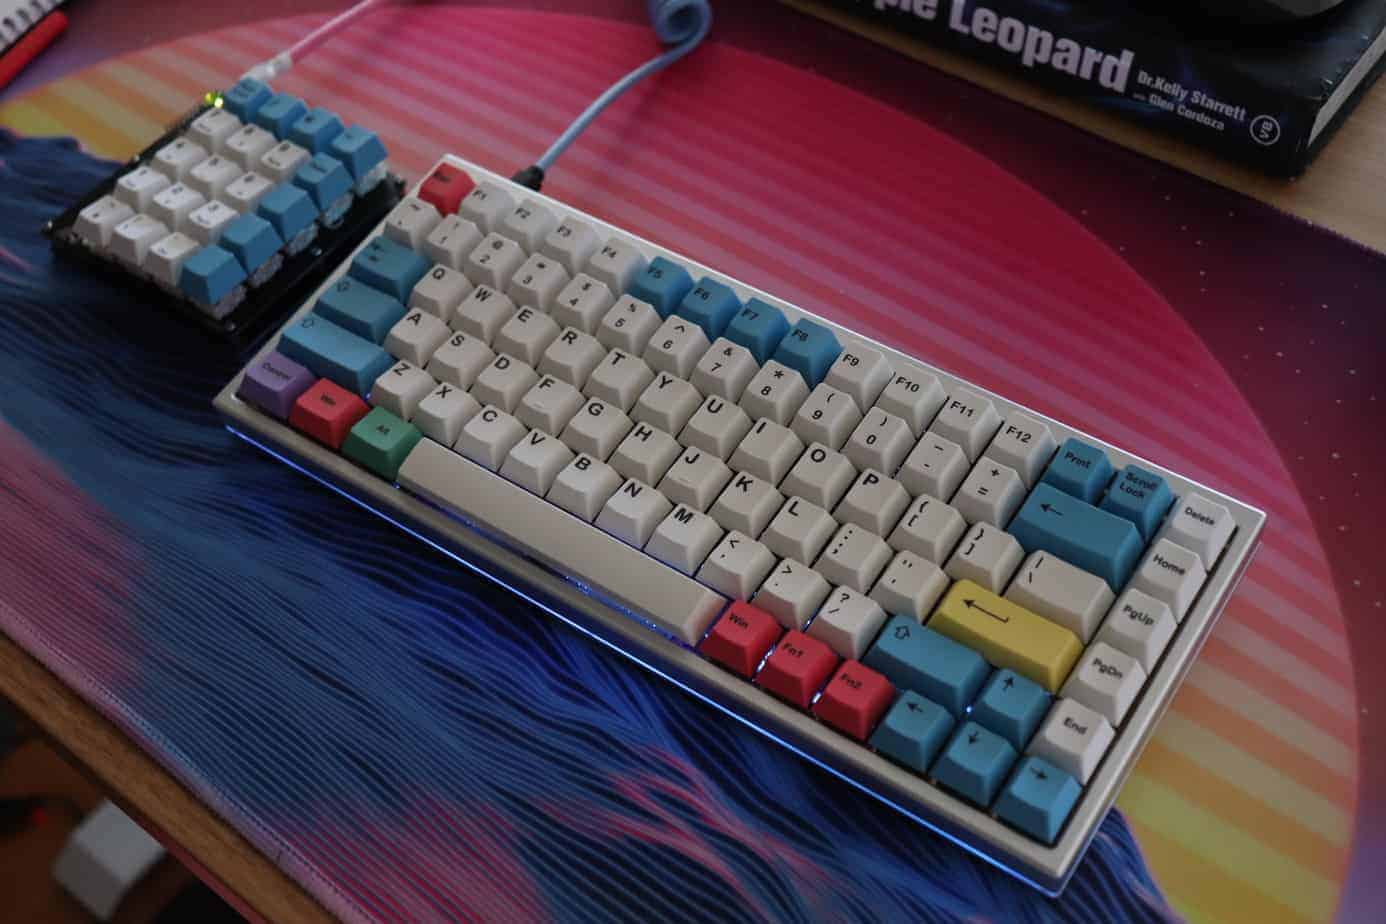
DIY: Build Your Own Keyboard – A Step-by-Step Guide
Published: May 24, 2024

Content Creator specializing in woodworking and interior transformations. Caegan's guides motivate readers to undertake their own projects, while his custom furniture adds a personal touch.
Learn how to build your own keyboard with our step-by-step DIY guide. Get creative with DIY & Crafts and customize your own unique keyboard today!
(Many of the links in this article redirect to a specific reviewed product. Your purchase of these products through affiliate links helps to generate commission for Twigandthistle.com, at no extra cost. Learn more)
Introduction
Are you tired of using the same old keyboard and want to add a personal touch to your workspace? Building your own keyboard can be a fun and rewarding DIY project that allows you to customize the look and feel of your typing experience. Whether you're a mechanical keyboard enthusiast or just looking for a unique addition to your desk, building your own keyboard can be a great way to unleash your creativity and showcase your personality. In this step-by-step guide, we will walk you through the process of building your own keyboard from scratch, so you can enjoy a one-of-a-kind typing experience that reflects your style and preferences. Let's dive in and get started on this exciting DIY adventure!
Gathering Materials and Tools
Before you embark on your keyboard-building journey, it's essential to gather all the necessary materials and tools. Here's a list of items you'll need to get started:
Materials
- Keyboard Case: Choose a case that suits your style and preferences, whether it's a sleek aluminum case or a vibrant acrylic one.
- Switches: Select the type of switches that best fit your typing needs, such as tactile, clicky, or linear switches.
- Keycaps: Pick keycaps that match your aesthetic and provide a comfortable typing experience.
- Circuit Board: Acquire a compatible circuit board that supports your chosen switches and layout.
- Stabilizers: These are essential for larger keys like the spacebar and enter key to ensure smooth and consistent keypresses.
- USB Cable: You'll need a USB cable to connect your custom keyboard to your computer.
Tools
- Soldering Iron and Solder: For assembling the circuit board and switches, a reliable soldering iron and solder are crucial.
- Tweezers: These will come in handy for placing small components and ensuring precise assembly.
- Keycap Puller: Use this tool to remove and install keycaps without damaging them.
- Screwdriver Set: Different screwdrivers may be required for assembling the keyboard case and securing the circuit board.
- Flush Cutters: These are useful for trimming excess leads after soldering components to the circuit board.
- Solder Sucker or Desoldering Pump: In case you need to correct any soldering mistakes, these tools will help you remove excess solder.
By gathering these materials and tools, you'll be well-prepared to move on to the next exciting phase of building your own keyboard.
Preparing the Keyboard Case
Once you have all the necessary materials and tools at your disposal, it's time to prepare the keyboard case for the assembly process. Here's a step-by-step guide to help you get the keyboard case ready for the next stages:
-
Inspect the Case: Before you begin, carefully inspect the keyboard case for any defects or imperfections. Ensure that the case is free from any damage and is suitable for housing the keyboard components securely.
-
Clean the Case: Use a soft, lint-free cloth and a mild cleaning solution to wipe down the keyboard case. This will help remove any dust, fingerprints, or residues that may have accumulated during storage or handling.
-
Prepare the Mounting Points: If your keyboard case requires mounting standoffs or screws to secure the circuit board, make sure to install them according to the manufacturer's instructions. This will provide a stable foundation for the internal components.
-
Customization: If you want to add a personal touch to your keyboard case, consider customizing it with decals, paint, or other decorative elements. This is an opportunity to showcase your creativity and make your keyboard truly unique.
-
Test Fit Components: Before proceeding further, perform a test fit of the circuit board, switches, and stabilizers inside the case. This will help you ensure that the components fit properly and identify any potential issues that need to be addressed before final assembly.
By following these steps, you'll be well-prepared to move on to the next phase of assembling the switches and keycaps, bringing you one step closer to completing your custom-built keyboard.
Assembling the Switches and Keycaps
Now that the keyboard case is prepared, it's time to move on to the exciting process of assembling the switches and keycaps. This step is crucial as it directly impacts the tactile feel and overall performance of your custom keyboard. Follow these detailed steps to ensure a smooth and successful assembly:
-
Layout Planning: Before installing the switches, carefully plan the layout of your keyboard. Decide on the positioning of each switch and ensure that the keycaps will align correctly with the switches. This planning phase is essential for achieving a well-organized and visually appealing keyboard layout.
-
Install the Switches: Begin by inserting the switches into the designated slots on the circuit board. Depending on the type of switches you've chosen, such as tactile, clicky, or linear switches, ensure that they are securely seated and aligned properly. Take your time to avoid damaging the switches during installation.
-
Keycap Placement: Once the switches are in place, it's time to install the keycaps. Carefully position each keycap over its corresponding switch, ensuring that they are aligned and seated evenly. Apply gentle pressure to snap the keycaps into position, taking care not to bend or damage the switches during this process.
-
Stabilizer Installation: For larger keys such as the spacebar, enter key, and shift keys, it's essential to install stabilizers to ensure consistent and smooth key presses. Follow the manufacturer's instructions for installing and securing the stabilizers, as they play a crucial role in enhancing the typing experience for these keys.
-
Test the Key Presses: After assembling the switches and keycaps, perform a quick test of the key presses to ensure that each switch registers input correctly. This step will help you identify any potential issues with the switch or keycap alignment before proceeding further.
By following these detailed steps, you'll be well on your way to completing the assembly of the switches and keycaps, bringing you closer to the final stages of building your custom keyboard.
Soldering the Circuit Board
Soldering the circuit board is a critical step in the process of building your own keyboard, as it involves assembling the electrical components that enable the keystrokes to be registered and transmitted to the computer. Here's a detailed guide to help you navigate through the soldering process with confidence:
-
Prepare the Work Area: Before you begin soldering, ensure that your work area is well-ventilated and free from any clutter. Place the circuit board on a stable surface and gather all the necessary tools, including the soldering iron, solder, and any additional aids such as helping hands or a magnifying glass if needed.
-
Tinning the Soldering Iron: Start by tinning the soldering iron tip to ensure optimal heat transfer during the soldering process. This involves coating the tip of the soldering iron with a small amount of solder, which helps improve its conductivity and facilitates the flow of solder onto the circuit board.
-
Secure the Components: Position the electrical components, such as the switches and diodes, onto the circuit board according to the layout and orientation specified by the keyboard's design. Use a pair of helping hands or a PCB holder to secure the circuit board and components in place, allowing for steady and precise soldering.
-
Apply Solder to the Joints: With the soldering iron heated to the appropriate temperature, carefully touch the tip of the iron to the joint where the component meets the circuit board pad. Then, apply a small amount of solder to the junction, allowing it to flow and create a secure connection between the component lead and the pad.
-
Avoid Excessive Heat: It's crucial to avoid applying excessive heat to the components and circuit board, as prolonged exposure to high temperatures can damage the sensitive electronic parts. Maintain a steady and controlled soldering technique, ensuring that the solder flows smoothly without creating solder bridges or cold joints.
-
Inspect the Solder Joints: After soldering each component, visually inspect the solder joints to ensure they are shiny, smooth, and free from any irregularities. Check for proper fillets that indicate a strong and reliable connection between the component leads and the circuit board pads.
-
Trim Excess Leads: Once the solder joints have been inspected and confirmed, use a pair of flush cutters to trim any excess component leads protruding from the circuit board. This step helps create a neat and tidy appearance while preventing any potential short circuits or interference with other components.
By following these detailed steps and exercising patience and precision, you can successfully solder the circuit board, bringing you closer to the completion of your custom-built keyboard.
Testing and Troubleshooting
Once the keyboard components are assembled and soldered, it's time to conduct thorough testing to ensure that your custom-built keyboard functions as intended. Additionally, troubleshooting any potential issues that may arise during the testing phase is crucial for achieving a fully operational keyboard. Here's a detailed guide to help you navigate through the testing and troubleshooting process with confidence:
-
Initial Functionality Test: Connect the keyboard to your computer using the USB cable and verify that it is recognized by the operating system. Check if the LED indicators, if present, light up as expected. Press each key to confirm that the keystrokes are registered and displayed on the screen.
-
Key Mapping Verification: Use a key testing software or an online keyboard tester to verify the key mapping and ensure that each key press corresponds to the correct input. This step helps identify any potential key switch or circuitry issues that may affect the keyboard's functionality.
-
Multi-Key Input Test: Perform a multi-key input test to check for any potential key ghosting or rollover issues. Press multiple keys simultaneously and observe if all the pressed keys are registered without any conflicts or missed inputs. This test is essential for ensuring smooth and accurate typing experiences, especially during fast and complex typing tasks.
-
LED and Backlight Testing: If your custom keyboard features LED backlighting, test the functionality of the LEDs to ensure that they illuminate as expected. Verify the color, brightness, and effects of the backlighting to confirm that it aligns with your design preferences.
-
Firmware Configuration: If your keyboard utilizes programmable firmware, such as QMK or VIA, configure the firmware settings to customize key functions, macros, and lighting effects. Test the programmed functions to ensure that they operate correctly and meet your specific requirements.
-
Troubleshooting Potential Issues: If any issues are identified during the testing phase, such as non-responsive keys, erratic behavior, or inconsistent input, begin troubleshooting by inspecting the solder joints, component connections, and firmware settings. Use a multimeter to check for continuity and potential short circuits on the circuit board.
-
Reflow Soldering: In case of intermittent or unreliable connections, consider reflow soldering the affected joints to improve the electrical connections. This process involves re-melting the solder to create a more reliable bond between the components and the circuit board pads.
-
Component Replacement: If troubleshooting reveals faulty switches, diodes, or other components, consider replacing them with new, functional parts. Ensure that the replacements are compatible with the keyboard's design and layout to maintain consistent performance.
By following these detailed testing and troubleshooting steps, you can identify and address any potential issues, ensuring that your custom-built keyboard delivers a reliable and enjoyable typing experience.
Final Assembly and Customization
With the keyboard components successfully tested and any troubleshooting completed, it's time to proceed with the final assembly and customization of your custom-built keyboard. This phase involves bringing together all the individual elements to create a fully functional and personalized typing tool. Here's a detailed guide to help you complete the final assembly and add your unique touch to the keyboard:
-
Circuit Board Mounting: Carefully place the circuit board inside the prepared keyboard case, ensuring that it aligns with the mounting points and securely fits into position. Use the appropriate screws or fasteners to secure the circuit board, providing stability and support for the internal components.
-
USB Cable Connection: Connect the USB cable to the designated port on the circuit board, ensuring a secure and reliable connection. Route the cable through the cable routing channels or guides within the keyboard case to maintain a tidy and organized appearance.
-
Case Closure: Once the circuit board and USB cable are in place, carefully close the keyboard case, ensuring that all the components fit snugly and that there are no obstructions or misalignments. Secure the case using the provided screws or fasteners, ensuring that it is firmly closed and ready for use.
-
Customization: This is the exciting part where you can add your personal flair to the keyboard. Consider adding custom keycap sets, artisan keycaps, or novelty keycaps to enhance the visual appeal of your keyboard. Additionally, you can explore custom cable options, such as coiled or sleeved cables, to complement the overall aesthetic.
-
Keycap Profiles and Layout: Experiment with different keycap profiles and layouts to find the combination that best suits your typing style and preferences. Whether it's a sculpted profile like SA or DSA, or a more ergonomic layout like ortholinear or split, customizing the keycap arrangement can significantly impact the typing experience.
-
Switch Tuning and Lubrication: If desired, consider fine-tuning the switches by applying lubricants to enhance their smoothness and reduce friction during key presses. This process can contribute to a quieter and more refined typing feel, especially for mechanical switches.
-
LED and Backlight Customization: If your keyboard features LED backlighting, explore the available customization options to adjust the color, brightness, and lighting effects to your liking. Some keyboards offer RGB lighting with customizable patterns and animations, allowing you to create a visually stunning keyboard setup.
-
Keymap Configuration: Utilize the programmable features of your keyboard to configure custom keymaps, macros, and shortcuts that align with your workflow and typing habits. Take advantage of the flexibility offered by programmable firmware to tailor the keyboard's functionality to your specific needs.
By following these detailed steps for the final assembly and customization, you can bring your custom-built keyboard to life, reflecting your unique style and preferences while delivering a personalized and enjoyable typing experience.
Conclusion
Congratulations on successfully completing the journey of building your own custom keyboard! By following this step-by-step guide, you've gained valuable insights into the intricate process of assembling, soldering, testing, and customizing a keyboard that reflects your individuality and preferences. Your dedication and attention to detail have resulted in a unique and personalized typing tool that enhances your workspace and showcases your creativity.
As you begin using your custom-built keyboard, take pride in the craftsmanship and effort you've invested in this DIY project. Embrace the satisfying click of the switches, the smooth feel of the keycaps, and the visual appeal of your customized layout and design. Your custom keyboard is not only a functional tool but also a reflection of your passion for craftsmanship and individual expression.
As you continue to explore the world of DIY and home improvement, remember that the skills and knowledge you've acquired in building your own keyboard can be applied to future projects. Whether it's customizing other peripherals, crafting unique desk accessories, or embarking on new DIY endeavors, the experience gained from this project will serve as a foundation for future creative pursuits.
Now, with your custom keyboard at the center of your workspace, enjoy the seamless typing experience and the satisfaction of using a tool that you've meticulously crafted. Let your custom-built keyboard inspire you to pursue further DIY projects and continue to infuse your living spaces with your personal touch and ingenuity.
As you embark on future DIY and home improvement ventures, remember that the journey itself is as rewarding as the finished product. Embrace the process, learn from each step, and revel in the joy of creating something that is truly your own. Your custom-built keyboard stands as a testament to your creativity, resourcefulness, and dedication to the art of DIY and home improvement.