
Home>Create & Decorate>DIY & Crafts>DIY BBQ Pit: How To Build Your Own Backyard Barbecue
DIY & Crafts
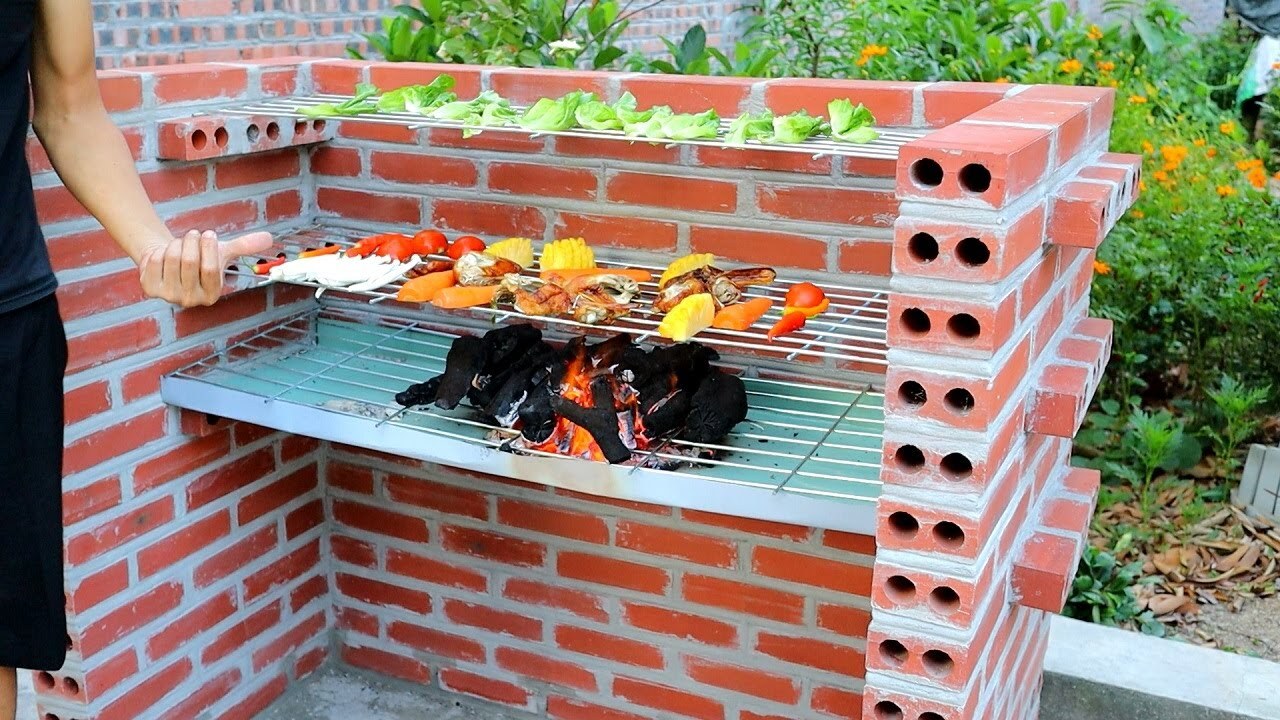
DIY BBQ Pit: How To Build Your Own Backyard Barbecue
Published: June 5, 2024

Senior Editor in Create & Decorate, Kathryn combines traditional craftsmanship with contemporary trends. Her background in textile design and commitment to sustainable crafts inspire both content and community.
Learn how to build your own backyard barbecue pit with our DIY guide. Perfect for DIY & Crafts enthusiasts looking to create their own outdoor cooking space.
(Many of the links in this article redirect to a specific reviewed product. Your purchase of these products through affiliate links helps to generate commission for Twigandthistle.com, at no extra cost. Learn more)
Introduction
Are you ready to take your backyard gatherings to the next level? Building your own DIY BBQ pit can be a rewarding and enjoyable project that will provide you with a dedicated space for grilling and entertaining. Whether you're a seasoned DIY enthusiast or a novice looking for a new challenge, constructing your own backyard barbecue pit can be a fun and fulfilling endeavor. In this guide, we'll walk you through the step-by-step process of building your very own DIY BBQ pit from start to finish. So, roll up your sleeves, gather your tools, and let's get started on creating the ultimate outdoor cooking space!
Planning Your DIY BBQ Pit
Before you dive into the construction process, it's crucial to start with a well-thought-out plan for your DIY BBQ pit. Here are the essential steps to consider when planning your project:
-
Selecting the Location: Choose a suitable spot in your backyard for the BBQ pit. Consider factors such as proximity to your home, prevailing wind direction, and the overall layout of your outdoor space.
-
Design and Layout: Decide on the size and design of your BBQ pit. Will it be a simple, traditional pit or a more elaborate structure with additional features like built-in seating or storage space?
-
Local Regulations: Check with your local authorities or homeowner's association to ensure compliance with any regulations or restrictions regarding outdoor construction or fire pits.
-
Budget and Materials: Determine your budget for the project and make a list of the materials and tools you'll need. This may include bricks, concrete, gravel, a metal grate, and various masonry tools.
-
Gathering Inspiration: Look for inspiration from DIY websites, home improvement magazines, or even by visiting local barbecue joints to gather ideas for your own unique BBQ pit design.
By carefully planning these aspects, you'll set the stage for a successful and enjoyable DIY BBQ pit construction project.
Gathering Materials and Tools
When it comes to building your DIY BBQ pit, having the right materials and tools at your disposal is essential for a smooth and efficient construction process. Here's a comprehensive list of the items you'll need to gather before getting started:
Materials
- Bricks or Pavers: These will form the main structure of your BBQ pit, providing durability and heat resistance.
- Concrete: Used for creating a solid foundation and securing the bricks in place.
- Gravel: Essential for drainage and stability, especially if your BBQ pit will be located on bare ground.
- Metal Grate: This will serve as the cooking surface for your BBQ pit, allowing for even heat distribution and easy grilling.
- Rebar: If you're building a larger BBQ pit, reinforcing the concrete with rebar can add extra strength and stability.
- Fire Bricks or Fireproof Mortar: These specialized materials are designed to withstand high temperatures and are used to line the interior of the BBQ pit.
Tools
- Shovel: For digging the foundation and leveling the ground.
- Trowel: Essential for spreading and shaping the concrete during the construction process.
- Level: Ensures that the bricks are laid evenly and the BBQ pit is constructed on a flat, stable surface.
- Masonry Saw or Chisel: Used for cutting bricks to size and shaping them to fit the desired layout.
- Work Gloves and Safety Goggles: Protect your hands and eyes from potential hazards during construction.
- Measuring Tape: Essential for ensuring accurate dimensions and layout of the BBQ pit.
By gathering these materials and tools in advance, you'll be well-prepared to tackle the construction of your DIY BBQ pit with confidence and efficiency.
Building the Foundation
The foundation of your DIY BBQ pit is crucial for ensuring stability and longevity. Follow these steps to create a solid base for your barbecue pit:
-
Site Preparation: Begin by clearing the chosen area of any debris, rocks, or vegetation. Use a shovel to level the ground, ensuring that the foundation will be laid on a flat surface.
-
Excavation: Dig a trench for the foundation, ensuring that it is deep enough to accommodate the concrete base. The depth will depend on the frost line in your region and the type of soil present.
-
Adding Gravel: Once the trench is dug, fill it with a layer of gravel. This will provide drainage and prevent moisture from accumulating beneath the foundation.
-
Formwork: Construct a form using wooden boards to contain the concrete for the foundation. Ensure that the form is level and securely in place.
-
Mixing and Pouring Concrete: Prepare the concrete mix according to the manufacturer's instructions. Pour the concrete into the form, ensuring that it is evenly distributed and fills the entire area of the trench.
-
Smoothing and Leveling: Use a trowel to smooth the surface of the concrete, removing any air pockets or uneven areas. Check the level to ensure that the foundation is flat and even.
-
Curing: Allow the concrete to cure for the recommended time, typically several days. During this period, keep the concrete moist to promote proper curing and prevent cracking.
By following these steps, you'll establish a sturdy and durable foundation for your DIY BBQ pit, setting the stage for the next phase of construction.
Constructing the BBQ Pit
With the foundation in place, it's time to move on to the exciting phase of constructing the actual BBQ pit. Follow these steps to bring your vision to life:
-
Laying the First Course: Begin by laying the first course of bricks or pavers on top of the cured concrete foundation. Use a level to ensure that the bricks are even and well-aligned.
-
Building the Walls: As you continue to stack the bricks, use a combination of mortar and fireproof bricks to build the walls of the BBQ pit. This will create a heat-resistant and durable enclosure for your grilling area.
-
Creating the Cooking Surface: Once the walls are constructed to the desired height, place the metal grate on top of the pit to serve as the cooking surface. Ensure that it is securely positioned and level.
-
Adding a Chimney or Ventilation: Depending on the design of your BBQ pit, you may want to incorporate a chimney or ventilation system to control airflow and smoke. This can be achieved by leaving a gap in the brickwork or adding a metal chimney structure.
-
Finishing Touches: Once the main structure is in place, take the time to add any finishing touches, such as decorative elements or additional features like built-in storage or seating. This is where you can personalize the BBQ pit to suit your preferences and style.
-
Curing and Drying: Allow the mortar to cure and the entire structure to dry thoroughly before firing up the BBQ pit for the first time. This will ensure that the materials have properly set and are ready for use.
By following these steps, you'll be well on your way to completing the construction of your DIY BBQ pit, bringing you one step closer to enjoying delicious outdoor meals with family and friends.
Adding Finishing Touches
Once the main structure of your DIY BBQ pit is in place, it's time to add those final details that will elevate both the functionality and aesthetics of your outdoor cooking space. Here are some essential finishing touches to consider:
-
Decorative Elements: Consider adding decorative elements to personalize your BBQ pit. This could include mosaic tiles, engraved stones, or colorful accents that reflect your personal style and complement your outdoor decor.
-
Built-in Storage: If you want to streamline your grilling experience, incorporating built-in storage for grilling tools, charcoal, or cooking accessories can be a game-changer. This can be achieved by adding shelves or compartments within the structure of the BBQ pit.
-
Seating Area: If space allows, consider creating a built-in seating area around the BBQ pit. This can be achieved by extending the brickwork to create a comfortable and inviting space for guests to gather while the grill is in use.
-
Lighting: Adding outdoor lighting around the BBQ pit can extend its functionality into the evening hours. Consider installing low-voltage lighting fixtures or solar-powered lights to create a warm and inviting ambiance.
-
Customization: Take the opportunity to customize your BBQ pit to suit your specific needs. Whether it's adding hooks for utensils, a built-in thermometer, or a designated area for food preparation, tailoring the BBQ pit to your preferences can enhance its overall usability.
By incorporating these finishing touches, you'll not only enhance the visual appeal of your DIY BBQ pit but also maximize its functionality, creating a space that is both practical and inviting for all your outdoor cooking adventures.
Safety Precautions
When embarking on the construction and use of your DIY BBQ pit, it's essential to prioritize safety at every stage of the process. Here are some crucial safety precautions to keep in mind:
-
Fire Safety: Ensure that your BBQ pit is located at a safe distance from any flammable structures, such as your home, wooden fences, or overhanging tree branches. This will minimize the risk of accidental fires spreading to surrounding areas.
-
Ventilation: Adequate ventilation is essential to prevent the buildup of smoke and carbon monoxide. If your BBQ pit includes a chimney or ventilation system, ensure that it is functioning effectively to direct smoke away from gathering areas.
-
Stable Foundation: Verify that the foundation of your BBQ pit is solid and stable to prevent any risk of collapse or shifting during use. This will help avoid accidents and injuries caused by structural instability.
-
Heat Protection: When using the BBQ pit, be mindful of the intense heat generated during grilling. Keep a safe distance from the cooking surface to avoid burns, and use appropriate heat-resistant gloves and tools when handling hot grates or surfaces.
-
Supervision: Always supervise the BBQ pit when it is in use, especially if children or pets are present. Educate family members and guests about the potential hazards of the BBQ pit and establish clear safety guidelines for its use.
-
Extinguishing Flames: Keep a fire extinguisher, a bucket of sand, or a garden hose nearby to quickly extinguish any unexpected flare-ups or embers that may pose a fire hazard.
-
Cleaning and Maintenance: Regularly clean the BBQ pit to remove grease buildup and debris, which can pose a fire risk. Additionally, inspect the structure for any signs of wear or damage, and promptly address any maintenance needs to ensure its continued safety.
By adhering to these safety precautions, you can enjoy your DIY BBQ pit with peace of mind, knowing that you've taken the necessary steps to create a safe and enjoyable outdoor cooking environment for you and your loved ones.
Enjoying Your DIY BBQ Pit
Now that your DIY BBQ pit is complete, it's time to reap the rewards of your hard work and enjoy the ultimate outdoor cooking experience. Here are some tips for making the most of your new backyard barbecue pit:
-
Grilling Gatherings: Invite friends and family over for a memorable grilling get-together. Whether it's a casual weekend cookout or a special celebration, your DIY BBQ pit provides the perfect setting for creating lasting memories and savoring delicious meals.
-
Exploring New Recipes: With your BBQ pit ready to go, it's the ideal opportunity to expand your culinary horizons. Experiment with different grilling techniques, marinades, and recipes to elevate your outdoor cooking skills and delight your taste buds.
-
Seasonal Celebrations: Embrace the changing seasons by incorporating seasonal ingredients and flavors into your outdoor cooking. From summer barbecues to fall harvest feasts, your BBQ pit can be the centerpiece of seasonal celebrations throughout the year.
-
Al Fresco Dining: Create a welcoming outdoor dining area near your BBQ pit, complete with comfortable seating and ambient lighting. Enjoying meals in the open air adds a special charm to the dining experience and allows you to fully appreciate your outdoor cooking space.
-
Relaxing Evenings: As the sun sets, gather around the warm glow of your BBQ pit with loved ones. Whether it's for roasting marshmallows, sharing stories, or simply enjoying the crackling of the fire, your DIY BBQ pit can be a cozy and inviting spot for relaxed evenings outdoors.
-
Cooking Demonstrations: Share your passion for grilling with others by hosting cooking demonstrations or outdoor cooking classes. Your DIY BBQ pit can become a focal point for sharing culinary knowledge and bringing people together over a shared love of food.
-
Continual Refinement: As you use your BBQ pit, take note of any adjustments or improvements that could enhance its functionality or aesthetics. Whether it's adding new features, refining the layout, or incorporating innovative grilling accessories, your BBQ pit can be an ongoing project for creative enhancements.
By embracing these ideas, you can fully embrace the pleasures of outdoor cooking and entertaining with your DIY BBQ pit, creating a space that brings joy, delicious food, and cherished moments with those around you.