
Home>Organize & Storage>Closet Organization>DIY Utility Closet Organization Guide
Closet Organization
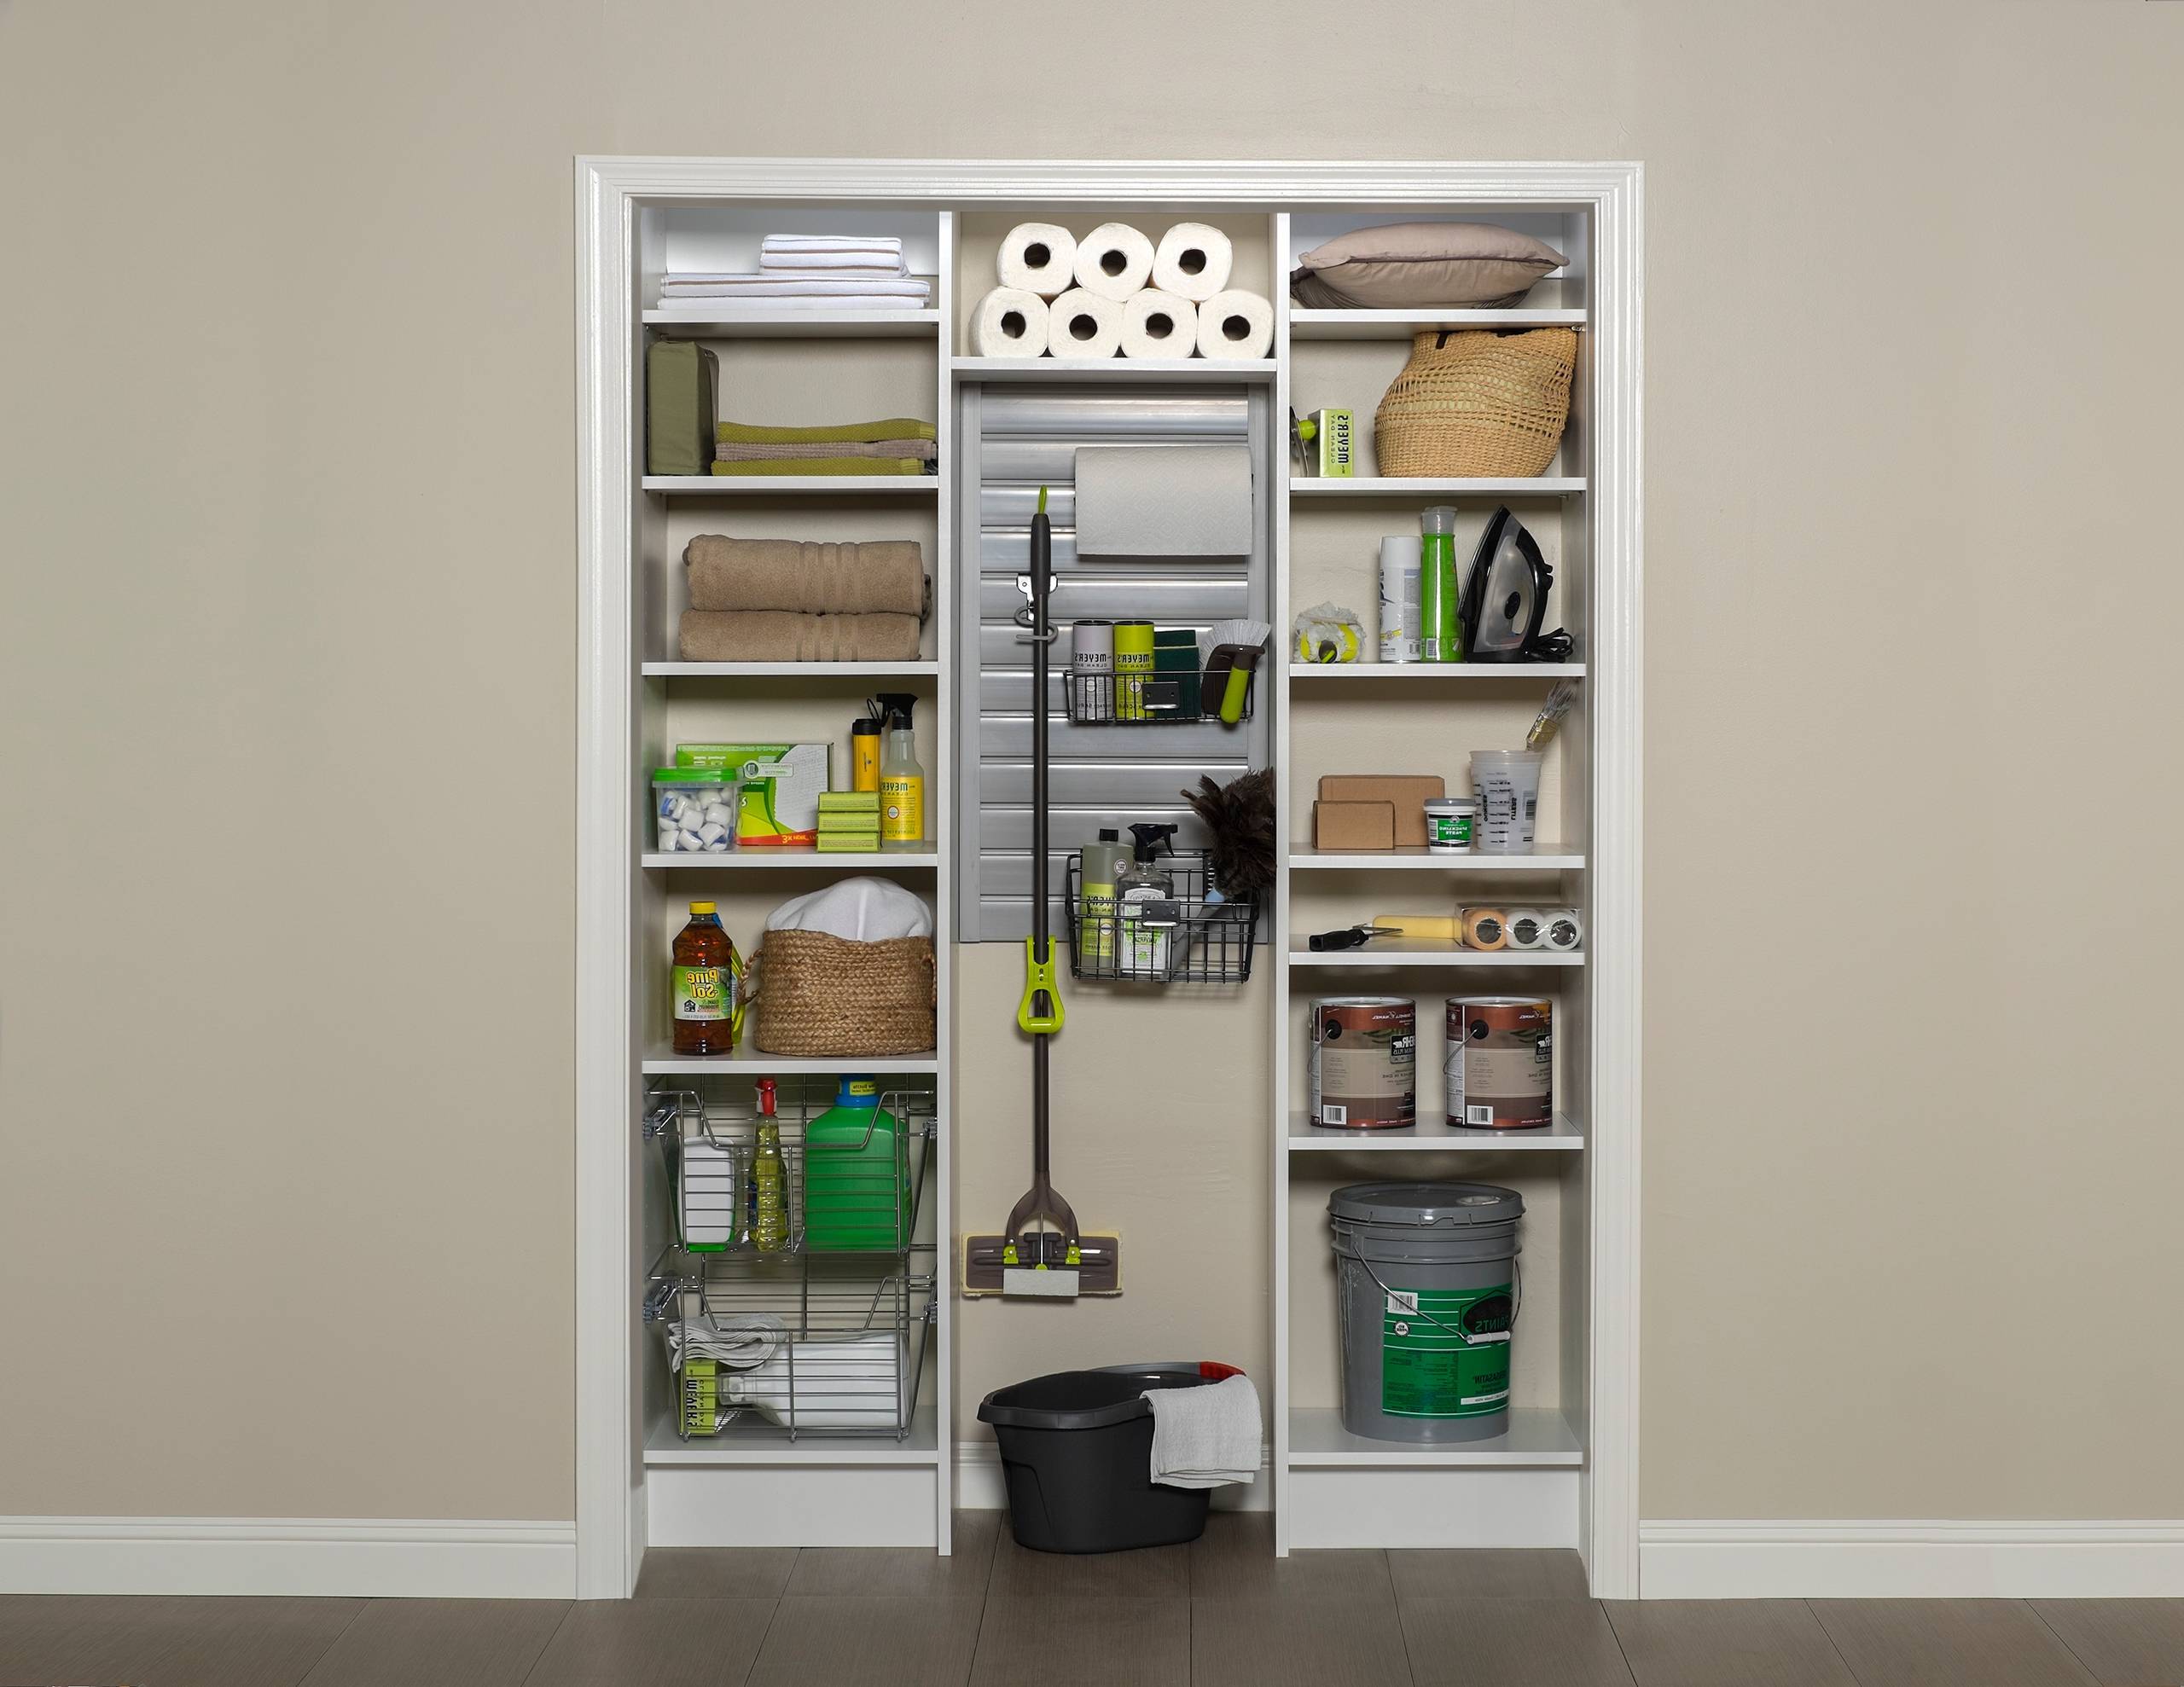
DIY Utility Closet Organization Guide
Published: September 5, 2024
Transform your cluttered utility closet with our DIY organization guide. Discover practical tips and creative solutions for a neat, efficient, and functional space.
(Many of the links in this article redirect to a specific reviewed product. Your purchase of these products through affiliate links helps to generate commission for Twigandthistle.com, at no extra cost. Learn more)
Utility closets can quickly become cluttered and chaotic. They often end up as dumping grounds for cleaning supplies, tools, and miscellaneous items. A well-organized utility closet not only saves space but also makes it easier to find what you need when you need it. Whether you're dealing with a small nook in a hallway or a larger space in the garage, organizing your utility closet can be simple and rewarding. With a few clever tips and practical steps, you can transform this often-overlooked area into a functional and tidy part of your home. Let's get started on this DIY project!
Getting Ready for Your Project
Clear Out the Closet: Remove everything from the closet. This helps you see the space you have and what needs organizing.
Sort Items: Group similar items together. For example, cleaning supplies, tools, and seasonal items.
Measure the Space: Use a tape measure to get the dimensions of the closet. This will help when buying shelves or storage bins.
Safety Gear: Wear gloves and a dust mask if the closet is dusty or has cleaning chemicals.
Clean the Closet: Wipe down shelves, sweep the floor, and dust corners. A clean space makes organizing easier.
Plan Your Layout: Decide where each group of items will go. Keep frequently used items at eye level and less-used items higher or lower.
Gather Supplies: Get storage bins, shelves, hooks, and labels. Make sure they fit the measurements you took.
Set Up Workspace: Lay out your tools and supplies in an area close to the closet. This keeps everything within reach.
Install Shelves and Hooks: Follow the instructions for any new shelves or hooks. Use a level to make sure they are straight.
Label Everything: Use labels to mark where each group of items belongs. This helps keep the closet organized over time.
Gather Your Materials and Tools
- Shelving Units: These provide extra storage space. Adjustable shelves are best for flexibility.
- Storage Bins: Use these to group similar items together. Clear bins help you see what's inside.
- Hooks and Pegboards: Great for hanging tools, brooms, and other items. Pegboards can be customized with various hooks.
- Label Maker: Helps keep everything organized. Label bins, shelves, and hooks for easy identification.
- Measuring Tape: Essential for measuring the space and ensuring shelves and bins fit properly.
- Screwdriver and Screws: Needed for installing shelves and hooks. A power drill can make the job faster.
- Stud Finder: Ensures shelves and heavy items are securely attached to the wall studs.
- Level: Keeps shelves and hooks straight. A small bubble level works well.
- Utility Knife: Useful for opening packages and trimming shelf liners.
- Shelf Liners: Protects shelves from spills and makes cleaning easier. Choose non-slip liners for added stability.
- Step Stool: Helps reach higher shelves safely. A foldable one can be stored easily.
- Trash Bags: For decluttering and disposing of unwanted items. Heavy-duty bags are best for larger items.
- Cleaning Supplies: Include a broom, dustpan, and all-purpose cleaner. Clean the space before organizing.
These tools and materials will help transform your utility closet into a well-organized space.
Required Skills and Time Commitment
Skill Level: Intermediate
Time Required: 4-6 hours
- Decluttering: 1-2 hours
- Installing Shelves: 1-2 hours
- Organizing Items: 1-2 hours
Follow These Steps
Empty the Closet
- Remove everything from the closet.
- Sort items into categories: keep, donate, or discard.
Clean the Space
- Sweep or vacuum the floor.
- Wipe down shelves and walls with a damp cloth.
Measure the Closet
- Measure the height, width, and depth.
- Note these measurements for planning storage solutions.
Plan Storage Solutions
- Sketch a layout for shelves, hooks, and bins.
- Consider vertical space for maximum storage.
Install Shelving
- Use a level to mark where shelves will go.
- Drill holes and attach brackets to the wall.
- Place shelves on brackets and secure them.
Add Hooks and Racks
- Install hooks on the back of the door or walls.
- Use racks for brooms, mops, and other long items.
Label Storage Bins
- Use labels to identify contents of bins.
- Place bins on shelves according to categories.
Organize Items
- Place frequently used items at eye level.
- Store less-used items on higher or lower shelves.
Maintain Organization
- Regularly check and tidy the closet.
- Adjust storage solutions as needed.
Helpful Tips and Tricks
Use clear bins to store smaller items. This helps you see what's inside without opening each one. Label everything so you know where things go. Install hooks on the inside of the door for hanging brooms, mops, and dustpans. Add shelves to maximize vertical space. Use tension rods to hang spray bottles.
Common mistakes to avoid: Overloading shelves can cause them to collapse. Not measuring the space before buying organizers can lead to wasted money. Ignoring vertical space means missing out on storage opportunities.
Alternatives: Instead of buying expensive bins, repurpose old shoeboxes. Use pegboards for flexible storage options. If you can't install shelves, stackable bins work well.
Budgeting for Your Project
Shelving Units: $50-$100 each. You might need 2-3 units depending on the size of your closet.
Storage Bins: $5-$15 each. Plan for around 6-10 bins.
Hooks and Hangers: $10-$20 for a pack. Estimate needing 2-3 packs.
Pegboard: $20-$30. Useful for hanging tools and small items.
Pegboard Hooks: $10-$15 for a set. One set should be enough.
Labels: $5-$10. Helps keep everything organized.
Screws and Anchors: $5-$10. Needed for securing shelves and pegboard.
Tools: If you don't already have them, a drill ($30-$50), screwdriver set ($10-$20), and measuring tape ($5-$10) will be necessary.
Total Cost: Roughly $200-$400.
Budget-Friendly Alternatives:
- Use cardboard boxes instead of storage bins. Free if you have some lying around.
- Repurpose old shelves or furniture.
- DIY hooks using nails or leftover materials.
- Skip the pegboard and use wall-mounted hooks instead.
Different Ways to Customize
Shelving: Use wooden shelves for a rustic look, or metal shelves for a modern touch. Wire racks offer a lightweight, airy feel.
Bins and Baskets: Choose plastic bins for durability, woven baskets for a natural vibe, or fabric bins for a softer appearance. Label them for easy identification.
Hooks and Hangers: Install adhesive hooks for a quick fix, or screw-in hooks for heavier items. Magnetic strips can hold metal tools.
Paint and Colors: Paint the closet interior a bright color to make it feel larger, or use neutral tones for a clean look. Chalkboard paint on one wall can serve as a handy note-taking space.
Lighting: Add LED strip lights for energy efficiency, or a motion-sensor light for convenience. Battery-operated puck lights are easy to install and move.
Flooring: Lay down rubber mats for easy cleaning, or use peel-and-stick tiles for a quick update. Vinyl flooring is durable and water-resistant.
Door Options: Replace the door with a sliding barn door for style, or use a curtain for easy access. Frosted glass doors add a modern touch while hiding clutter.
Custom Storage: Build custom cubbies for specific items, or use adjustable shelving to change the layout as needed. Pegboards can hold a variety of tools and accessories.
Decorative Touches: Add wall decals for a fun look, or use framed prints to make the space inviting. Small plants can add a touch of greenery.
Organizational Tools: Use drawer dividers for small items, or stackable bins to maximize vertical space. Over-the-door organizers can hold cleaning supplies or shoes.
Eco-Friendly Suggestions
Repurpose old boxes or crates for storage. Use recycled wood to build shelves. Glass jars can hold small items like nails or screws. Fabric scraps can become liners for shelves or bins. Cardboard tubes from paper towels can organize cords. Old baskets can store cleaning supplies. Mason jars can hold smaller tools. Reclaimed wood can create hooks for hanging items. Recycled plastic containers can store miscellaneous items. Upcycled tin cans can hold brushes or other small tools. Old shoe organizers can store spray bottles or other tall items. Reused wine crates can become stackable storage. Vintage suitcases can store seasonal items. Recycled paper can label bins and boxes. Old magazine racks can hold instruction manuals or small tools.
Your Organized Closet Awaits
You've got all the tools and tips now to transform that cluttered utility closet into a well-organized space. Start by sorting through your items, deciding what to keep, toss, or donate. Use shelves, bins, and hooks to maximize your storage. Label everything clearly so you can find what you need in a snap. Don't forget to use vertical space and the back of the door for extra storage. Regularly check and tidy up to keep it neat. With a bit of effort, your utility closet will be a functional, organized haven. Now, roll up your sleeves and get to work. Your future self will thank you!
How can I maximize space in my utility closet?
Use shelves, hooks, and bins. Stack items vertically to free up floor space. Consider using over-the-door organizers for smaller items.
What should I store in a utility closet?
Store cleaning supplies, tools, brooms, mops, and vacuum cleaners. Keep frequently used items at eye level for easy access.
How do I keep my utility closet safe?
Store hazardous materials like chemicals on high shelves, out of reach of children and pets. Use childproof locks if necessary.
How often should I clean and organize my utility closet?
Aim to clean and reorganize every three to six months. Regular maintenance helps keep clutter at bay and ensures everything is easy to find.
What are some budget-friendly organization tips?
Use repurposed containers like old jars or boxes. Dollar stores often have affordable bins and hooks. DIY some shelves using scrap wood.
How can I make my utility closet look neat?
Label bins and shelves. Keep similar items together. Use clear containers so you can see what's inside without opening them.
Should I install lighting in my utility closet?
Yes, good lighting helps you find items quickly. Consider battery-operated LED lights if there's no electrical outlet.