
Home>Organize & Storage>Closet Organization>DIY Target Bookshelf Closet Hack
Closet Organization
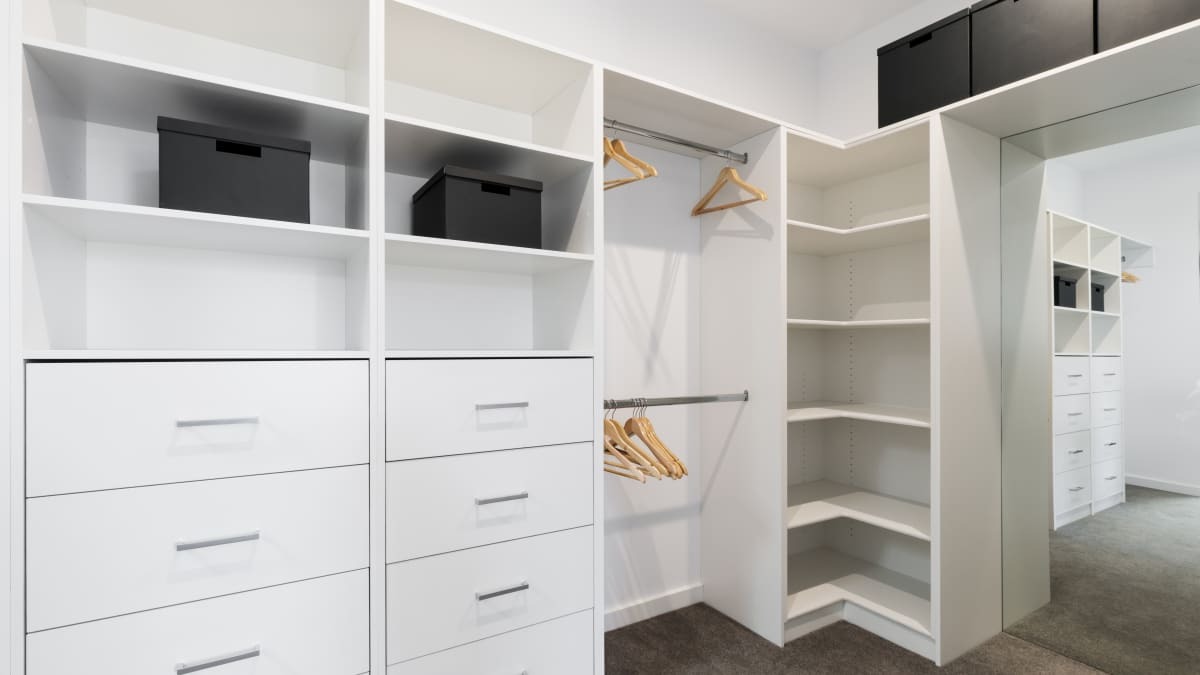
DIY Target Bookshelf Closet Hack
Published: September 5, 2024
Transform your closet with a DIY Target bookshelf hack! Discover step-by-step instructions to maximize storage and style. Perfect for any budget and skill level.
(Many of the links in this article redirect to a specific reviewed product. Your purchase of these products through affiliate links helps to generate commission for Twigandthistle.com, at no extra cost. Learn more)
Ever felt like your closet could use more space? With a few simple steps, you can turn an ordinary Target bookshelf into a stylish and functional addition to your wardrobe area. This hack is perfect for creating extra storage without spending big bucks. You'll find it straightforward, fun, and incredibly useful. Whether you need room for shoes, bags, or folded clothes, this project fits the bill. Plus, it adds a personal touch to your home. Ready to get started? Let's dive into how you can achieve this easy and effective DIY project.
Getting Ready for Your Project
Measure Your Space: Use a tape measure to get the dimensions of your closet. Write down the height, width, and depth.
Gather Materials: You'll need a Target bookshelf, screws, brackets, a drill, a level, and a screwdriver. Make sure you have all these items before starting.
Clear the Area: Remove everything from the closet. This includes clothes, shoes, and any other items. Clean the space to ensure a smooth installation.
Safety Gear: Wear safety goggles and gloves to protect your eyes and hands while drilling and handling tools.
Workspace Setup: Lay out all your tools and materials in an organized manner. Keep them within reach to avoid unnecessary movement.
Pre-Drill Holes: Mark where you will place the brackets on the wall. Use a pencil to make small marks. Pre-drill holes to make it easier to screw in the brackets.
Check for Level: Use a level to ensure the bookshelf will be straight. Adjust your marks if needed.
Install Brackets: Attach the brackets to the wall using screws and a drill. Make sure they are secure and level.
Assemble Bookshelf: Follow the instructions provided with the Target bookshelf to assemble it. Double-check that all parts are securely fastened.
Mount Bookshelf: Lift the assembled bookshelf and place it on the brackets. Secure it with additional screws if necessary.
Test Stability: Gently push and pull the bookshelf to ensure it is stable. Make any adjustments if needed.
Organize: Once the bookshelf is securely in place, start organizing your items back into the closet.
Gather Your Materials and Tools
- Bookshelf: A sturdy bookshelf from Target, preferably with adjustable shelves.
- Closet Rod: A rod to hang clothes, which can be mounted inside the bookshelf.
- Brackets: Metal or plastic brackets to support the closet rod.
- Screws: Various sizes of screws to secure the brackets and rod.
- Drill: A power drill for making holes and driving screws.
- Screwdriver: A manual or electric screwdriver for tightening screws.
- Measuring Tape: To measure the space and ensure everything fits perfectly.
- Level: To make sure the rod and shelves are straight.
- Pencil: For marking where to drill holes.
- Saw: If the closet rod needs to be cut to size.
- Sandpaper: To smooth any rough edges after cutting.
- Paint or Stain: Optional, to match the bookshelf to your closet's decor.
- Paintbrushes: If you choose to paint or stain the bookshelf.
- Drop Cloth: To protect your floor while painting or drilling.
- Safety Gear: Safety glasses and gloves to protect yourself while working.
Required Skills and Time Commitment
Skill Level: Intermediate
Time Required: 4-6 hours
- Measure and Plan: 30 minutes
- Assemble Bookshelves: 1-2 hours
- Install Shelves in Closet: 1 hour
- Secure Bookshelves to Wall: 1 hour
- Organize and Decorate: 1-2 hours
Follow These Steps
Gather Materials:
- Target bookshelf
- Closet rod
- Closet rod brackets
- Screws
- Drill
- Level
- Measuring tape
- Pencil
Assemble Bookshelf:
- Follow the instructions to put together the Target bookshelf.
- Ensure all pieces are securely fastened.
Measure Closet Space:
- Use the measuring tape to find the width of your closet.
- Mark the height where you want the closet rod to go.
Install Closet Rod Brackets:
- Use the pencil to mark where the brackets will be placed.
- Drill holes for the screws.
- Attach the brackets to the wall using screws.
Attach Closet Rod:
- Slide the closet rod into the brackets.
- Ensure it is level and secure.
Position Bookshelf:
- Place the assembled bookshelf under the closet rod.
- Adjust its position to fit snugly.
Secure Bookshelf:
- If needed, use screws to attach the bookshelf to the wall for added stability.
- Ensure it is level and does not wobble.
Organize Closet:
- Hang clothes on the rod.
- Use the bookshelf for shoes, bags, or folded clothes.
Final Touches:
- Check all screws and brackets for tightness.
- Make any necessary adjustments to ensure everything is secure.
Helpful Tips and Tricks
Measure your closet space before buying the bookshelf. Use a level to ensure the bookshelf stands straight. Secure the bookshelf to the wall with brackets for safety. Add baskets or bins for extra storage. Label the bins to keep things organized.
Common mistakes to avoid: Not measuring the space accurately. Forgetting to secure the bookshelf to the wall. Overloading shelves with heavy items. Ignoring the need for a level surface.
Alternatives: Instead of a bookshelf, use floating shelves for a more open look. Repurpose an old dresser by removing drawers and adding shelves. Use tension rods and hanging organizers for flexible storage.
Estimating the Cost
Bookshelf: $30-$50 each (you'll need 2-3)
Closet Rod: $10-$20
Brackets: $5-$10 (for the rod)
Screws and Anchors: $5
Paint or Stain (optional): $10-$20
Tools:
- Drill: $30-$50 (if you don't already have one)
- Screwdriver: $5-$10
- Measuring Tape: $5-$10
- Level: $5-$10
Total Cost: $100-$200
Budget-Friendly Alternatives:
- Second-hand Bookshelves: $10-$20 each
- Repurpose Old Closet Rod: Free
- Borrow Tools from friends or family: Free
Different Ways to Customize
Alternative Materials: Instead of standard particleboard, use solid wood for a more durable and upscale look. Plywood can also be a budget-friendly yet sturdy option. For a modern twist, consider metal shelving.
Colors: Paint the bookshelf in bright colors like teal, yellow, or red to make it pop. For a more sophisticated look, use neutral tones like white, gray, or black. Stain the wood for a natural finish.
Styles: Add decorative molding to the edges for a classic touch. Use industrial-style brackets for a rugged look. Install sliding doors or curtains to hide the shelves when not in use.
Additional Features: Attach hooks or pegs to the sides for hanging accessories. Add LED strip lights under each shelf for better visibility. Install casters on the bottom for easy mobility.
Storage Solutions: Use baskets or bins to keep smaller items organized. Add shelf dividers to separate different types of clothing or accessories. Incorporate pull-out drawers for hidden storage.
Personal Touches: Decorate with wallpaper or contact paper on the back panel for a unique background. Add mirrors to the sides for a functional and stylish touch. Attach corkboard or chalkboard panels for notes and reminders.
Eco-Friendly Tips
Reclaimed wood can be used to build shelves. It’s sturdy and gives a rustic look. Bamboo is another great option. It grows quickly, making it a renewable resource.
Recycled metal brackets can support shelves. They’re strong and reduce waste. Eco-friendly paint or stain can be used to finish the project. Look for products with low or no VOCs (volatile organic compounds).
Repurpose old furniture by taking apart unused pieces and using the wood or hardware. This reduces waste and saves money. Thrift stores often have items that can be reused or upcycled.
Natural fiber baskets or bins can be used for storage. They’re biodegradable and often made from renewable materials like cotton or jute. LED lights can be added for better visibility. They use less energy and last longer than traditional bulbs.
Recycled plastic can be used for drawer organizers or shelf liners. It’s durable and keeps plastic out of landfills. Corkboard can be added to the inside of closet doors for pinning notes or small items. Cork is renewable and biodegradable.
Avoid single-use plastics by using glass jars or metal containers for small items. They’re reusable and often more durable. Fabric scraps can be used to make drawer liners or small storage bags. This reduces textile waste.
Compostable materials like cardboard can be used for temporary storage solutions. They’re easy to recycle or compost when no longer needed. Solar-powered lights can be used if the closet needs extra lighting. They’re energy-efficient and reduce electricity use.
Your DIY Closet Awaits
You've got all the tools and steps to transform a Target bookshelf into a stylish closet. This project isn't just about saving money; it's about creating something unique that fits your space perfectly. With a bit of time and effort, you can have a custom closet that looks great and functions well. Remember, the key is to measure carefully, plan your layout, and take your time with the assembly. Don't rush it. Enjoy the process and take pride in your work. Once you're done, you'll have a functional and aesthetic piece that you can be proud of. So, grab your tools, get started, and turn that bookshelf into the closet of your dreams. Happy building!
How much does this DIY project cost?
The cost can vary, but typically, you'll spend around $50-$100 on materials. Most of it goes towards the bookshelf and closet hardware.
What tools will I need?
You'll need a drill, screwdriver, measuring tape, level, and screws. A saw might be handy if you need to cut shelves to fit.
How long does it take to complete?
Expect to spend about 2-4 hours on this project. It depends on your experience and how complex you want your setup to be.
Can I use any bookshelf?
Most standard bookshelves will work. Just make sure it's sturdy enough to hold clothes and other items.
Do I need to secure the bookshelf to the wall?
Yes, it's a good idea to anchor the bookshelf to the wall for safety, especially if you have kids or pets.
How do I customize the shelves?
You can add hooks, rods, or even baskets to the shelves. Paint or wallpaper can also give it a unique look.
Is this suitable for renters?
Absolutely! Just be mindful of how you anchor the bookshelf. Use removable wall anchors if possible.