
Home>Organize & Storage>Closet Organization>DIY Loft Bed with Closet Ideas
Closet Organization
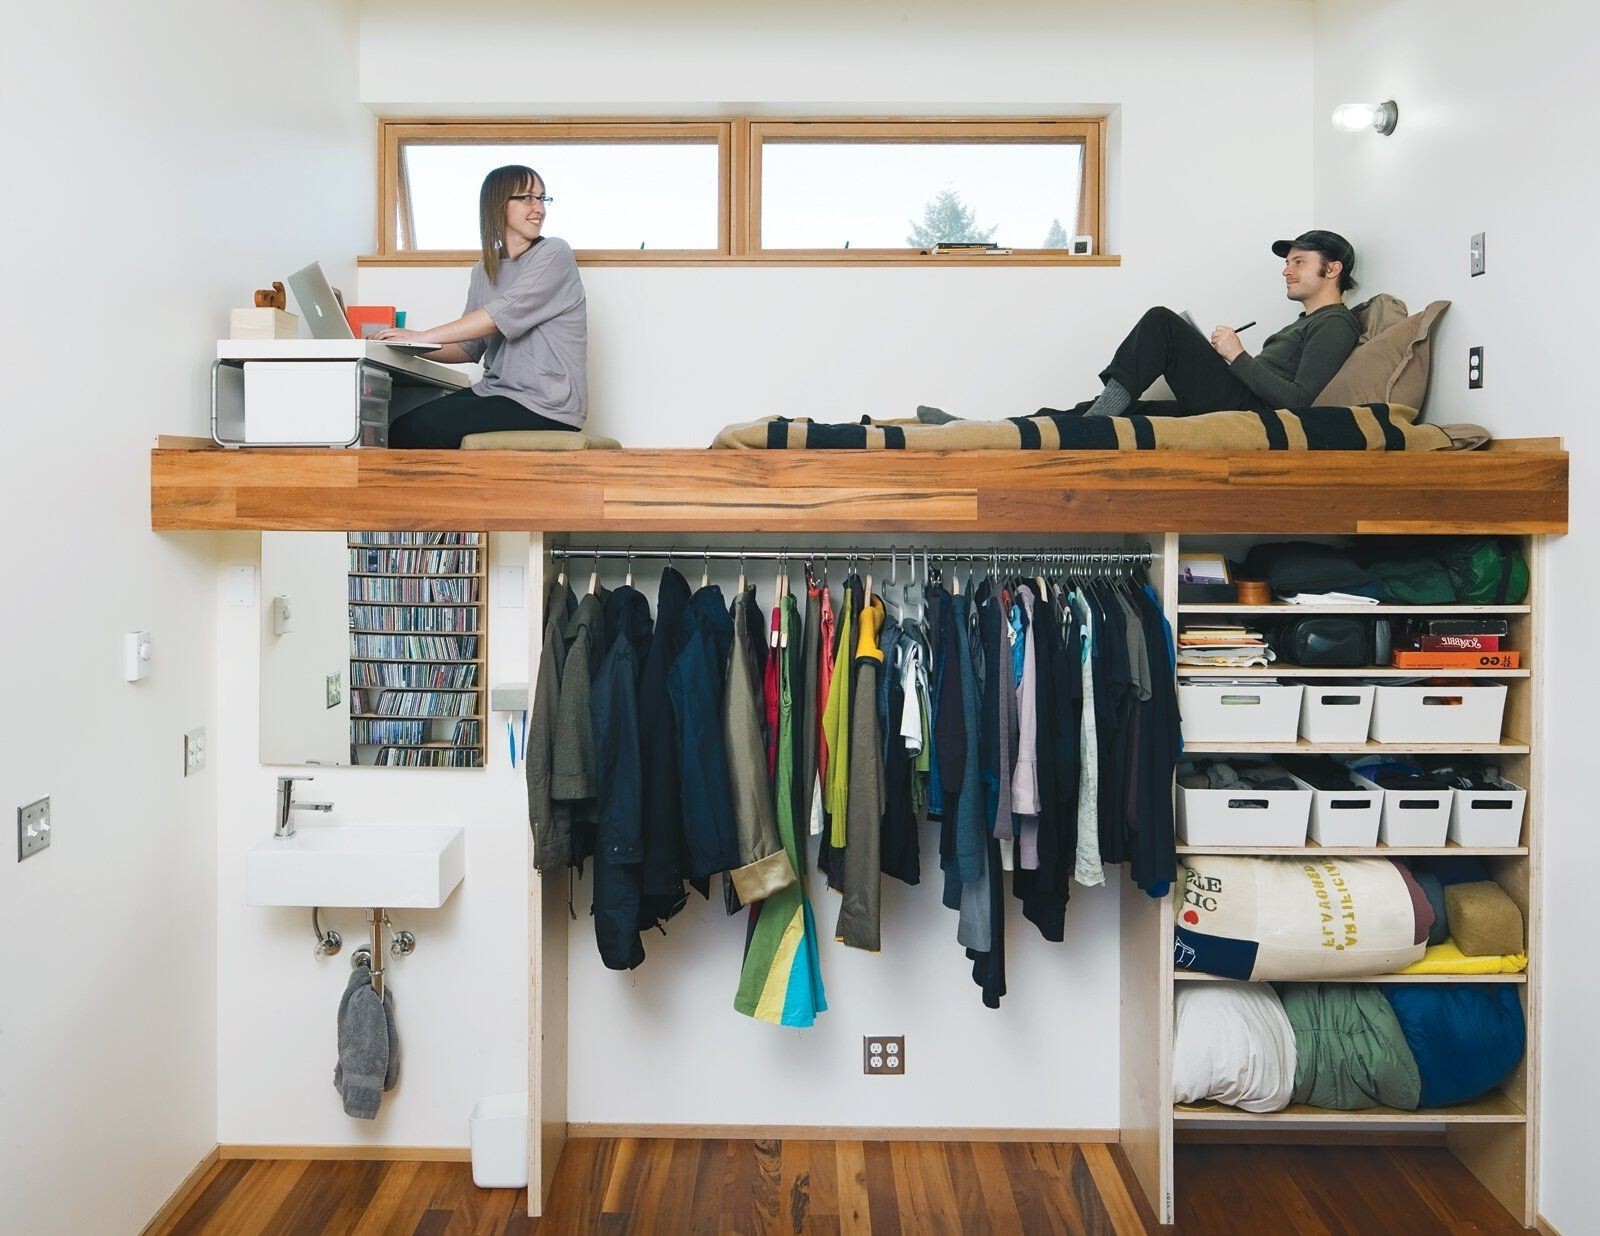
DIY Loft Bed with Closet Ideas
Published: September 4, 2024
Discover creative DIY loft bed with closet ideas to maximize space and functionality in your bedroom. Perfect for small spaces, these designs blend style and practicality.
(Many of the links in this article redirect to a specific reviewed product. Your purchase of these products through affiliate links helps to generate commission for Twigandthistle.com, at no extra cost. Learn more)
Looking for a fun and practical way to maximize space in your room? A DIY loft bed with a closet underneath can be a game-changer. Whether you're looking to free up some floor space or add extra storage, integrating a closet into your loft bed design is a fantastic solution. Not only does it combine sleeping and storage areas, but it also adds a touch of creativity to your room. With a few tools, some materials, and a bit of creativity, you can create a unique and functional piece of furniture tailored to your needs. Ready to get started?
Getting Ready for Your Project
Measure Your Space: Use a tape measure to get the exact dimensions of the room. Make sure there's enough height for the loft bed and space for the closet underneath.
Gather Materials: Collect all necessary materials like wood, screws, brackets, and paint. Check your tools, ensuring you have a saw, drill, screwdriver, and level.
Safety Gear: Wear safety goggles, gloves, and a dust mask. Keep a first aid kit nearby in case of minor injuries.
Clear the Area: Remove furniture and other items from the workspace. Lay down a drop cloth to protect the floor from dust and paint.
Create a Plan: Sketch a detailed plan of your loft bed with closet. Include measurements and a list of materials. This will help you stay organized.
Cut Wood Pieces: Use a saw to cut wood according to your plan. Sand the edges to avoid splinters.
Pre-Drill Holes: Pre-drill holes in the wood to make assembly easier and prevent splitting.
Assemble Frame: Start by assembling the frame of the loft bed. Use a level to ensure everything is straight.
Install Supports: Add support beams for stability. Secure them with screws and brackets.
Build Closet: Construct the closet underneath the loft bed. Install shelves, rods, and doors as per your design.
Paint or Stain: Apply paint or stain to the wood. Let it dry completely before using the bed.
Final Check: Inspect the entire structure for stability. Tighten any loose screws and make sure everything is secure.
Gathering Materials and Tools
- Wood: Essential for building the frame and structure of the loft bed. Use sturdy types like pine or oak.
- Plywood: Needed for the bed platform and closet walls. Provides a smooth, strong surface.
- Screws and Nails: Hold everything together. Choose sizes based on wood thickness.
- Wood Glue: Adds extra strength to joints and connections.
- Paint or Stain: Customize the look of your loft bed. Protects the wood from wear and tear.
- Sandpaper: Smooths rough edges and surfaces. Prepares wood for painting or staining.
- Measuring Tape: Ensures accurate cuts and measurements. Crucial for a well-fitting structure.
- Saw: Cuts wood to the required sizes. A circular saw or handsaw works well.
- Drill: Makes holes for screws. Also used for driving screws into the wood.
- Screwdriver: Tightens screws. A power screwdriver can save time.
- Level: Ensures the bed and closet are even. Prevents a wobbly structure.
- Clamps: Holds pieces of wood together while the glue dries. Keeps everything in place.
- Ladder or Steps: Provides access to the loft bed. Can be built-in or separate.
- Closet Rods and Shelves: For hanging clothes and storing items. Adds functionality to the closet space.
- Drawer Slides: If adding drawers to the closet. Allows smooth opening and closing.
- Safety Gear: Includes gloves, goggles, and a dust mask. Protects you while working.
Required Skills and Time Commitment
Skill Level: Intermediate. Building a loft bed with a closet requires basic carpentry skills, familiarity with tools like saws, drills, and measuring tapes, and the ability to follow detailed plans.
Time Required: 20-30 hours. This project involves multiple steps, including measuring, cutting, assembling, and finishing. Time may vary based on experience and available tools.
Important Steps:
- Design and Planning: 2-4 hours
- Measuring and Cutting Wood: 4-6 hours
- Assembling the Frame: 6-8 hours
- Building the Closet: 4-6 hours
- Finishing Touches (sanding, painting): 4-6 hours
Detailed Building Instructions
Plan Your Design
- Measure the room's height, width, and length.
- Sketch a design including the bed, ladder, and closet space.
Gather Materials
- Wood: Plywood, 2x4s, and 4x4s.
- Hardware: Screws, nails, brackets, and wood glue.
- Tools: Saw, drill, measuring tape, level, and sander.
Build the Frame
- Cut the wood to size based on your design.
- Assemble the bed frame using 2x4s for support.
- Secure the frame with screws and brackets.
Construct the Loft Bed
- Attach 4x4 posts to each corner of the frame.
- Ensure the posts are level and secure.
- Add cross beams for extra support.
Create the Closet Space
- Measure and cut plywood for the closet walls.
- Attach the plywood to the frame using screws.
- Install shelves or rods inside the closet.
Build the Ladder
- Cut 2x4s for the ladder sides and rungs.
- Attach the rungs evenly spaced between the sides.
- Secure the ladder to the bed frame.
Sand and Finish
- Sand all surfaces to remove rough edges.
- Apply paint or stain for a polished look.
Assemble and Secure
- Move the loft bed to its final location.
- Ensure all parts are tightly secured.
- Test for stability before use.
Helpful Tips and Tricks
Measure your space carefully before starting. Ensure the ceiling height allows enough room for both the bed and the closet underneath.
Use sturdy materials like solid wood or metal for the frame. This ensures the bed can support weight safely.
Pre-drill holes before screwing pieces together. This prevents wood from splitting and makes assembly easier.
Add safety rails to the bed. Falling from a loft bed can cause serious injury.
Incorporate lighting under the bed. LED strip lights work well and don’t take up much space.
Use modular storage solutions for the closet. Shelves, drawers, and hanging rods can be adjusted as needed.
Paint or stain the wood before assembly. It’s easier than trying to paint around assembled parts.
Label all parts during the cutting process. This avoids confusion and speeds up assembly.
Common mistakes to avoid:
Skipping measurements. Incorrect dimensions can lead to a bed that doesn’t fit or isn’t stable.
Using weak materials. Plywood or particle board may not support the weight and can break.
Ignoring weight limits. Overloading the bed can cause it to collapse.
Forgetting safety features. Lack of rails or a sturdy ladder can make the bed dangerous.
Alternatives for materials or methods:
Instead of wood, consider using metal pipes for an industrial look. They are strong and can be easier to assemble.
For the closet, use fabric hanging organizers if you don’t want to build shelves. They are flexible and easy to install.
Instead of traditional screws, use pocket hole screws for a cleaner look and stronger joints.
For lighting, battery-operated puck lights can be a good alternative to wired lights. They are easy to install and don’t require electrical work.
Estimating Your Project Costs
Materials:
- Wood (Plywood, 2x4s, 2x6s): $150-$200
- Screws, Nails, and Brackets: $20-$30
- Paint or Stain: $20-$40
- Closet Rod: $10-$20
- Closet Shelves: $30-$50
- Mattress: $100-$200
Tools:
- Saw (Circular or Hand Saw): $50-$100
- Drill: $40-$60
- Measuring Tape: $5-$10
- Level: $10-$15
- Paint Brushes or Rollers: $5-$10
- Sandpaper: $5-$10
Total Cost: $445-$755
Budget-Friendly Alternatives:
- Reclaimed Wood: Often free or much cheaper
- Second-hand Tools: Check garage sales or online marketplaces
- Basic Paint: Opt for cheaper brands or leftover paint
- DIY Closet Shelves: Use crates or repurpose old furniture
Personalizing Your Loft Bed
Materials: Use reclaimed wood for a rustic look or metal for an industrial style. Plywood offers a budget-friendly option, while bamboo provides an eco-friendly choice.
Colors: Paint the bed frame in bright colors like turquoise or yellow for a fun vibe. For a more sophisticated look, choose neutral tones like gray or white. Stain the wood to highlight its natural grain.
Closet Doors: Install sliding barn doors for a farmhouse feel. Use curtains for a softer, more flexible option. Mirrored doors can make the room feel larger.
Storage Options: Add drawers under the bed for extra storage. Use open shelves to display books or toys. Install hanging rods for clothes inside the closet.
Lighting: Attach LED strip lights under the bed for a modern touch. Use clip-on lamps for reading. Install a chandelier for a touch of elegance.
Ladder Styles: Build a straight ladder for a simple look. Create a staircase with storage for added functionality. Use a rope ladder for a playful, adventurous feel.
Decor: Add wall decals or painted murals to personalize the space. Use cushions and throws to make the bed cozy. Hang picture frames or artwork to decorate the walls.
Safety Features: Install guardrails to prevent falls. Use non-slip pads on the ladder steps. Ensure the bed is securely anchored to the wall.
Eco-Friendly Building Tips
Reclaimed Wood: Use old pallets or barn wood. Sand and treat them to ensure they’re safe and sturdy.
Bamboo: This fast-growing plant is strong and eco-friendly. It’s perfect for bed frames and shelves.
Recycled Metal: Old pipes or metal scraps can be repurposed for bed supports or closet rods.
Low-VOC Paint: Choose paints with low volatile organic compounds. They’re better for your health and the environment.
Natural Fabrics: Use organic cotton or linen for curtains or bed linens. These materials are sustainable and biodegradable.
Eco-Friendly Adhesives: Opt for water-based glues. They have fewer harmful chemicals.
LED Lighting: Install LED lights in the closet area. They use less energy and last longer.
Second-Hand Furniture: Repurpose old dressers or cabinets. Give them a new life as part of your loft bed setup.
Natural Finishes: Use beeswax or linseed oil to finish wood. They’re non-toxic and sustainable.
Modular Design: Create a design that can be easily disassembled. This makes it easier to recycle or repurpose materials in the future.
Your DIY Loft Bed Awaits
Building a DIY loft bed with a closet underneath is a fantastic way to maximize space. You've got the tools, the materials, and the know-how. Now, it's time to put it all together. Measure twice, cut once, and don't rush. Patience is key. Remember, the closet can be customized to fit your needs, whether it's for clothes, books, or even a small workspace. Adding personal touches like paint or decor can make it uniquely yours. Safety first, always. Secure everything properly to avoid any mishaps. Once completed, you'll have a functional, stylish addition to your room. Enjoy the process, and take pride in your work. Happy building!
How much space do I need for a loft bed with a closet?
You’ll need at least 8 feet of ceiling height to comfortably fit a loft bed with a closet underneath. Make sure there's enough room for both the bed and the closet doors to open.
What materials should I use?
Use sturdy materials like solid wood or metal for the bed frame. For the closet, plywood or MDF works well. Ensure all materials can support the weight and are safe for use.
Can I build it myself?
Absolutely! With basic carpentry skills, you can build a loft bed with a closet. Follow detailed plans, measure twice, and cut once. Safety first—use proper tools and wear protective gear.
How do I maximize storage space?
Use every inch wisely. Install shelves, drawers, and hanging rods inside the closet. Add storage bins or baskets for smaller items. Consider using the sides of the bed for extra shelves.
What tools will I need?
Basic tools like a saw, drill, screwdriver, and measuring tape are essential. A level ensures everything is straight. Sandpaper smooths rough edges, and paint or stain finishes the look.
How do I ensure it's safe?
Secure the bed frame to the wall for stability. Use guardrails on the loft bed to prevent falls. Make sure the ladder is sturdy and properly attached. Regularly check for loose screws or weak spots.
Can I customize the design?
Of course! Paint or stain the wood to match your room’s decor. Add personal touches like curtains, LED lights, or decorative knobs on the closet doors. Make it uniquely yours!