
Home>Home & Furniture>Roof>How to Build a DIY Sprinter Roof Rack
Roof
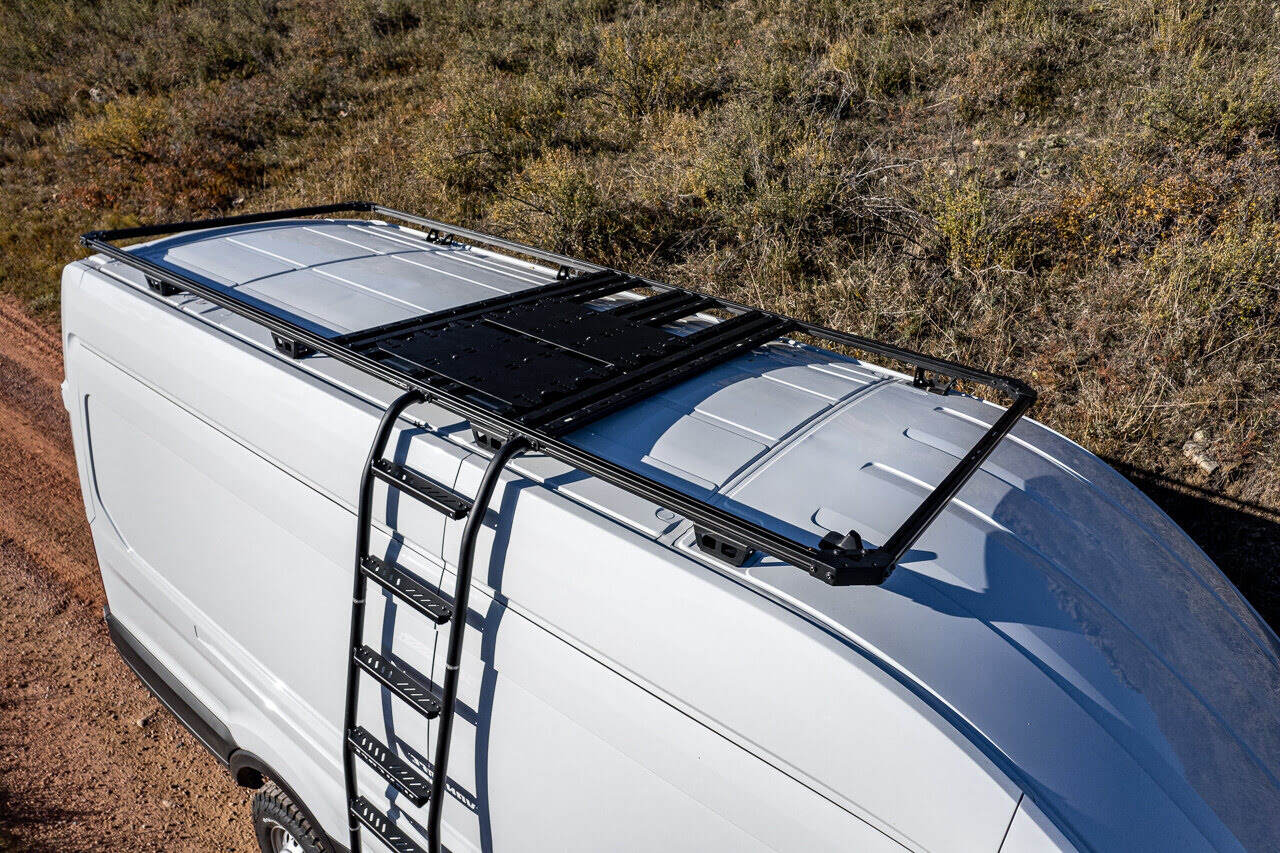
How to Build a DIY Sprinter Roof Rack
Published: August 16, 2024
Learn how to build a DIY Sprinter roof rack with our step-by-step guide. Perfect for van life enthusiasts looking to maximize storage and utility on their adventures.
(Many of the links in this article redirect to a specific reviewed product. Your purchase of these products through affiliate links helps to generate commission for Twigandthistle.com, at no extra cost. Learn more)
Building a roof rack for your Sprinter van can save money and give a sense of accomplishment. Whether planning a road trip or needing extra storage, a homemade rack will serve various purposes. This guide will walk you through the basics of constructing a durable, functional roof rack from scratch. All you need are some basic tools, materials, and a bit of patience. By the end, your van will be ready for all your adventures, complete with a custom-fit roof rack made by you.
Getting Ready for Your Project
Gather Materials: Collect all necessary tools and materials like metal bars, screws, brackets, a drill, measuring tape, and safety gear.
Safety Gear: Wear gloves, safety glasses, and a helmet to protect yourself from potential injuries.
Workspace Setup: Clear a spacious area in your garage or driveway. Ensure the space is well-lit and ventilated.
Measure the Roof: Use a measuring tape to get accurate dimensions of your Sprinter's roof. This helps in cutting metal bars to the correct length.
Cut Metal Bars: Use a saw or metal cutter to cut the bars according to your measurements. Double-check measurements before cutting.
Pre-Drill Holes: Mark and pre-drill holes in the metal bars where screws and brackets will go. This makes assembly easier.
Check Vehicle Load Capacity: Refer to your Sprinter's manual to know the maximum weight the roof can handle. This ensures safety and prevents damage.
Lay Out Parts: Arrange all cut bars, screws, and brackets in the order they will be assembled. This helps in visualizing the final product.
Test Fit: Before final assembly, place the bars on the roof to ensure they fit properly. Adjust if necessary.
Clean Roof Surface: Wipe down the roof to remove dirt and debris. This ensures a secure fit for the rack.
Gather Assistance: Have a friend or family member ready to help. Some steps may require an extra pair of hands.
Review Instructions: Go through any specific instructions or guides you have. This helps avoid mistakes during assembly.
Gathering Materials and Tools
- Aluminum Extrusions: Lightweight, strong metal bars forming the rack's frame.
- Steel Brackets: Connect and support the aluminum extrusions.
- Bolts and Nuts: Fasten the frame and brackets securely.
- Rubber Gaskets: Prevent water leaks and protect the van's roof.
- Measuring Tape: Ensure accurate measurements for cutting and fitting.
- Drill: Create holes for bolts and screws.
- Metal Saw: Cut aluminum extrusions to the required lengths.
- Wrenches: Tighten bolts and nuts.
- Screwdriver: Fasten screws into place.
- Level: Ensure the rack is even and properly aligned.
- Marker: Mark measurements and drilling points.
- Safety Gear: Gloves and goggles to protect hands and eyes during construction.
Required Skills and Time Commitment
Skill Level: Intermediate
Time Required: Approximately 8-12 hours
- Gather Materials: 1 hour
- Measure and Cut: 2 hours
- Assemble Frame: 3 hours
- Install Crossbars: 2 hours
- Secure to Roof: 2-4 hours
Instructions for Building Your Roof Rack
Gather Materials and Tools
- Aluminum or steel bars
- Measuring tape
- Drill and drill bits
- Bolts, nuts, and washers
- Metal saw or grinder
- Protective gloves and goggles
- Ladder
Measure the Roof
- Measure the length and width of your Sprinter's roof.
- Decide how many crossbars you need.
Cut the Bars
- Cut the aluminum or steel bars to the desired length.
- Ensure all cuts are straight and smooth.
Drill Holes
- Mark where the holes will go on each bar.
- Drill holes for the bolts at the marked spots.
Assemble the Rack
- Align the bars on the roof.
- Insert bolts through the holes and secure with nuts and washers.
- Tighten all bolts to ensure stability.
Install the Rack
- Carefully lift the assembled rack onto the roof.
- Use a ladder for safety.
- Secure the rack to the roof using additional bolts and brackets if needed.
Check Stability
- Ensure all bolts are tight.
- Test the rack by gently shaking it to check for any movement.
Add Finishing Touches
- Smooth any rough edges with a grinder.
- Apply a protective coating to prevent rust if using steel.
Load and Enjoy
- Load your gear onto the rack.
- Secure items with straps or bungee cords.
Helpful Tips and Tricks
Measure Twice, Cut Once: Always double-check measurements before cutting any material. This saves time and prevents waste.
Use Lightweight Materials: Aluminum is a great choice. It's strong but light, reducing the load on your vehicle.
Pre-Drill Holes: Pre-drilling holes helps prevent materials from splitting and ensures screws go in straight.
Rust-Proofing: Apply a rust-proof coating to metal parts. This extends the life of your roof rack, especially in wet climates.
Secure Fasteners: Use lock washers or thread-locking fluid to keep bolts and screws from loosening over time.
Test Fit: Assemble the rack loosely first to ensure all parts fit correctly before tightening everything down.
Use Rubber Gaskets: Place rubber gaskets between the rack and the roof to prevent leaks and reduce vibration.
Common Mistakes to Avoid:
Overloading: Don't exceed the weight limit of your roof rack. This can damage your vehicle and create safety hazards.
Ignoring Aerodynamics: Poor design can increase wind resistance and reduce fuel efficiency. Aim for a low-profile design.
Skipping Instructions: If using a kit, follow the instructions carefully. Skipping steps can lead to an unstable rack.
Alternatives for Materials or Methods:
PVC Pipes: For a budget-friendly option, consider using PVC pipes. They are easy to work with and lightweight.
Wood: Treated wood can be a good alternative if metalworking tools are unavailable. Ensure it's sealed to prevent rot.
Pre-Made Kits: If building from scratch seems too complex, pre-made kits offer a simpler solution. They come with all necessary parts and instructions.
Estimating the Cost
Aluminum Tubing: $100-$150
Steel Tubing: $50-$100 (cheaper but heavier)
Mounting Brackets: $30-$50
Bolts, Nuts, and Washers: $20-$30
Drill and Drill Bits: $50-$100 (if not already owned)
Saw for Cutting Metal: $50-$100 (if not already owned)
Measuring Tape: $10
Protective Gear (Gloves, Safety Glasses): $20-$30
Paint or Rust-Proof Coating: $20-$40
Total Cost: $350-$610
Budget-Friendly Alternatives:
PVC Pipe: $20-$40 (lighter but less durable)
Used Tools: Check local listings or thrift stores for cheaper options.
DIY Brackets: Use scrap metal or wood to save money.
Different Ways to Customize
Materials: Instead of using steel, consider aluminum for a lighter option. Wood can also be used for a rustic look, but ensure it's treated for weather resistance.
Colors: Paint the rack in matte black for a sleek, modern appearance. For a more vibrant look, use bright colors like red or blue. Camouflage patterns can blend the rack with nature if you enjoy outdoor adventures.
Styles: Opt for a minimalist design with fewer bars for a cleaner look. Add side rails for extra security when carrying larger items. Integrate a basket-style rack to hold smaller items securely.
Accessories: Attach LED lights for better visibility during night trips. Install solar panels to charge devices on the go. Add tie-down points for securing cargo more effectively.
Finishes: Use a powder-coated finish for durability and resistance to rust. A galvanized finish can also protect against corrosion. For a unique touch, consider a brushed metal finish.
Mounting Options: Use clamp mounts for easy removal and installation. Permanent mounts offer more stability but require drilling. Magnetic mounts can be a temporary solution for lighter loads.
Shape: A flat rack is versatile for various cargo types. A curved rack can be more aerodynamic, reducing wind resistance. Modular racks allow you to add or remove sections based on your needs.
Storage Solutions: Incorporate built-in storage boxes for tools or small items. Add hooks for hanging gear like bikes or kayaks. Use netting to keep loose items from shifting during travel.
Eco-Friendly Building Tips
Reclaimed wood can be a great option for the base of your roof rack. It’s sturdy and gives a rustic look. Recycled aluminum is another excellent choice. It’s lightweight, strong, and resists rust.
For the brackets, consider using scrap metal from old projects or local junkyards. This reduces waste and saves money. Bamboo is a sustainable material that can be used for crossbars. It’s strong, flexible, and grows quickly, making it eco-friendly.
Use natural oils or beeswax to seal and protect the wood instead of chemical-based sealants. These options are biodegradable and safer for the environment.
When assembling, opt for recycled screws or bolts. Many hardware stores offer these, and they work just as well as new ones.
Finally, if you need padding, repurpose old rubber mats or yoga mats. They provide cushioning and grip without needing to buy new materials.
Your Roof Rack Awaits
Building a DIY Sprinter roof rack isn't just about saving money, it's about creating something that fits your needs perfectly. You've got the tools, the materials, and the know-how. Now, it's time to put it all together. Measure twice, cut once, and don't rush the process. Take pride in each step, from drilling the holes to securing the final bolt. If you hit a snag, remember, there's a whole community of DIY enthusiasts ready to help. Once it's done, you'll have a sturdy, custom roof rack ready for all your adventures. So, grab your gear, load up, and hit the road. Your next adventure is just a drive away.
What materials do I need to build a DIY Sprinter roof rack?
You’ll need aluminum or steel tubing, brackets, bolts, nuts, and a drill. Don’t forget measuring tape and a saw for cutting.
How much weight can a DIY Sprinter roof rack hold?
Typically, a well-built rack can hold between 200-300 pounds. Always check the vehicle’s manual for weight limits.
Do I need any special tools?
Basic tools like a drill, saw, wrench, and screwdriver should do the trick. A welder might be handy if using steel.
How long does it take to build?
Depending on your skill level, it can take anywhere from a few hours to a weekend. Planning and measuring can save time.
Is it safe to drive with a DIY roof rack?
Yes, as long as it’s securely attached and you don’t exceed the weight limit. Regularly check for loose bolts.
Can I customize the design?
Absolutely! You can add extra bars, hooks, or even a basket. Just make sure it’s balanced and secure.
Do I need to paint or coat the rack?
It’s a good idea to paint or coat the rack to prevent rust and corrosion, especially if using steel.