
Home>Home & Furniture>Kitchen>How to Build a Slide Out Camper Kitchen
Kitchen
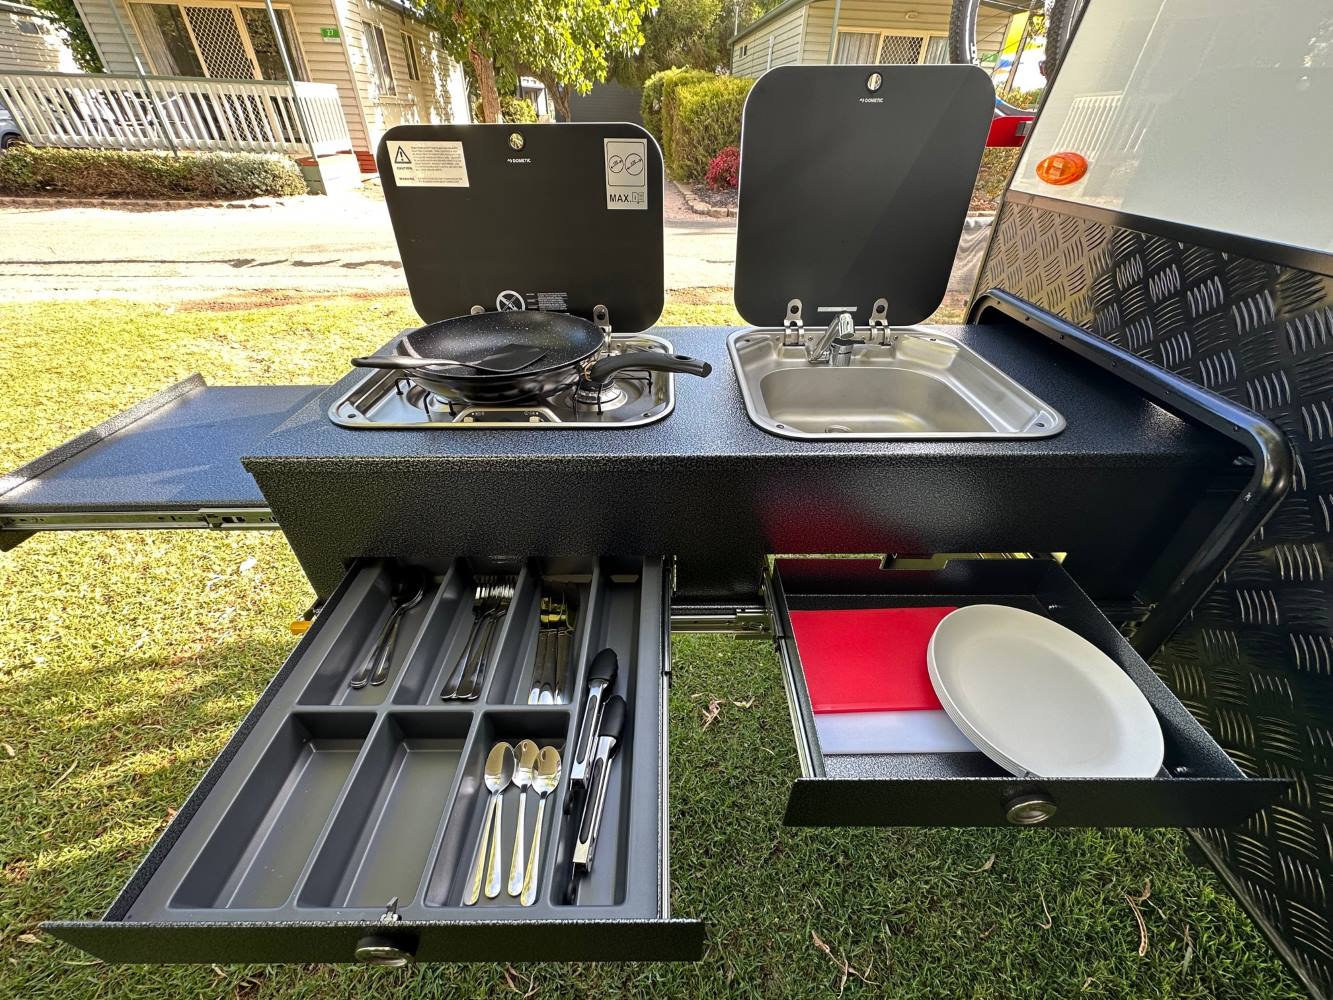
How to Build a Slide Out Camper Kitchen
Published: August 3, 2024
Learn how to build a slide-out camper kitchen with our step-by-step guide. Maximize space, enhance functionality, and enjoy outdoor cooking on your next adventure!
(Many of the links in this article redirect to a specific reviewed product. Your purchase of these products through affiliate links helps to generate commission for Twigandthistle.com, at no extra cost. Learn more)
Building a slide-out camper kitchen can turn camping trips into comfortable outdoor adventures. It's a fun project that combines practical skills with creativity. Imagine cooking in the fresh air without missing the comforts of home. With some tools, materials, and a bit of patience, you can craft a kitchen that slides out from your camper. This guide will help you navigate the process, from planning to finishing touches. Even if you’re new to DIY projects, following these steps will make the task manageable. Let’s get started on creating your own handy, slide-out camper kitchen!
Getting Ready for Your Camper Kitchen Project
Gather Materials: Collect all necessary tools and materials. You'll need plywood, screws, drawer slides, saw, drill, measuring tape, and safety gear.
Measure Your Space: Measure the area where the slide-out kitchen will go. Ensure you have enough room for the kitchen to slide in and out easily.
Design Your Layout: Sketch a simple design of your kitchen. Decide where the stove, sink, and storage will be placed.
Safety First: Wear safety goggles and gloves when cutting and drilling. Make sure your workspace is well-lit and free of clutter to avoid accidents.
Prepare the Workspace: Set up a sturdy workbench or table. Keep all tools within reach to avoid unnecessary movement.
Cut the Plywood: Cut the plywood to the required dimensions for the base, sides, and shelves of the kitchen. Double-check measurements before cutting.
Install Drawer Slides: Attach the drawer slides to the base and the sides of the kitchen. Ensure they are level and can support the weight of the kitchen components.
Assemble the Frame: Use screws and a drill to assemble the frame of the kitchen. Make sure all joints are secure and the structure is stable.
Add Components: Install the stove, sink, and storage units according to your design. Ensure all components are securely fastened.
Test the Slide-Out Mechanism: Slide the kitchen in and out several times to ensure it moves smoothly and fits properly. Make any necessary adjustments.
Final Touches: Sand any rough edges and apply a finish to protect the wood. Double-check all connections and make sure everything is secure.
Materials and Tools Checklist
Materials:
- Plywood: Used for constructing the main structure of the kitchen.
- Drawer Slides: Allow the kitchen to slide in and out smoothly.
- Screws and Nails: Essential for holding everything together.
- L-Brackets: Provide extra support and stability.
- Handles: Make it easier to pull the kitchen out.
- Waterproof Sealant: Protects the wood from moisture.
- Paint or Stain: Adds a finishing touch and protects the wood.
- Butcher Block or Countertop Material: Creates a durable surface for cooking.
- Sink and Faucet: For washing dishes and food prep.
- Water Jugs or Tanks: Store fresh and grey water.
- Propane Stove: For cooking meals.
- Hinges: Allow for foldable parts or doors.
- Rubber Feet or Casters: Provide stability and mobility.
Tools:
- Tape Measure: Ensures accurate measurements.
- Circular Saw: Cuts the plywood to size.
- Drill: For making holes and driving screws.
- Screwdriver: Tightens screws.
- Hammer: Drives nails into place.
- Level: Ensures everything is even.
- Clamps: Hold pieces together while assembling.
- Paintbrush or Roller: Applies paint or stain.
- Jigsaw: Cuts out shapes for the sink and other components.
- Wrench: Tightens bolts and nuts.
- Utility Knife: Cuts sealant and other materials.
- Sandpaper: Smooths rough edges.
- Safety Gear: Includes gloves, goggles, and ear protection.
Required Skills and Time Commitment
Skill Level: Intermediate
Time Required: 2-3 days
- Planning and Measuring: 2-3 hours
- Gathering Materials: 1-2 hours
- Cutting and Assembling the Frame: 6-8 hours
- Installing Slides and Hardware: 3-4 hours
- Attaching Countertop and Sink: 2-3 hours
- Finishing Touches and Testing: 3-4 hours
Building Instructions
Gather Materials:
- Plywood
- Drawer slides
- Screws
- Drill
- Saw
- Measuring tape
- Sandpaper
- Paint or sealant
Measure and Cut:
- Measure the space where the kitchen will go.
- Cut plywood to fit the dimensions.
Build the Frame:
- Assemble the frame using screws and plywood.
- Ensure the frame is sturdy and square.
Install Drawer Slides:
- Attach drawer slides to the frame.
- Make sure they are level and aligned.
Build the Drawer:
- Cut plywood for the drawer base and sides.
- Assemble the drawer using screws.
- Sand edges to smooth any rough spots.
Attach Drawer to Slides:
- Secure the drawer to the slides.
- Test to ensure it slides smoothly.
Add Countertop:
- Cut a piece of plywood for the countertop.
- Attach it to the top of the drawer.
Finish:
- Sand the entire kitchen unit.
- Paint or seal to protect the wood.
Install in Camper:
- Secure the slide-out kitchen in the camper.
- Ensure it is stable and functional.
Test:
- Slide the kitchen in and out.
- Make any necessary adjustments.
Helpful Tips and Tricks
Measure twice, cut once. Always double-check measurements before cutting materials. This saves time and reduces waste.
Use lightweight materials. Plywood or aluminum works well. Heavy materials can make the slide-out hard to operate.
Install heavy-duty drawer slides. Choose slides that can handle the weight of your kitchen setup. Look for ones with a locking mechanism to keep the kitchen in place during travel.
Plan for water and power. If you want a sink or stove, plan where water lines and electrical outlets will go. Use flexible hoses and wires to accommodate the sliding motion.
Seal all edges. Use waterproof sealant on all wood edges to prevent damage from moisture.
Test the slide-out. Before final installation, test the slide-out mechanism multiple times to ensure smooth operation.
Common mistakes to avoid:
Skipping the planning phase. Not having a detailed plan can lead to errors and wasted materials.
Using the wrong slides. Regular drawer slides won't support the weight and movement. Always use heavy-duty slides.
Ignoring weight distribution. Uneven weight can make the slide-out unstable. Balance the load evenly.
Alternatives for materials or methods:
Use pre-made slide-out kits. These kits come with all necessary components, making the process easier.
Consider a modular kitchen. Instead of a built-in slide-out, use portable kitchen modules that can be set up outside the camper.
Opt for a fold-out design. If space is limited, a fold-out kitchen might be more practical than a slide-out.
Budgeting for Your Camper Kitchen
Plywood: $50-$100 for a 4x8 sheet, depending on quality.
Drawer Slides: $20-$50 for heavy-duty slides.
Screws and Fasteners: $10-$20.
Handles and Knobs: $10-$30.
Paint or Stain: $20-$40.
Sealant: $10-$20.
Countertop Material: $50-$100, depending on choice.
Sink: $30-$100.
Faucet: $20-$50.
Water Container: $10-$30.
Stove: $50-$150.
Cooler or Mini Fridge: $50-$200.
Tools: If not already owned, a drill ($30-$100), saw ($50-$150), measuring tape ($5-$10), screwdrivers ($10-$20), and clamps ($10-$30).
Total Cost: $375-$1,200, depending on material quality and tool availability.
Budget-Friendly Alternatives:
- Use reclaimed wood or scrap plywood to save on material costs.
- Opt for a portable camping stove instead of a built-in one.
- Consider a manual pump faucet to reduce plumbing costs.
- Look for second-hand sinks and coolers at thrift stores or online marketplaces.
Personalizing Your Camper Kitchen
Materials: Instead of using plywood, consider aluminum for a lighter, rust-resistant option. Stainless steel works well for countertops, offering durability and easy cleaning. For a rustic look, use reclaimed wood.
Colors: Paint the kitchen in bright colors like yellow or blue to make it stand out. For a more natural feel, use earth tones like brown or green. Metallic finishes like silver or bronze can give a modern touch.
Styles: Go for a minimalist design with clean lines and simple hardware. For a vintage look, add retro knobs and handles. A bohemian style can be achieved with colorful tiles and decorative patterns.
Storage: Add pull-out drawers for utensils and spices. Install a folding table for extra prep space. Use magnetic strips to hold knives and other metal tools.
Appliances: Consider a portable induction cooktop instead of a gas stove. Use a compact fridge or cooler that fits under the counter. A collapsible sink can save space when not in use.
Lighting: Install LED strip lights under the counter for better visibility. Use solar-powered lights for an eco-friendly option. Add a clip-on lamp for focused lighting while cooking.
Water System: Use a foot pump for the sink to save water. Install a gravity-fed water tank for a simple, no-electricity solution. A portable water heater can provide hot water when needed.
Finishing Touches: Add decorative backsplash tiles for a pop of color. Use weather-resistant paint to protect the kitchen from the elements. Add hooks and racks for hanging pots, pans, and towels.
Eco-Friendly Building Tips
Reclaimed wood can be used for the frame and cabinets. It adds character and reduces waste. Bamboo is another great option for countertops. It's durable and grows quickly, making it a sustainable choice.
For the slide mechanism, consider repurposing drawer slides from old furniture. They are often sturdy and can handle the weight of a kitchen setup. Recycled metal can be used for brackets and supports, providing strength without the need for new materials.
Eco-friendly insulation like sheep's wool or recycled denim can keep your kitchen area temperature-controlled. These materials are effective and have a lower environmental impact.
Use low-VOC (volatile organic compounds) paints and finishes to reduce harmful emissions. These products are better for your health and the environment.
For water management, install a gravity-fed water system using a repurposed water container. This eliminates the need for electric pumps and reduces energy consumption.
Finally, consider solar panels for powering small appliances. They provide renewable energy and can be mounted on the roof of your camper.
Your Camper Kitchen Awaits
Building a slide-out camper kitchen isn't just about saving space; it's about creating a functional, enjoyable cooking area on the go. By using quality materials, ensuring proper measurements, and following safety guidelines, you can craft a kitchen that meets your needs. Remember to plan for storage, ventilation, and ease of use. Don't rush the process; take your time to get each step right. Once completed, you'll have a custom kitchen that enhances your camping experience. Whether you're a weekend warrior or a full-time traveler, this project will add value and convenience to your adventures. So, gather your tools, roll up your sleeves, and get started. Your perfect camper kitchen is just a few steps away. Enjoy the journey and the delicious meals you'll create on the road!
What materials do I need to build a slide-out camper kitchen?
You’ll need plywood, drawer slides, screws, hinges, a saw, drill, and measuring tape. Also, consider a sink, stove, and storage bins.
How much space do I need for a slide-out kitchen?
Measure your camper’s available space. Typically, you need at least 3 feet in width and 2 feet in depth. Adjust based on your specific needs.
Can I install a sink in my slide-out kitchen?
Yes, you can! Use a small sink with a water pump and portable water tanks. Make sure to plan for drainage and water supply.
How do I ensure the kitchen is secure while driving?
Use locking drawer slides and latches to keep everything in place. Double-check all fasteners and brackets before hitting the road.
What kind of stove should I use?
A portable propane stove works great. It’s compact, easy to use, and doesn’t require permanent installation. Make sure to store propane safely.
How do I make the kitchen weather-resistant?
Use waterproof sealant on all wood surfaces. Consider a weatherproof cover for the entire kitchen unit when it’s not in use.
Can I add a fridge to my slide-out kitchen?
Absolutely! A 12V portable fridge is ideal. It’s compact and runs off your camper’s battery. Ensure you have enough power supply and ventilation.