
Home>Home & Furniture>Kitchen>DIY Outdoor Kitchen Frame Kits: Step-by-step Guide
Kitchen
DIY Outdoor Kitchen Frame Kits: Step-by-step Guide
Published: July 27, 2024
Discover how to build your dream outdoor kitchen with our step-by-step guide on DIY outdoor kitchen frame kits. Perfect for any backyard chef looking to upgrade their space!
(Many of the links in this article redirect to a specific reviewed product. Your purchase of these products through affiliate links helps to generate commission for Twigandthistle.com, at no extra cost. Learn more)
Building an outdoor kitchen can be a fun project that adds value to your home. With DIY outdoor kitchen frame kits, you can create a functional and stylish space for entertaining without the need for professional help. These kits come with pre-cut materials and easy-to-follow instructions, making the process manageable even for beginners. Whether you’re a seasoned DIYer or just starting out, assembling your own outdoor kitchen frame can be a rewarding experience. This guide will walk you through the steps needed to complete the project, ensuring a smooth and successful build. Let's get started.
Getting Ready for Your Project
Plan Your Design: Sketch out your outdoor kitchen layout. Measure the space to ensure everything fits.
Gather Materials: Collect all necessary tools and materials. Common items include a tape measure, level, screws, drill, saw, and the frame kit itself.
Check Local Codes: Verify local building codes and regulations. Some areas require permits for outdoor structures.
Prepare the Workspace: Clear the area where the kitchen will be built. Remove debris, level the ground, and ensure a stable surface.
Safety Gear: Wear safety goggles, gloves, and sturdy shoes. Keep a first aid kit nearby.
Organize Tools: Lay out tools and materials in an orderly fashion. This makes the process smoother and quicker.
Read Instructions: Go through the frame kit instructions thoroughly. Familiarize yourself with each step before starting.
Mark the Area: Use stakes and string to outline the kitchen's footprint. This helps visualize the space and ensures accurate placement.
Check for Utilities: Ensure no underground utilities are in the build area. Contact local utility companies if unsure.
Weather Considerations: Choose a day with good weather. Avoid starting the project if rain or extreme heat is expected.
Gather Your Materials and Tools
Materials Needed:
- Pressure-Treated Lumber: Used for the frame to resist moisture and insects.
- Concrete Blocks: Provide a sturdy base for the kitchen.
- Cement: Bonds the concrete blocks together.
- Galvanized Screws: Prevent rust and ensure durability.
- Metal L-Brackets: Reinforce corners and joints.
- Plywood Sheets: Form the base for countertops and cabinets.
- Weatherproof Paint: Protects wood from the elements.
- Outdoor Kitchen Appliances: Grill, sink, refrigerator, etc.
- Countertop Material: Granite, tile, or stainless steel for a durable surface.
- Insulation Panels: Keep the kitchen area cool and energy-efficient.
Tools Needed:
- Measuring Tape: Ensures accurate measurements.
- Circular Saw: Cuts lumber and plywood to size.
- Drill: Drives screws and drills holes.
- Level: Ensures surfaces are even.
- Trowel: Spreads cement evenly.
- Hammer: Drives nails and helps with assembly.
- Screwdriver Set: Tightens screws and bolts.
- Paintbrushes: Applies weatherproof paint.
- Utility Knife: Cuts insulation panels and other materials.
- Safety Gear: Gloves, goggles, and ear protection for safety.
Required Skills and Time Commitment
Skill Level: Intermediate
Time Required: 2-3 days
- Planning and Design: 4-6 hours
- Gathering Materials: 2-3 hours
- Building the Frame: 8-10 hours
- Installing Countertops and Appliances: 6-8 hours
- Finishing Touches: 2-3 hours
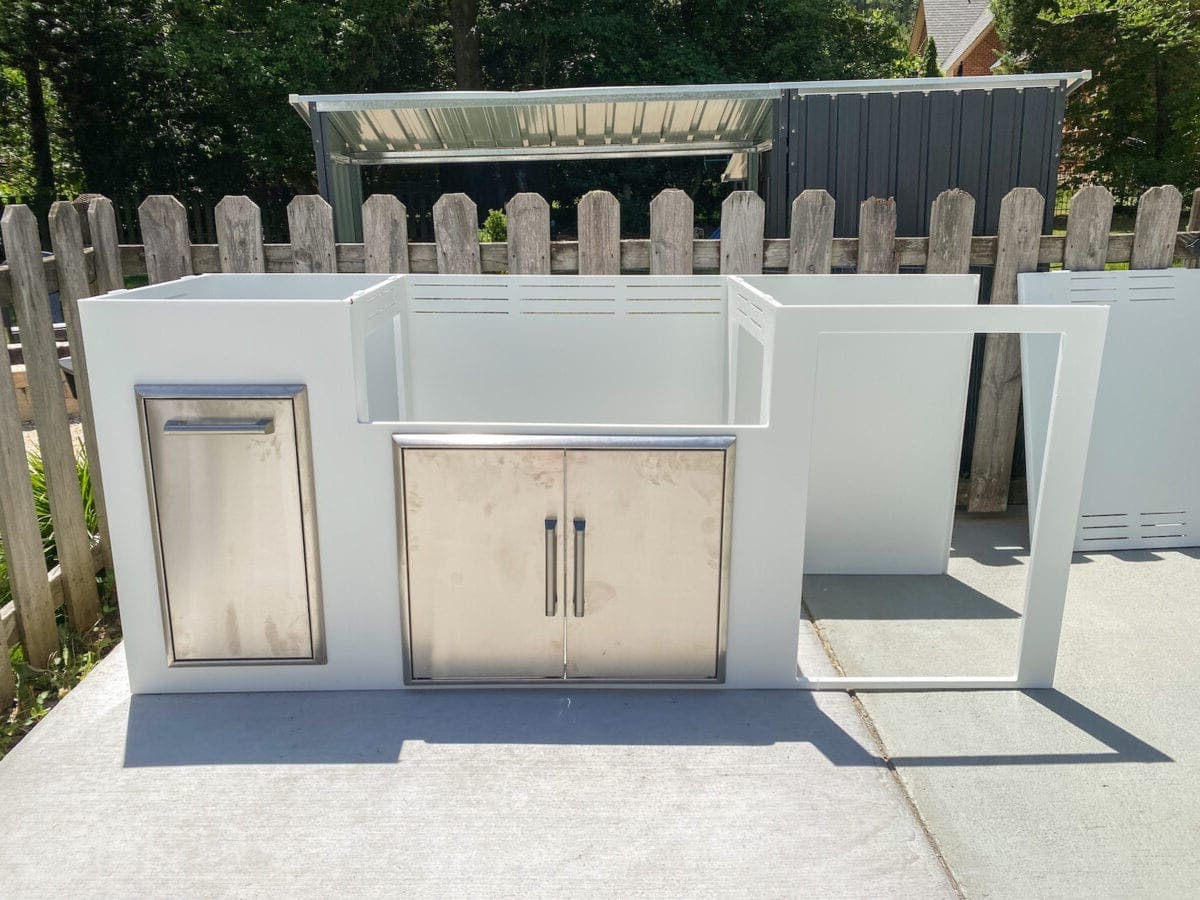
Detailed Building Instructions
Plan Your Layout
- Measure the space where the kitchen will go.
- Sketch a layout including grill, sink, and storage areas.
- Decide on materials like stainless steel or wood.
Gather Materials and Tools
- Purchase a frame kit that fits your design.
- Collect tools: drill, screws, level, measuring tape, saw.
- Get safety gear: gloves, goggles.
Prepare the Area
- Clear the space of debris and level the ground.
- Lay a concrete slab or pavers if needed for a stable base.
Assemble the Frame
- Follow the kit instructions to put together the frame.
- Use the level to ensure everything is even.
- Secure the frame with screws or bolts.
Install Utilities
- Run gas lines for the grill if needed.
- Install plumbing for the sink.
- Ensure electrical outlets are in place for appliances.
Attach Panels and Countertops
- Cut panels to fit around the frame.
- Attach panels using screws or adhesive.
- Install countertops, ensuring they are level and secure.
Install Appliances and Fixtures
- Place the grill, sink, and any other appliances in their designated spots.
- Connect gas, water, and electrical lines.
- Test all connections to ensure they work properly.
Add Finishing Touches
- Seal any gaps with caulk.
- Paint or stain wood parts if desired.
- Add decorative elements like tiles or stone veneer.
Clean Up
- Remove any construction debris.
- Wipe down all surfaces.
- Enjoy your new outdoor kitchen!
Helpful Tips and Tricks
Measure Twice, Cut Once: Always double-check measurements before cutting materials. This prevents waste and ensures pieces fit together properly.
Use Quality Materials: Opt for stainless steel or treated lumber to withstand weather conditions. These materials last longer and require less maintenance.
Level Ground: Ensure the ground where the kitchen will sit is level. This helps avoid uneven surfaces and potential structural issues.
Pre-Drill Holes: Pre-drilling holes in wood or metal reduces the risk of splitting or cracking. It also makes assembly easier.
Label Parts: Label all parts before starting assembly. This saves time and reduces confusion during the building process.
Weatherproofing: Apply a weatherproof sealant to wood and metal parts. This protects against moisture and extends the life of your kitchen.
Plan for Utilities: If including a sink or grill, plan for plumbing and gas lines. Ensure these utilities are accessible and safe.
Common Mistakes to Avoid:
- Skipping the Instructions: Always follow the kit’s instructions. Skipping steps can lead to mistakes and structural issues.
- Ignoring Permits: Check local regulations for permits. Building without permits can result in fines or having to dismantle your project.
- Poor Ventilation: Ensure proper ventilation for grills to prevent fire hazards and ensure safety.
Alternatives for Materials or Methods:
- Concrete Blocks: Instead of wood, use concrete blocks for a more durable and fire-resistant structure.
- Composite Decking: Use composite decking materials for countertops. They are weather-resistant and require less maintenance.
- Modular Kits: Consider modular kits that allow for easy expansion or reconfiguration. These kits offer flexibility and ease of use.
Estimating Your Costs
Materials:
- Pressure-treated lumber: $150-$200
- Concrete blocks: $50-$100
- Cement: $30-$50
- Stainless steel screws: $20-$30
- Plywood: $40-$60
- Countertop material (granite, tile, etc.): $200-$500
- Weatherproof sealant: $20-$30
Tools:
- Circular saw: $50-$100
- Drill: $40-$80
- Level: $10-$20
- Tape measure: $5-$15
- Trowel: $10-$20
- Screwdriver set: $10-$30
Total Cost: $635-$1,235
Budget-friendly alternatives:
- Reclaimed wood: $0-$50 (instead of pressure-treated lumber)
- Recycled concrete blocks: $0-$50
- Laminate countertop: $50-$150 (instead of granite or tile)
- Basic hand saw: $10-$20 (instead of circular saw)
- Manual screwdriver: $5-$10 (instead of drill)
Total Cost with Alternatives: $375-$710
Different Ways to Customize
Materials: Instead of using standard steel or wood, consider aluminum for a lightweight, rust-resistant option. Recycled materials like reclaimed wood or composite decking can add an eco-friendly touch.
Colors: Paint the frame in bold colors like navy blue or forest green for a standout look. For a more natural feel, use stains that highlight the wood grain, such as walnut or cherry.
Countertops: Swap out traditional granite for concrete countertops, which can be customized with different colors and textures. Butcher block countertops offer a warm, rustic appeal.
Cabinetry: Use stainless steel cabinets for a sleek, modern look. Weather-resistant wood like teak or cedar can give a more traditional, cozy feel.
Backsplash: Install a tile backsplash with a unique pattern or color scheme. Stone veneer can add a natural, rugged look.
Lighting: Incorporate LED strip lights under the countertops for a modern touch. Solar-powered lights can be an eco-friendly option for nighttime use.
Grill Options: Instead of a built-in gas grill, consider a charcoal grill or a wood-fired pizza oven for different cooking styles.
Seating: Build a bar-height counter with stools for a casual dining area. Use built-in benches with storage underneath for a space-saving solution.
Shelving: Add open shelves for easy access to frequently used items. Floating shelves can provide a minimalist look.
Weather Protection: Install a pergola or awning to protect your kitchen from the elements. Retractable canopies offer flexibility for different weather conditions.
Flooring: Use pavers or stone tiles for a durable, attractive surface. Composite decking can be a low-maintenance alternative.
Accessories: Include a built-in cooler or mini-fridge for convenience. Add a sink with a small prep area for easy clean-up.
Eco-Friendly Building Tips
Materials:
- Reclaimed Wood: Use old pallets, barn wood, or leftover lumber. Sand and treat to ensure durability.
- Recycled Metal: Look for scrap metal or old steel beams. Clean and treat to prevent rust.
- Eco-friendly Concrete: Use concrete with recycled aggregates or fly ash.
- Bamboo: Strong, renewable, and fast-growing. Ideal for countertops or shelving.
- Recycled Plastic Lumber: Durable and weather-resistant. Great for framing or decking.
Methods:
- Plan and Measure: Sketch your design. Measure twice, cut once to minimize waste.
- Disassemble Pallets: Carefully take apart pallets. Remove nails and sand rough edges.
- Frame Construction: Use reclaimed wood or recycled metal for the frame. Secure with screws or bolts.
- Concrete Countertops: Mix eco-friendly concrete. Pour into molds and let cure.
- Bamboo Shelving: Cut bamboo to size. Attach to the frame with brackets.
- Recycled Plastic Panels: Cut panels to fit. Attach to the frame for added stability.
- Seal and Protect: Use non-toxic sealants or paints to protect materials from weather.
Tips:
- Reuse Materials: Look for materials around your home or local salvage yards.
- Minimize Waste: Plan cuts carefully. Save scraps for future projects.
- Energy-efficient Tools: Use hand tools or energy-efficient power tools.
- Local Sourcing: Buy materials locally to reduce transportation emissions.
- Compostable Waste: Compost sawdust or wood shavings.
Your Outdoor Kitchen Awaits
Building your own outdoor kitchen frame kit can be a rewarding project. With the right tools, materials, and a bit of patience, you can create a space perfect for cooking and entertaining. Remember to measure twice, cut once, and always follow safety guidelines. Don't rush the process; take your time to ensure everything fits together perfectly. Once completed, you'll have a custom outdoor kitchen that not only adds value to your home but also provides a great place for family and friends to gather. Enjoy the satisfaction of knowing you built it yourself. Happy grilling!
What materials do I need for a DIY outdoor kitchen frame kit?
You’ll need pressure-treated wood, stainless steel screws, cement board, and metal studs. Also, grab a drill, saw, measuring tape, and level.
How long does it take to build an outdoor kitchen frame?
It usually takes a weekend if you’re handy. For beginners, it might stretch to a week.
Do I need any special tools?
Basic tools like a drill, saw, and level will do. A metal cutter might be handy if you’re using metal studs.
Can I customize the design?
Absolutely! You can adjust the size, shape, and layout to fit your space and needs.
Is it necessary to have a concrete base?
Yes, a concrete base provides a sturdy foundation. It helps prevent shifting and settling over time.
How do I protect my outdoor kitchen from weather?
Use weather-resistant materials like stainless steel and sealed wood. Also, consider a cover or awning.
Can I add appliances later?
Sure thing! Just make sure to leave enough space and access for future installations.