
Home>Home & Furniture>Kitchen>DIY Kitchen Extractor Installation Guide
Kitchen
DIY Kitchen Extractor Installation Guide
Published: July 27, 2024
Learn how to install a kitchen extractor with our step-by-step DIY guide. Enhance your kitchen's ventilation and keep it fresh with these easy-to-follow instructions.
(Many of the links in this article redirect to a specific reviewed product. Your purchase of these products through affiliate links helps to generate commission for Twigandthistle.com, at no extra cost. Learn more)
Thinking about installing a kitchen extractor yourself? It’s easier than you might think! Not only will this save some cash, but you’ll also gain a sense of accomplishment. This guide will walk through the steps needed to do the job safely and efficiently. Whether upgrading an old fan or installing one for the first time, the process is straightforward with the right tools and approach. Ready to improve your kitchen's ventilation while keeping dust and odors at bay? Let’s get started on this handy home improvement project.
Getting Ready for the Project
Gather Tools and Materials: Ensure you have a drill, screwdrivers, measuring tape, level, pencil, masking tape, ducting kit, and the extractor fan itself.
Read the Manual: Go through the instruction manual for specific details about your extractor model.
Turn Off Power: Switch off the electricity at the main circuit breaker to avoid any accidents.
Measure and Mark: Use the measuring tape and pencil to mark where the extractor will be installed. Make sure it’s centered over the stove.
Prepare the Wall: If you need to cut through the wall for ducting, use masking tape to outline the area and a drill to make pilot holes.
Check Ventilation: Ensure there’s a clear path for the ducting to the outside. This may involve checking the attic or other spaces.
Set Up Workspace: Clear the area around the stove. Lay down a drop cloth to catch debris and keep tools within reach.
Safety Gear: Wear safety goggles, gloves, and a dust mask to protect yourself during installation.
Test Fit: Before final installation, do a test fit to make sure everything aligns properly.
Secure the Extractor: Use the level to ensure it’s straight, then secure it to the wall with the provided screws and brackets.
Connect Ducting: Attach the ducting to the extractor and secure it with clamps or tape.
Reconnect Power: Once everything is in place, turn the electricity back on and test the extractor to ensure it’s working correctly.
What You Need: Materials and Tools
Materials and Tools Needed:
- Extractor Fan: The main device to remove smoke, steam, and odors from the kitchen.
- Ducting Kit: Includes pipes and connectors to channel air outside.
- Wall Vent: Allows air to exit the house.
- Screws and Wall Plugs: Secure the extractor and ducting to the wall.
- Drill: Creates holes for screws and wall plugs.
- Screwdriver: Tightens screws.
- Measuring Tape: Ensures accurate placement.
- Pencil: Marks positions for drilling.
- Spirit Level: Ensures the extractor is level.
- Jigsaw: Cuts holes in cabinets or walls for ducting.
- Wire Strippers: Prepares electrical wires for connection.
- Electrical Tape: Insulates electrical connections.
- Cable Ties: Organizes and secures cables.
- Safety Glasses: Protects eyes during drilling and cutting.
- Dust Mask: Prevents inhalation of dust during installation.
Extractor Fan: The main device to remove smoke, steam, and odors from the kitchen. Ducting Kit: Includes pipes and connectors to channel air outside. Wall Vent: Allows air to exit the house. Screws and Wall Plugs: Secure the extractor and ducting to the wall. Drill: Creates holes for screws and wall plugs. Screwdriver: Tightens screws. Measuring Tape: Ensures accurate placement. Pencil: Marks positions for drilling. Spirit Level: Ensures the extractor is level. Jigsaw: Cuts holes in cabinets or walls for ducting. Wire Strippers: Prepares electrical wires for connection. Electrical Tape: Insulates electrical connections. Cable Ties: Organizes and secures cables. Safety Glasses: Protects eyes during drilling and cutting. Dust Mask: Prevents inhalation of dust during installation.
Skill Level and Time Commitment
Skill Level: Intermediate
Time Required: 3-4 hours
Steps:
- Gather Tools and Materials: Screwdriver, drill, measuring tape, level, ducting, screws, wall anchors.
- Turn Off Power: Ensure safety by switching off the kitchen's power supply.
- Measure and Mark: Determine the position for the extractor, mark the spots for screws and ducting.
- Drill Holes: Create holes for mounting screws and ducting.
- Install Ducting: Attach ducting to the extractor and secure it to the wall or ceiling.
- Mount Extractor: Fix the extractor to the wall using screws and anchors.
- Connect Wiring: Safely connect the extractor to the power supply.
- Test Functionality: Turn the power back on and test the extractor to ensure it works correctly.
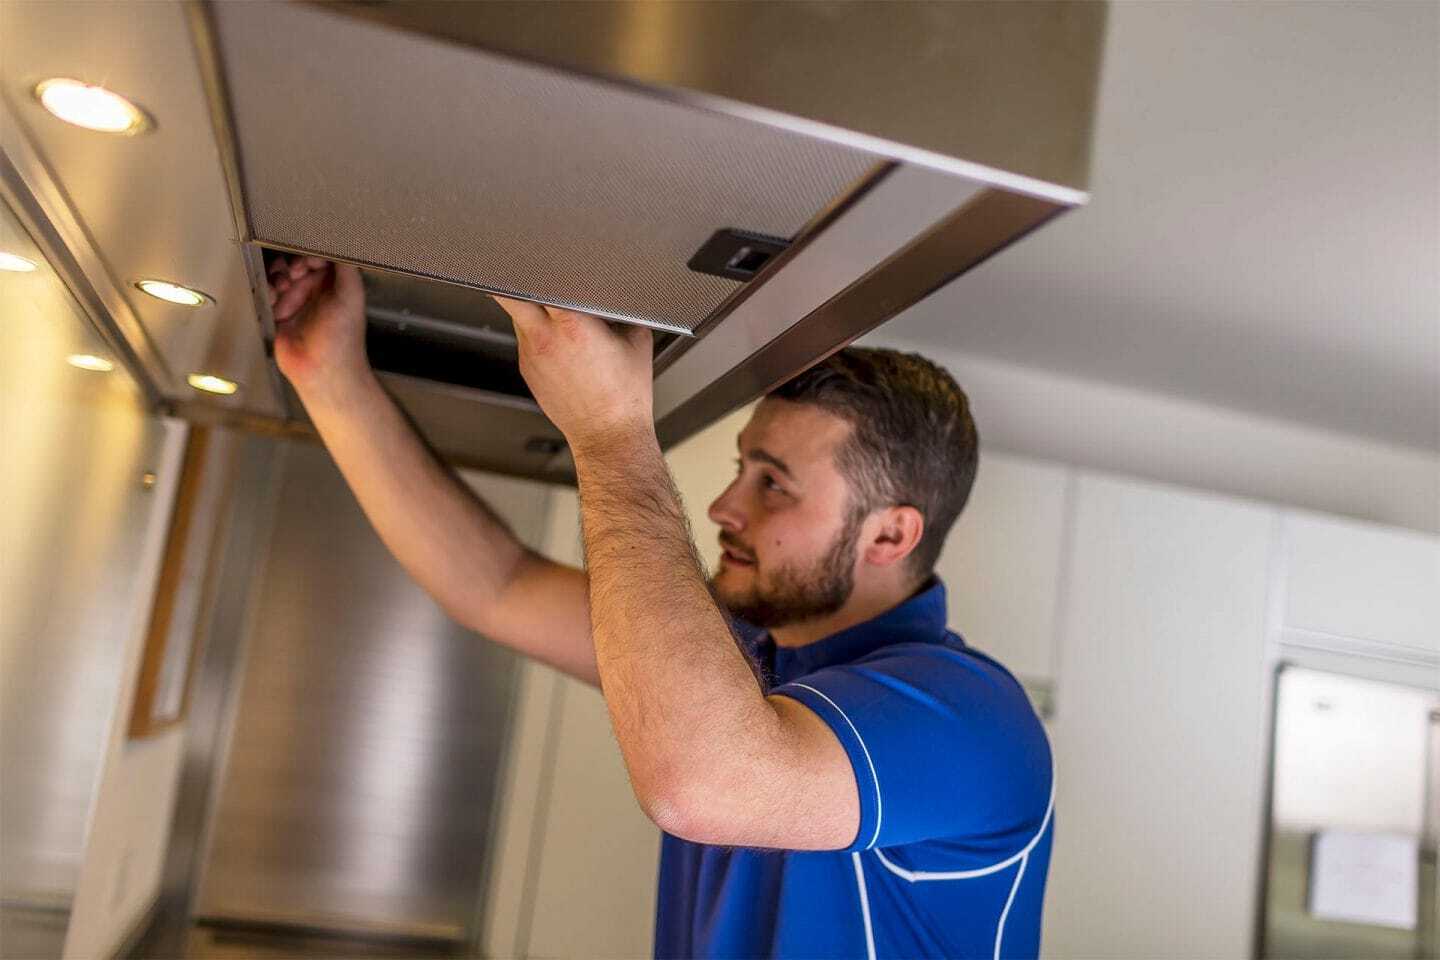
How to Install Your Kitchen Extractor
Gather Tools and Materials
- Screwdriver
- Drill
- Measuring tape
- Level
- Wall anchors
- Screws
- Ducting kit
- Pencil
Turn Off Power
- Switch off the power supply to the kitchen area.
Measure and Mark
- Use the measuring tape to find the center point above the stove.
- Mark the spot with a pencil.
Install Mounting Bracket
- Hold the mounting bracket against the wall.
- Ensure it is level using the level tool.
- Mark the screw holes with a pencil.
Drill Holes
- Drill holes at the marked spots.
- Insert wall anchors into the holes.
Attach Bracket
- Screw the mounting bracket into the wall anchors.
Prepare Ducting
- Measure the distance from the extractor to the outside wall.
- Cut the ducting to the required length.
Install Ducting
- Attach one end of the ducting to the extractor.
- Secure with duct tape or a clamp.
- Feed the other end through the wall opening.
Mount Extractor
- Lift the extractor onto the mounting bracket.
- Secure it with screws.
Connect Wiring
- Match the wires from the extractor to the power supply.
- Use wire nuts to secure connections.
- Tuck wires neatly inside the housing.
Test Extractor
- Turn the power back on.
- Test the extractor to ensure it works properly.
Seal Ducting
- Use silicone sealant around the ducting where it exits the wall.
- Ensure no gaps for air leaks.
Final Adjustments
- Check that the extractor is level.
- Tighten any loose screws.
Helpful Tips and Tricks
Measure Twice, Cut Once: Always double-check measurements before cutting any holes or making adjustments. Mistakes can be costly and hard to fix.
Use a Stud Finder: Ensure the extractor is mounted securely by finding studs in the wall. This will provide a strong anchor point.
Template First: Many extractors come with a template. Tape it to the wall to mark where holes need drilling. This helps avoid errors.
Proper Venting: Make sure the vent duct is the correct size and type for your extractor. Flexible ducts can be easier to install but may reduce efficiency.
Seal Gaps: Use caulk or foam sealant around the vent to prevent air leaks. This improves efficiency and keeps pests out.
Electrical Safety: Turn off the power at the breaker box before working with any wiring. Use a voltage tester to ensure no current is flowing.
Level and Plumb: Use a level to make sure the extractor is straight. An uneven installation can affect performance and appearance.
Common Mistakes to Avoid:
Skipping the Manual: Always read the installation manual. Each model can have specific requirements.
Wrong Height: Installing the extractor too high or too low can reduce its effectiveness. Follow the manufacturer's guidelines.
Ignoring Vent Length: Long or winding vent ducts can reduce airflow. Keep the duct as short and straight as possible.
Alternatives for Materials or Methods:
Ductless Extractors: If venting outside is not an option, consider a ductless extractor. These use filters to clean the air and recirculate it back into the kitchen.
Rigid Ducts: Use rigid metal ducts instead of flexible ones for better airflow and easier cleaning.
Magnetic Stud Finder: If you don't have an electronic stud finder, a magnetic one can also work to locate nails in studs.
Budgeting for Your DIY Project
Extractor fan: $100 - $300
Ducting kit: $30 - $50
Wall cap or roof cap: $20 - $40
Electrical wiring: $15 - $30
Toggle bolts or screws: $5 - $10
Drywall anchors: $5 - $10
Caulk: $5 - $10
Drill: $50 - $100 (if not already owned)
Hole saw: $10 - $20
Screwdriver: $5 - $15 (if not already owned)
Measuring tape: $5 - $10 (if not already owned)
Level: $10 - $20 (if not already owned)
Utility knife: $5 - $10 (if not already owned)
Total cost: $265 - $625
Budget-friendly alternatives:
Extractor fan: $50 - $100
Ducting kit: $20 - $30
Wall cap or roof cap: $15 - $25
Electrical wiring: $10 - $20
Toggle bolts or screws: $3 - $5
Drywall anchors: $3 - $5
Caulk: $3 - $5
Drill: Borrow from a friend or rent from a hardware store
Hole saw: Borrow or rent
Screwdriver: Borrow or use a multi-tool
Measuring tape: Borrow
Level: Borrow
Utility knife: Borrow or use a basic one
Total cost with budget-friendly alternatives: $117 - $325
Personalize Your Kitchen Extractor
Materials: Instead of using a standard stainless steel extractor, consider a copper or brass finish for a more rustic look. For a modern touch, opt for a tempered glass extractor.
Colors: Paint the extractor hood to match or contrast with your kitchen decor. Use matte black for a sleek, contemporary feel or bright colors like red or yellow to add a pop of color.
Styles: Choose between wall-mounted, island, or under-cabinet extractors based on your kitchen layout. For a minimalist style, go for a hidden or integrated extractor that blends seamlessly with your cabinets.
Lighting: Add LED strip lights around the extractor for better visibility and a modern look. Choose warm white for a cozy atmosphere or cool white for a clean, bright effect.
Filters: Upgrade to charcoal filters for better odor removal or washable metal filters for easy maintenance.
Controls: Install touch-sensitive controls for a sleek, modern interface or smart controls that connect to your home automation system for convenience.
Noise Reduction: Opt for an extractor with sound insulation or add acoustic panels around the installation area to minimize noise.
Ducting: Use flexible ducting for easier installation or rigid ducting for better airflow and efficiency. Consider decorative covers for exposed ducts to match your kitchen style.
Eco-Friendly Installation Tips
Choose eco-friendly materials like bamboo or reclaimed wood for the extractor hood. These materials are sustainable and add a natural touch to your kitchen. Use low-VOC (volatile organic compounds) paints or finishes to reduce harmful emissions.
Opt for energy-efficient extractor fans. Look for models with an Energy Star rating. These fans use less electricity, saving energy and reducing your carbon footprint.
Reuse or recycle materials whenever possible. If you have an old extractor fan, consider refurbishing it instead of buying a new one. You can also use leftover wood or metal from other projects to build the hood.
Install LED lights in the extractor hood. LEDs consume less power and last longer than traditional bulbs, making them a more sustainable choice.
Seal gaps and cracks around the extractor to improve efficiency. This reduces the workload on the fan, saving energy.
Use natural cleaning products to maintain your extractor. Avoid harsh chemicals that can harm the environment. Simple mixtures of vinegar and baking soda work well for cleaning grease and grime.
Plan the installation to minimize waste. Measure carefully to avoid cutting errors and excess material. This reduces the amount of waste generated during the project.
Consider a ductless extractor with a carbon filter. These models recirculate air, reducing the need for extensive ductwork and the materials required for it.
Compost or recycle packaging from new materials. Many packaging materials can be composted or recycled, reducing landfill waste.
Your Kitchen's New Best Friend
Installing a kitchen extractor isn't rocket science. With the right tools and a bit of patience, you can tackle this project yourself. Remember to measure twice, cut once, and always double-check your connections. Safety first: turn off the power before starting. Follow the manufacturer's instructions closely. If you hit a snag, don't hesitate to consult a professional. Once installed, your kitchen will be fresher, cleaner, and more enjoyable. Plus, you'll have the satisfaction of knowing you did it yourself. Happy cooking!
How do I choose the right extractor for my kitchen?
Look at your kitchen size and cooking habits. For a small kitchen, a simple recirculating extractor might do. For larger spaces or heavy cooking, go for a ducted extractor. Check the CFM rating (cubic feet per minute) to match your kitchen's needs.
What tools will I need for installation?
You'll need a drill, screwdriver, measuring tape, level, duct tape, and possibly a jigsaw if you need to cut through cabinets or walls. Don't forget screws and wall plugs.
Can I install an extractor myself, or do I need a professional?
If you're comfortable with basic DIY tasks and have the right tools, you can install it yourself. However, if you're dealing with electrical wiring or cutting through walls, it might be safer to hire a professional.
How do I ensure proper ventilation?
Make sure the ductwork is as straight and short as possible. Avoid too many bends, which can reduce efficiency. Use rigid ducting instead of flexible ones for better airflow.
What height should the extractor be installed at?
Generally, install it 24 to 30 inches above the cooking surface. Check the manufacturer's guidelines for specific recommendations.
How do I maintain my kitchen extractor?
Clean the filters regularly, usually every month. Wipe down the exterior to remove grease and dust. If it has a charcoal filter, replace it every 6 months to a year.
What should I do if my extractor is noisy?
Check if it's securely mounted and that the ductwork is properly installed. Loose parts can cause noise. If it's still loud, consider adding soundproofing material around the ductwork.