
Home>Home & Furniture>Kitchen>DIY Breakfast Nook: How to Create a Cozy Corner
Kitchen
DIY Breakfast Nook: How to Create a Cozy Corner
Published: July 24, 2024
Create a cozy breakfast nook with our DIY guide! Learn how to design, build, and decorate a charming corner for your morning meals. Perfect for any kitchen space.
(Many of the links in this article redirect to a specific reviewed product. Your purchase of these products through affiliate links helps to generate commission for Twigandthistle.com, at no extra cost. Learn more)
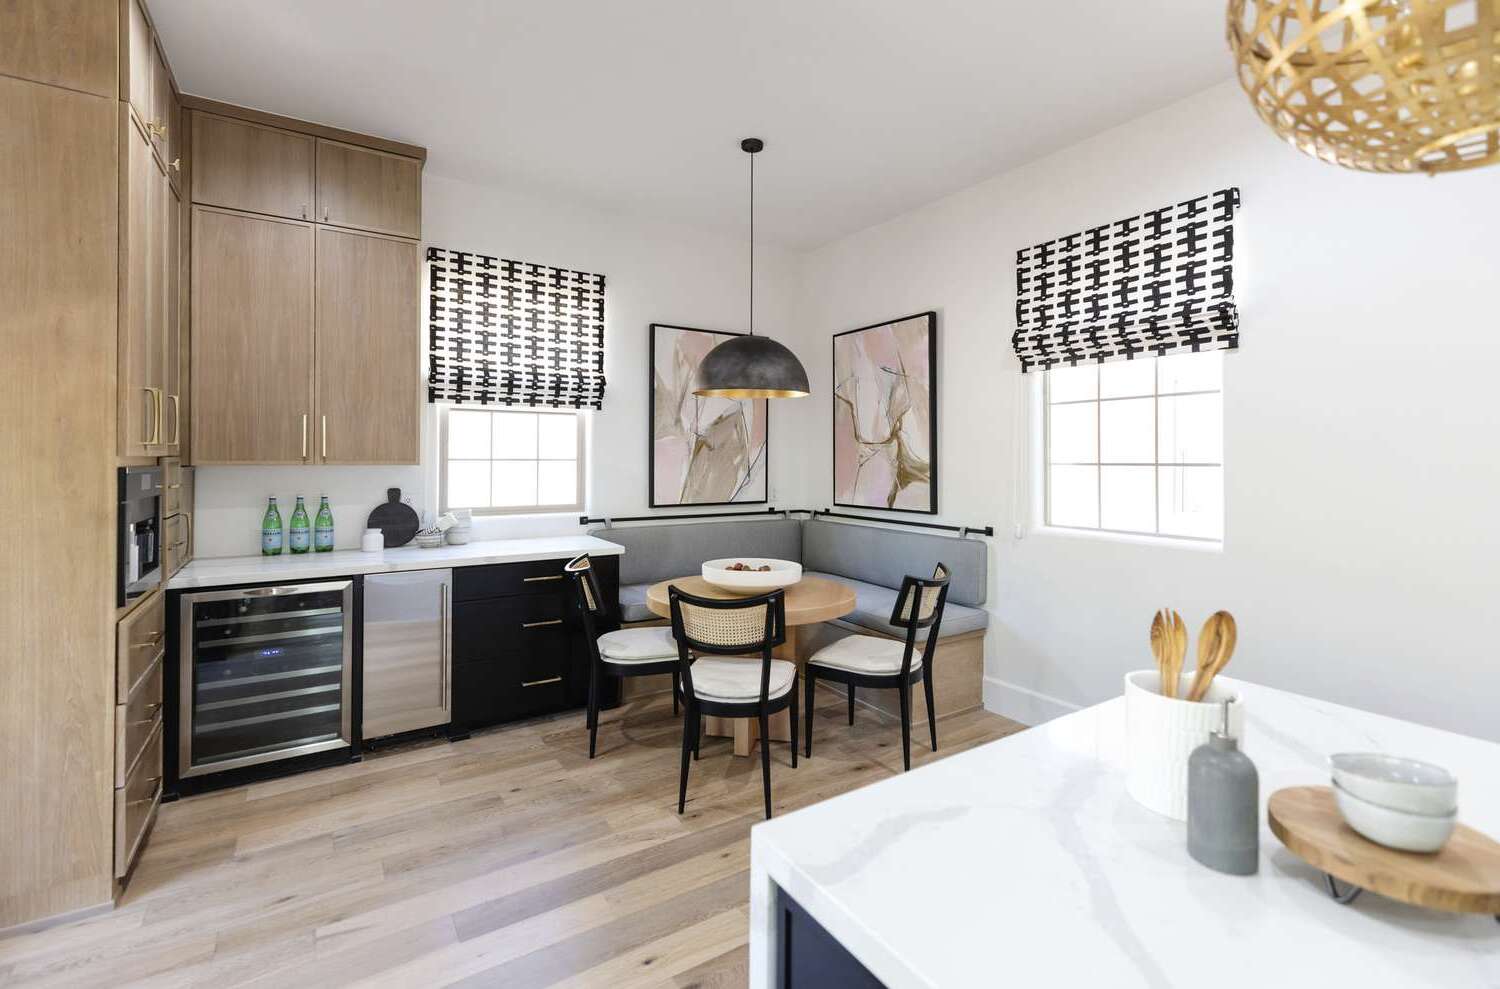
Creating a cozy breakfast nook at home can be a fun and rewarding project. It’s a great way to add charm and functionality to your kitchen or dining area. Whether you’re looking for a comfy spot to enjoy your morning coffee or a small table for family breakfasts, a nook can blend style and comfort seamlessly. With a few tools, some creativity, and a bit of effort, you can transform a corner of your home into an inviting space. Let's get started on making your perfect breakfast nook, a place where you’ll love spending time every day.
Getting Ready for Your Project
Measure the Space: Use a tape measure to get the exact dimensions of the area where you want to build your breakfast nook. Write down the measurements.
Gather Materials: Collect all necessary materials like wood, screws, nails, cushions, and paint. Make sure you have everything before starting.
Safety Gear: Wear safety goggles, gloves, and a dust mask to protect yourself from sawdust and debris.
Clear the Area: Remove any furniture or items from the workspace. Ensure you have enough room to move around comfortably.
Check Tools: Ensure all tools like a saw, drill, hammer, and measuring tape are in good working condition.
Plan Design: Sketch a simple design of your breakfast nook. Decide on the shape, size, and any additional features like storage benches.
Cut Wood: Use a saw to cut the wood pieces according to your measurements. Double-check measurements before cutting to avoid mistakes.
Sand Edges: Sand down the edges of the wood to prevent splinters and ensure a smooth finish.
Pre-drill Holes: Pre-drill holes in the wood pieces to make assembly easier and prevent the wood from splitting.
Assemble Frame: Start assembling the frame of your breakfast nook. Use screws and a drill to secure the pieces together.
Paint or Stain: Apply paint or stain to the wood. Let it dry completely before moving on to the next step.
Add Cushions: Place cushions on the seating area for comfort. Choose cushions that match your kitchen decor.
Final Check: Inspect the nook for any loose screws or rough edges. Make any necessary adjustments to ensure stability and safety.
Gathering Materials and Tools
Materials Needed:
- Wood Planks: Used for building the seating and table. Choose sturdy types like pine or oak.
- Cushions: Provide comfort for the seating area. Pick ones that match your decor.
- Paint or Stain: Adds color or a protective finish to the wood. Select based on your style preference.
- Screws and Nails: Essential for assembling the wood pieces. Ensure they are the right size for your planks.
- Sandpaper: Smooths out rough edges on the wood. Use different grits for best results.
- Wood Glue: Strengthens joints and connections. Choose a high-quality, strong adhesive.
- Fabric: Covers the cushions. Pick durable, easy-to-clean material.
- Foam Padding: Adds extra comfort to the seating. Cut to fit your cushion covers.
Tools Needed:
- Measuring Tape: Ensures accurate measurements for cutting wood and fabric.
- Saw: Cuts the wood planks to the desired size. A circular or hand saw works well.
- Drill: Makes holes for screws and nails. A cordless drill offers flexibility.
- Screwdriver: Tightens screws. A power screwdriver speeds up the process.
- Hammer: Drives nails into the wood. Choose a comfortable, well-balanced one.
- Paintbrushes or Rollers: Applies paint or stain evenly. Use different sizes for detailed work.
- Staple Gun: Attaches fabric to cushions. Ensure it’s easy to handle.
- Clamps: Holds wood pieces together while the glue dries. Use adjustable ones for various sizes.
These materials and tools will help you create a cozy breakfast nook.
Required Skills and Time Commitment
Skill Level: Intermediate
Time Required: 2-3 days
- Planning and Measuring: 2-3 hours
- Purchasing Materials: 1-2 hours
- Building Bench Seating: 8-10 hours
- Installing Table: 2-3 hours
- Painting/Staining: 4-5 hours
- Adding Cushions and Decor: 1-2 hours
Instructions to Follow
Choose the Spot
- Find a corner or small area in your kitchen or dining room.
- Make sure it gets good natural light.
Measure the Space
- Measure the length, width, and height of the area.
- Write down these measurements.
Select Furniture
- Pick a small table that fits your space.
- Choose benches or chairs that match the table.
Build or Buy Benches
- If building, cut wood to match your measurements.
- Assemble the benches using screws and wood glue.
- Sand and paint or stain the benches.
Install Benches
- Place benches against the walls.
- Secure them with brackets if needed.
Add the Table
- Position the table in the center of the nook.
- Ensure it’s stable and level.
Add Cushions and Pillows
- Place cushions on the benches for comfort.
- Add decorative pillows for a cozy feel.
Decorate the Walls
- Hang artwork, shelves, or a mirror above the benches.
- Use wall decals or paint for added flair.
Add Lighting
- Install a pendant light or wall sconces.
- Use soft, warm bulbs for a cozy atmosphere.
Accessorize
- Place a small rug under the table.
- Add a centerpiece like a vase of flowers or a bowl of fruit.
Enjoy Your Nook
- Sit back, relax, and enjoy your new breakfast nook.
Helpful Tips and Tricks
Measure your space carefully before starting. This ensures everything fits perfectly. Use multi-functional furniture like benches with storage underneath. Add cushions and pillows for comfort and style. Choose a small table that fits the space without overcrowding it. Install shelves above the nook for extra storage and decoration.
Common mistakes to avoid include not measuring the space properly, which can lead to furniture that doesn't fit. Avoid using furniture that's too large or bulky. Don't forget about lighting; a cozy nook needs good light. Skipping the cushions and pillows can make the nook uncomfortable.
Alternatives for materials or methods include using reclaimed wood for a rustic look. Instead of built-in benches, consider freestanding benches that can be moved. If space is tight, use folding tables or drop-leaf tables. For a unique touch, use mix-and-match chairs instead of a uniform set.
Estimating the Cost
Wood: $100-$200, depending on the type and quality. Pine is cheaper, while oak costs more.
Cushions and Fabric: $50-$100. Pre-made cushions are more expensive. Buy fabric and stuffing separately to save money.
Paint or Stain: $20-$40. Choose a color that matches your kitchen.
Screws, Nails, and Glue: $10-$20. Essential for holding everything together.
Sandpaper: $5-$10. Smooths out rough edges.
Saw: $30-$60. A basic handsaw is cheaper, but a power saw makes the job easier.
Drill: $40-$100. Cordless drills are more convenient.
Measuring Tape and Level: $10-$20. Ensures everything is even and fits correctly.
Budget-Friendly Alternatives: Use reclaimed wood or pallets to save on wood costs. Check thrift stores for cushions and fabric. Borrow tools from friends or family instead of buying new ones.
Different Ways to Customize
Seating Options: Use a bench with storage underneath for extra space. Try upholstered chairs for added comfort. Consider a built-in bench for a more permanent solution.
Table Choices: Opt for a round table to save space. Use a drop-leaf table for flexibility. A farmhouse table can add a rustic touch.
Materials: Choose reclaimed wood for an eco-friendly option. Use metal accents for an industrial look. Glass tabletops can make the area feel more open.
Colors: Paint the nook in soft pastels for a calming effect. Use bold colors to make a statement. Neutral tones can create a timeless look.
Cushions and Fabrics: Select patterned cushions for a lively feel. Use solid colors for a minimalist vibe. Mix and match different fabrics for a unique touch.
Lighting: Install a pendant light for focused lighting. Use string lights for a cozy atmosphere. Wall sconces can save space and add elegance.
Decor: Add wall art to personalize the space. Use plants to bring in some greenery. Throw pillows can add both comfort and style.
Flooring: Consider hardwood floors for a classic look. Use tiles for easy cleaning. A rug can add warmth and define the space.
Storage: Incorporate floating shelves for extra storage. Use baskets under the bench for hidden storage. Built-in cabinets can keep the area clutter-free.
Windows: Install Roman shades for a sleek look. Use curtains for a softer feel. Blinds can offer more control over light and privacy.
Eco-Friendly Ideas
Reclaimed wood can be used for benches or tables. It adds character and reduces waste. Salvaged furniture from thrift stores or garage sales can be repurposed. Sand and paint them to match your style.
Eco-friendly paint is a great choice. Look for low-VOC or zero-VOC options to keep the air clean. Natural fabrics like cotton or linen work well for cushions and curtains. They are biodegradable and often more durable.
Upcycled materials can be turned into unique decor. Old jars can become vases or candle holders. Recycled metal can be used for light fixtures or shelf brackets.
Bamboo is another sustainable option. It grows quickly and can be used for flooring or furniture. Cork is also eco-friendly and can be used for bulletin boards or coasters.
Energy-efficient lighting is a must. LED bulbs use less electricity and last longer. Solar-powered lights can be used if your nook gets enough sunlight.
Plants not only look great but also improve air quality. Choose low-maintenance varieties like succulents or herbs. Recycled planters can be made from old cans or bottles.
Insulation is important for comfort. Use recycled insulation materials to keep your nook cozy in all seasons. Draft stoppers made from fabric scraps can help keep the cold out.
Natural cleaning products are better for the environment. Use vinegar, baking soda, and essential oils to keep your nook clean and fresh.
Your Cozy Corner Awaits
You've got all the tools and tips to create a breakfast nook that's both functional and inviting. Start with a sturdy table and comfortable seating. Add some cushions and throws for extra coziness. Don't forget the lighting; a well-placed lamp or some string lights can make a big difference. Personalize the space with decor like plants, artwork, or family photos. Remember, the goal is to make a spot where you can relax and enjoy your morning coffee or a meal with loved ones. With a bit of effort and creativity, your nook will become a favorite spot in your home. So, roll up your sleeves, gather your materials, and get started. Your perfect breakfast nook is just a few steps away. Happy DIY-ing!
How much space do I need for a breakfast nook?
You don't need a ton of space. A small corner in your kitchen or dining area works just fine. Even a 5x5-foot area can be enough.
What kind of seating should I use?
Bench seating is popular because it saves space and can fit more people. You can also use a small table with chairs if you prefer.
How do I make it cozy?
Add some cushions, throw pillows, and maybe a soft rug. Warm lighting like a small lamp or string lights can also make it feel inviting.
What type of table works best?
A round or oval table is great for small spaces since it has no sharp corners. A drop-leaf table can also be handy if you need extra room sometimes.
Can I build it myself?
Absolutely! With some basic tools and materials, you can build a simple bench or table. There are plenty of DIY plans available online.
What colors should I use?
Light colors can make the space feel bigger and more open. Soft pastels or neutral tones work well. You can add pops of color with accessories.
How do I decorate it?
Keep it simple. A small vase with fresh flowers, a few framed photos, or a piece of wall art can add personality without cluttering the space.