
Home>Home & Furniture>Doors & Windows>How to Build Craftsman Door Trim
Doors & Windows
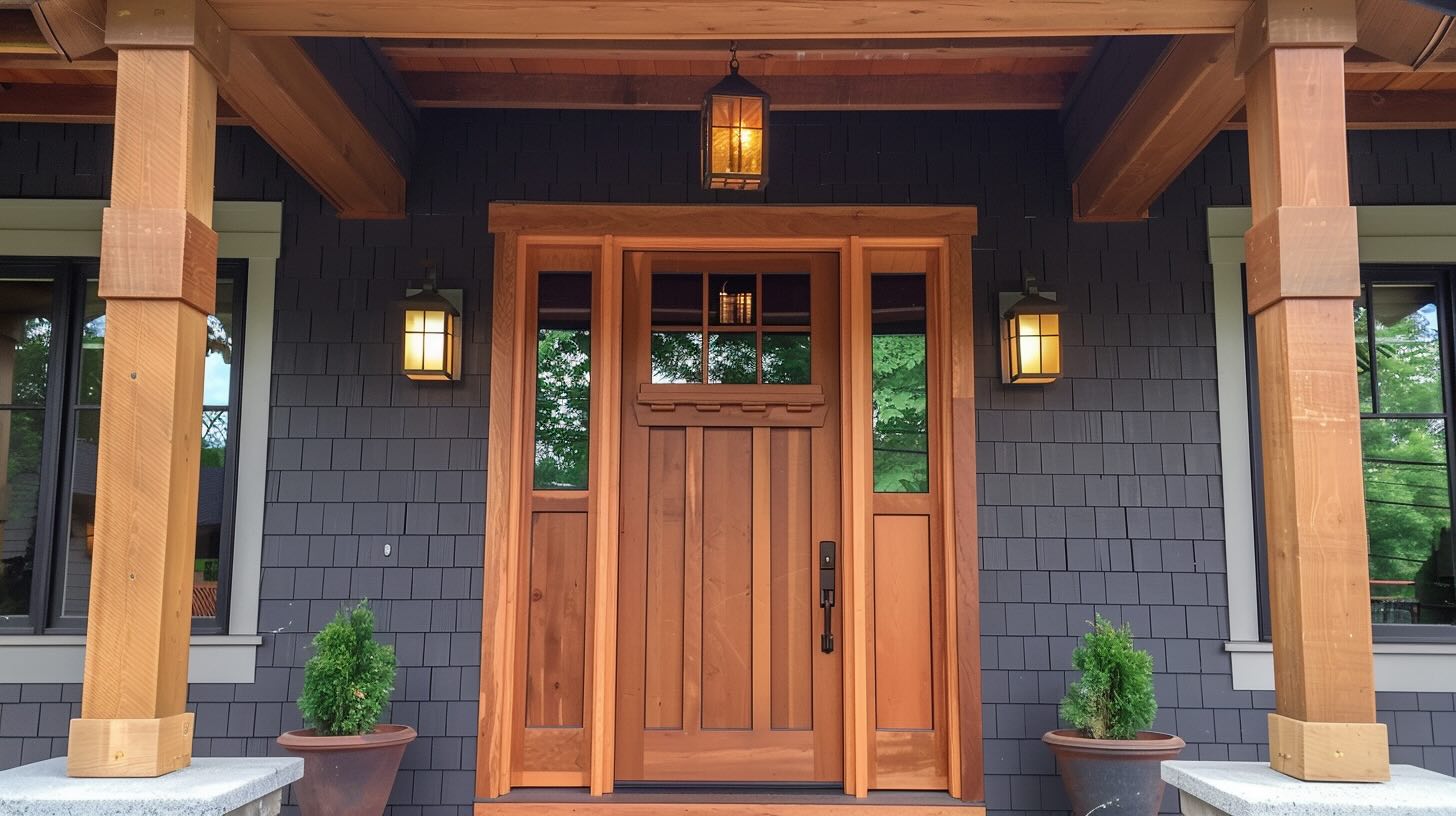
How to Build Craftsman Door Trim
Published: September 9, 2024
Learn how to build Craftsman door trim with our step-by-step guide. Enhance your home's aesthetic with this classic design. Perfect for DIY enthusiasts and home improvement projects.
(Many of the links in this article redirect to a specific reviewed product. Your purchase of these products through affiliate links helps to generate commission for Twigandthistle.com, at no extra cost. Learn more)
Building Craftsman door trim can add a touch of classic elegance to your home. This style, known for its clean lines and sturdy appearance, is both beautiful and functional. Whether you're a seasoned DIY enthusiast or a beginner, creating Craftsman trim is a rewarding project. All you need are a few basic tools, some good materials, and a bit of patience. In this guide, we’ll walk you through the process step-by-step, ensuring that you end up with a professional-looking finish. Ready to enhance your home's charm with Craftsman door trim? Let's get started!
Getting Ready for Your Project
Gather Materials: Collect wood trim pieces, nails, wood glue, a measuring tape, a saw, a level, sandpaper, and paint or stain.
Measure Door Frame: Measure the height and width of the door frame. Write down these measurements to ensure accurate cuts.
Cut Trim Pieces: Use a saw to cut the trim pieces to the correct lengths. Make sure to cut at a 45-degree angle for corners.
Sand Edges: Sand the edges of the trim pieces to smooth out any rough spots. This helps the pieces fit together better.
Set Up Workspace: Clear a workspace near the door. Lay down a drop cloth to protect the floor from sawdust and paint.
Safety Gear: Wear safety goggles and gloves to protect your eyes and hands while cutting and sanding.
Dry Fit Trim: Place the trim pieces around the door frame without attaching them. Check for proper fit and make any necessary adjustments.
Apply Wood Glue: Apply wood glue to the back of each trim piece before attaching it to the door frame.
Nail Trim: Use a hammer and nails to secure the trim pieces to the door frame. Make sure the trim is level before nailing.
Fill Gaps: Use wood filler to fill any gaps or nail holes. Let it dry, then sand smooth.
Paint or Stain: Paint or stain the trim to match your decor. Allow it to dry completely before using the door.
Gather Your Materials and Tools
- Measuring Tape: Used to measure the dimensions of the door frame accurately.
- Miter Saw: Essential for making precise angled cuts on the trim pieces.
- Nail Gun: Speeds up the process of attaching trim pieces securely.
- Level: Ensures that the trim is installed straight and even.
- Wood Glue: Provides additional bonding strength between trim pieces.
- Caulk Gun: Used to apply caulk for sealing gaps and joints.
- Sandpaper: Smooths out rough edges and surfaces of the trim.
- Primer and Paint: Prepares and finishes the trim for a polished look.
- Trim Boards: The main material for the door trim, typically made of wood.
- Wood Filler: Fills in nail holes and imperfections in the wood.
- Safety Glasses: Protects eyes from dust and debris during cutting and sanding.
- Drop Cloth: Keeps the work area clean and protects floors from paint spills.
Skill Level and Time Commitment
Skill Level: Intermediate
Time Required: 4-6 hours
- Measure and Cut: 1 hour
- Sand and Prime: 1 hour
- Install Trim: 1-2 hours
- Caulk and Paint: 1-2 hours
Follow These Steps
Gather Materials and Tools
- Wood trim pieces (casing, header, apron)
- Measuring tape
- Miter saw
- Nail gun or hammer and nails
- Wood glue
- Level
- Sandpaper
- Paint or stain
Measure the Door Frame
- Measure the height and width of the door frame.
- Add extra length for the header and apron pieces.
Cut the Trim Pieces
- Cut two vertical casing pieces to the height of the door frame.
- Cut the header piece to the width of the door frame plus the width of both casing pieces.
- Cut the apron piece to match the width of the header.
Sand the Edges
- Sand all edges of the trim pieces to smooth out any rough spots.
Attach the Vertical Casings
- Apply wood glue to the back of one casing piece.
- Position it along one side of the door frame.
- Use a level to ensure it’s straight.
- Secure it with nails.
- Repeat for the other side.
Install the Header
- Apply wood glue to the back of the header piece.
- Place it on top of the vertical casings.
- Ensure it’s level.
- Nail it into place.
Attach the Apron
- Apply wood glue to the back of the apron piece.
- Position it below the header, aligning it with the outer edges of the vertical casings.
- Secure it with nails.
Fill Nail Holes and Gaps
- Use wood filler to fill any nail holes or gaps.
- Let it dry.
Sand and Paint/Stain
- Sand the filled areas until smooth.
- Paint or stain the trim to match your decor.
Final Touches
- Inspect the trim for any imperfections.
- Touch up paint or stain as needed.
Helpful Tips and Tricks
Measure twice, cut once. This old saying is crucial. Double-check measurements to avoid wasting materials.
Use a miter saw for precise cuts. It ensures clean, accurate angles.
Pre-paint or stain the trim before installation. This saves time and avoids messes on walls.
Use a level to ensure everything is straight. Crooked trim looks unprofessional.
Fill gaps with caulk. This gives a seamless look and hides imperfections.
Sand edges lightly before painting. Smooth edges absorb paint better.
Common mistakes to avoid:
- Skipping primer. Always prime wood to prevent paint from peeling.
- Incorrect measurements. Measure door frame width and height accurately.
- Using nails only. Combine nails with wood glue for stronger joints.
- Ignoring wall texture. Ensure walls are smooth where trim will be attached.
Alternatives for materials or methods:
- MDF instead of wood. Medium-density fiberboard is cheaper and easier to work with.
- Liquid nails instead of wood glue**. Provides a strong bond and is easier to apply.
- Pre-made trim kits. These save time and ensure all pieces fit together perfectly.
- Paintable caulk. Use this for filling gaps; it blends well with painted surfaces.
Estimating the Cost
Wood: You'll need 1x4 boards for the sides and 1x6 boards for the top. Expect to spend around $50-$70 for quality wood.
Nails: A box of finishing nails costs about $5-$10.
Wood Glue: A bottle of wood glue runs about $5.
Caulk: A tube of paintable caulk costs around $3-$5.
Paint or Stain: Depending on your choice, a can of paint or stain will cost $15-$30.
Sandpaper: A pack of sandpaper costs around $5.
Tools: If you don't have them, you'll need a miter saw (around $100-$200), a hammer (about $10), a caulking gun (around $5), and a paintbrush (about $5).
Budget-friendly alternatives: Instead of a miter saw, use a miter box and handsaw for about $20. For paint, consider sample sizes which can cost as little as $5.
Different Ways to Customize
Materials: Instead of traditional wood, consider using MDF (Medium-Density Fiberboard) for a smoother finish or PVC trim for moisture resistance. Reclaimed wood can add a rustic touch.
Colors: Paint the trim in bold colors like navy blue or forest green for a modern twist. For a classic look, use white or off-white. Staining the wood in rich tones like walnut or cherry can highlight the wood grain.
Styles: Add decorative molding at the top for an elegant look. Use beveled edges instead of straight cuts for a softer appearance. Incorporate wainscoting or paneling below the trim for added texture.
Patterns: Create a geometric pattern with the trim pieces for a contemporary feel. Use contrasting colors for different sections of the trim to make it stand out.
Hardware: Add decorative brackets or corbels at the corners for extra detail. Use antique-style nails or screws for a vintage look.
Finishes: Apply a high-gloss finish for a sleek, modern look. A matte finish can give a more understated, elegant appearance. Use distressing techniques to give the trim an aged, weathered look.
Combinations: Mix and match different materials and finishes for a unique, personalized look. Combine painted sections with stained wood for a two-tone effect.
Eco-Friendly Tips
Reclaimed wood makes an excellent choice for Craftsman door trim. It adds character and reduces waste. Look for old barn wood or salvaged lumber from construction sites.
Bamboo is another sustainable option. It grows quickly and is very strong. Bamboo trim can give a unique look while being eco-friendly.
Use low-VOC (volatile organic compounds) paints and finishes. These are better for indoor air quality and the environment.
Recycled metal hardware can add a nice touch. Look for handles or hinges made from recycled materials.
Natural adhesives like plant-based glues are less harmful than synthetic ones. They work well for attaching trim pieces.
Energy-efficient tools help reduce electricity use. Hand tools or battery-powered tools with rechargeable batteries are good choices.
Insulation behind the trim can improve energy efficiency. Use eco-friendly insulation materials like recycled denim or cellulose.
Local sourcing reduces the carbon footprint. Find materials from local suppliers to cut down on transportation emissions.
Your Trim Project Awaits
Building Craftsman door trim isn't just about adding style to your home; it's about creating something with your own hands. You've learned the steps, gathered the materials, and now it's time to get to work. Measure twice, cut once, and don't rush the process. Mistakes happen, but each one is a chance to learn. Sanding and painting might seem tedious, but they make all the difference in the final look. Remember, the devil's in the details. Take pride in your work, and soon you'll have a beautiful, custom trim that adds character to any room. So grab your tools, roll up your sleeves, and dive into your next DIY adventure. Your home will thank you, and you'll have the satisfaction of knowing you did it yourself. Happy building!
What materials do I need to build Craftsman door trim?
You’ll need wood trim, measuring tape, miter saw, nails, wood glue, sandpaper, paint or stain, and a level.
How do I measure for the trim?
Measure the height and width of the door frame. Add a few inches to each side for the overhang. Write down these measurements.
What type of wood should I use?
Pine or poplar are great choices. They’re easy to work with and take paint or stain well.
How do I cut the wood pieces?
Use a miter saw to cut the wood at a 45-degree angle for the corners. Make sure your cuts are precise for a snug fit.
How do I attach the trim to the wall?
Apply wood glue to the back of each piece, then use nails to secure it. A nail gun can make this step quicker.
Should I paint or stain the trim before or after installation?
It’s easier to paint or stain the trim before installing it. This way, you avoid getting paint on the wall.
How do I ensure the trim is level?
Use a level to check each piece as you install it. Adjust as needed before the glue dries.
Can I install Craftsman door trim by myself?
Absolutely! With the right tools and a bit of patience, you can tackle this project solo.