
Home>Home & Furniture>Doors & Windows>How to Build Cedar Window Boxes
Doors & Windows
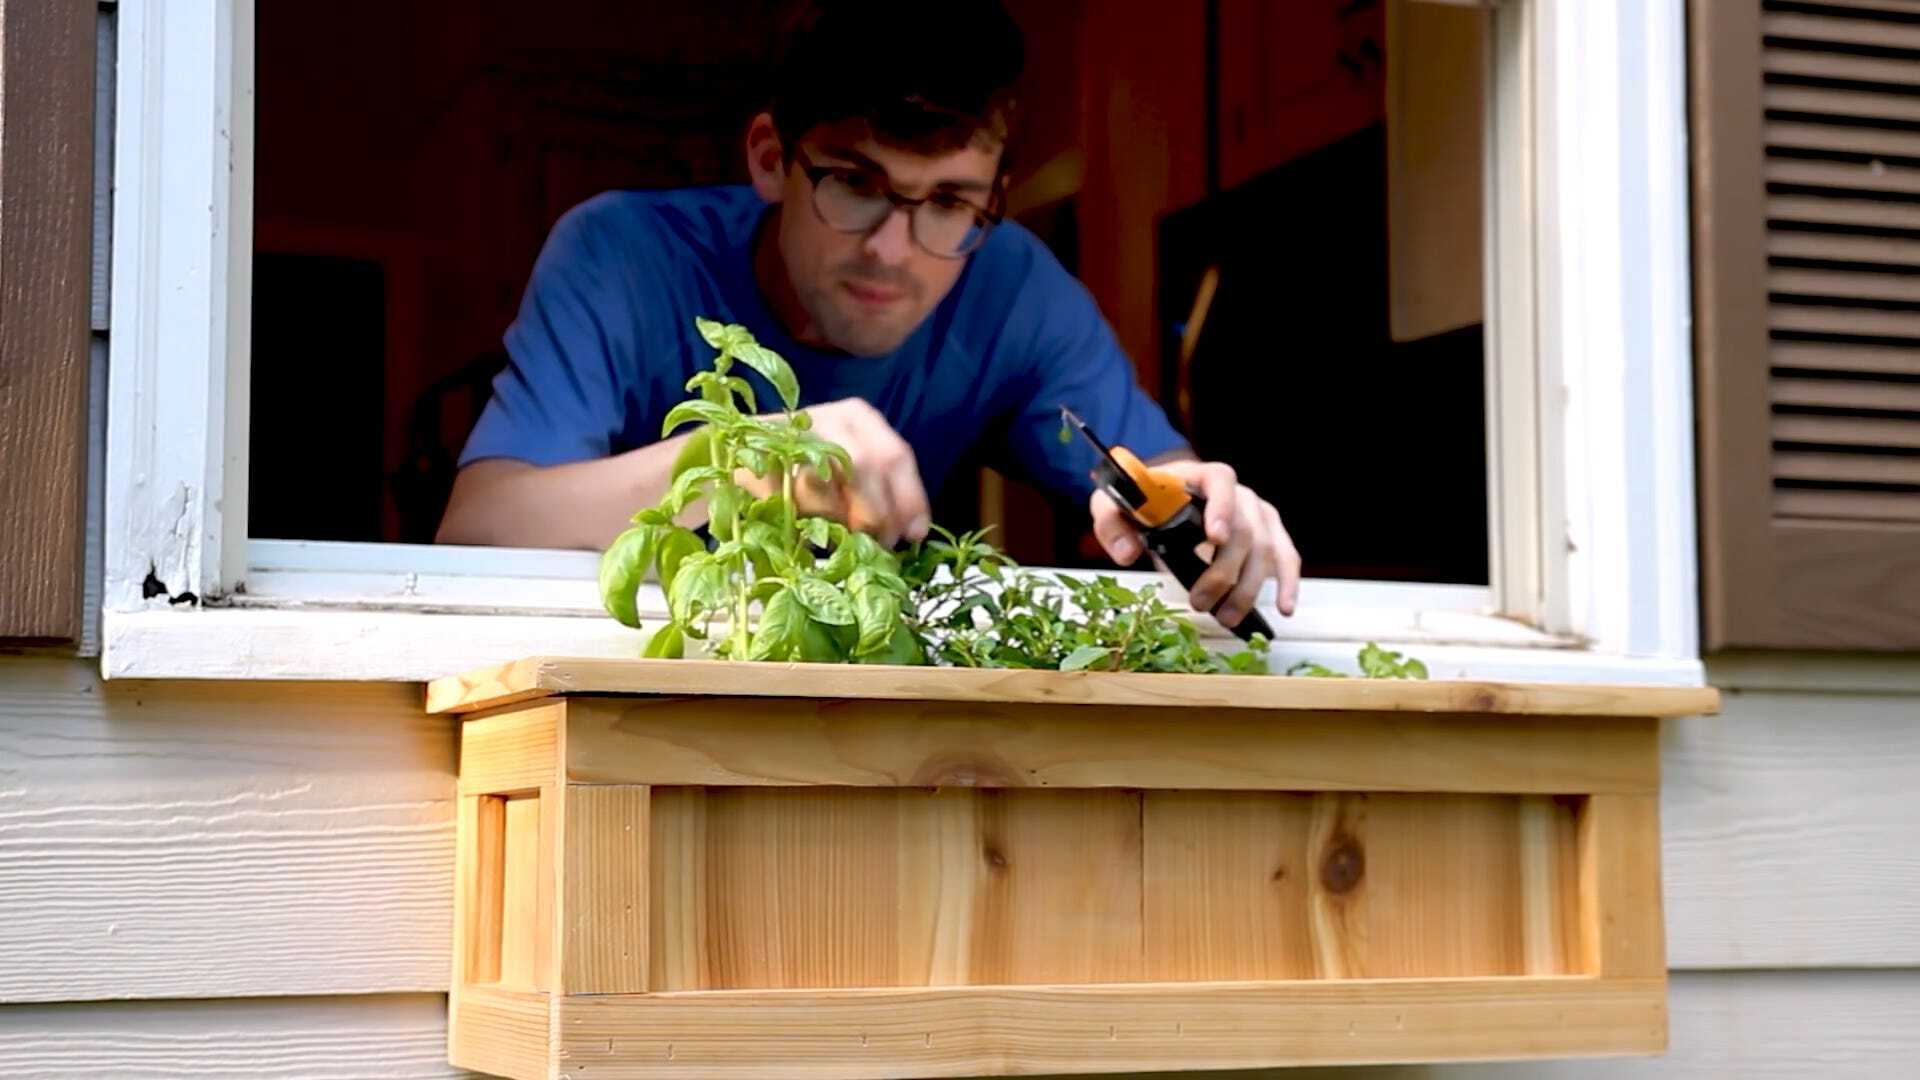
How to Build Cedar Window Boxes
Published: August 11, 2024
Learn how to build beautiful cedar window boxes with our step-by-step guide. Perfect for adding charm to your home, these DIY boxes are both functional and stylish.
(Many of the links in this article redirect to a specific reviewed product. Your purchase of these products through affiliate links helps to generate commission for Twigandthistle.com, at no extra cost. Learn more)
Thinking about giving your windows a charming touch? Cedar window boxes are a fantastic way to add a splash of color and life to your home's exterior. Not only are they practical for growing flowers, herbs, and small plants, but cedar wood is also naturally resistant to rot and insects. This makes it a durable choice for outdoor projects. Building your own cedar window boxes can be a fun and rewarding project, even for beginners. With some basic tools and a bit of time, you can create beautiful, custom boxes that will enhance your home's curb appeal.
Getting Ready for the Project
Gather Materials: Get cedar wood, screws, a saw, a drill, measuring tape, sandpaper, wood glue, and a level.
Measure Windows: Measure the width of your windows to determine the size of the boxes.
Cut Wood: Use the saw to cut the cedar wood into the required lengths for the front, back, sides, and bottom of the boxes.
Sand Edges: Sand all edges of the wood pieces to avoid splinters.
Pre-Drill Holes: Pre-drill holes in the wood pieces where screws will go to prevent splitting.
Assemble Box: Use wood glue and screws to assemble the box, ensuring all corners are square with the level.
Seal Wood: Apply a wood sealer to protect the cedar from weather damage.
Install Brackets: Attach mounting brackets to the wall under the windows, making sure they are level.
Mount Boxes: Secure the cedar boxes onto the brackets.
Safety Tips: Wear safety goggles when cutting wood, use gloves to handle wood, and ensure the workspace is well-ventilated.
What You Need to Build Cedar Window Boxes
Cedar Boards: Cedar is durable and resistant to rot, making it perfect for outdoor use. You'll need enough to create the sides, bottom, and ends of the window box.
Measuring Tape: Essential for measuring the dimensions of your window box accurately.
Saw: A circular saw or hand saw will help cut the cedar boards to the required sizes.
Drill: Necessary for making pilot holes and driving screws.
Screws: Use weather-resistant screws to hold the box together securely.
Wood Glue: Adds extra strength to the joints of your window box.
Sandpaper: Smooths out rough edges and surfaces of the cedar boards.
Clamps: Hold the pieces together while the glue dries.
Exterior Paint or Sealant: Protects the wood from weather damage.
Paintbrush: For applying paint or sealant evenly.
Safety Gear: Safety glasses and gloves to protect yourself while working.
Pencil: Marking measurements and cutting lines on the wood.
Level: Ensures your window box is straight and even.
Drill Bits: Different sizes for making pilot holes and drainage holes.
Screwdriver: Tightening screws if you don't use a drill for this purpose.
L-Brackets: Optional but useful for extra support at the corners.
Potting Soil: Fills the window box for planting.
Plants or Flowers: The final touch to make your window box beautiful.
Required Skills and Time Commitment
Skill Level: Intermediate
Time Required: 4-6 hours
Steps:
- Measure and Cut Wood: 1 hour
- Assemble Box: 1.5 hours
- Sand and Finish: 1 hour
- Install Drainage: 30 minutes
- Mount Boxes: 1-2 hours
Instructions for Building Cedar Window Boxes
Gather Materials and Tools
- Cedar boards (1x6 and 1x8)
- Screws
- Wood glue
- Drill
- Saw
- Measuring tape
- Sandpaper
- Paint or stain (optional)
Measure and Cut Wood
- Measure window width.
- Cut two 1x6 boards to match window width (front and back).
- Cut two 1x6 boards for the sides (6-8 inches deep).
- Cut one 1x8 board for the bottom (same length as front and back).
Assemble the Box
- Apply wood glue to the edges of the side boards.
- Attach side boards to the front board using screws.
- Attach back board to the sides using screws.
- Place bottom board inside the box frame.
- Secure bottom board with screws.
Sand and Finish
- Sand all edges and surfaces until smooth.
- Paint or stain if desired.
Drill Drainage Holes
- Drill several small holes in the bottom for drainage.
Install Brackets
- Attach metal brackets to the window frame or wall.
- Ensure brackets are level and secure.
Mount the Box
- Place the cedar box on the brackets.
- Secure the box to the brackets with screws.
Add Soil and Plants
- Fill the box with potting soil.
- Plant flowers or herbs.
Helpful Tips and Tricks
Measure twice, cut once. Always double-check measurements before cutting your cedar wood. This prevents waste and ensures pieces fit together perfectly.
Use galvanized screws. These resist rust, which is crucial for outdoor projects like window boxes. Rust can weaken the structure over time.
Pre-drill holes. This helps prevent the wood from splitting when you insert screws. Cedar can be prone to splitting, especially near edges.
Seal the wood. Apply a waterproof sealant to protect the cedar from moisture. This extends the life of your window boxes and keeps them looking fresh.
Add drainage holes. Drill several small holes in the bottom of the box to allow excess water to escape. This prevents root rot in your plants.
Line with landscape fabric. Place fabric inside the box before adding soil. This keeps soil from washing out through the drainage holes but still allows water to drain.
Use a level. Ensure your window boxes are level when mounting them. This prevents uneven water distribution, which can harm plants.
Common mistakes to avoid:
Skipping the sealant. Unsealed cedar will weather quickly, losing its color and durability.
Incorrect measurements. Misjudging dimensions can lead to gaps or misaligned pieces, weakening the structure.
Forgetting drainage. Without proper drainage, plants can become waterlogged and unhealthy.
Alternatives for materials or methods:
Composite wood. If cedar is too pricey, composite wood offers a durable, weather-resistant alternative.
Plastic liners. Instead of landscape fabric, use plastic liners with drainage holes. These can be easier to clean and replace.
Metal brackets. For mounting, metal brackets provide strong support and can be decorative.
Estimating the Cost
Cedar boards: $30-$50 (depends on size and quantity)
Wood screws: $5-$10
Wood glue: $5-$10
Sandpaper: $5
Exterior paint or sealant: $10-$20
Drill: $30-$50 (if you don't already own one)
Saw: $20-$40 (if you don't already own one)
Paintbrushes: $5-$10
Measuring tape: $5-$10
Total cost: $115-$205
Budget-friendly alternatives:
Pine boards instead of cedar: $15-$25
Basic hand saw instead of power saw: $10-$15
Total cost with alternatives: $85-$150
Different Ways to Customize Your Window Boxes
Alternative Materials: Instead of cedar, try pine for a more affordable option or redwood for added durability. Reclaimed wood can give a rustic look, while composite materials offer low maintenance.
Colors: Paint the boxes in bright colors like blue or yellow for a cheerful vibe. Use stains to enhance the natural wood grain, or go for a whitewash effect for a vintage feel.
Styles: Add decorative trim or molding for an elegant touch. Incorporate metal brackets or iron accents for a more industrial look. Use stencils to create patterns or designs on the wood.
Shapes: Instead of traditional rectangular boxes, consider triangular or hexagonal shapes. Create tiered boxes for a cascading effect or corner boxes to fit snugly around window edges.
Additional Features: Install drainage holes to prevent waterlogging. Add liners to protect the wood from moisture. Attach hooks for hanging small garden tools or built-in trellises for climbing plants.
Eco-Friendly Building Tips
Cedar is a great choice for window boxes because it’s naturally resistant to rot and insects. To make your project more eco-friendly, consider using reclaimed cedar from old fences or barns. This not only saves trees but also gives your boxes a rustic look.
For the fasteners, use stainless steel screws or nails. They last longer and won’t rust, reducing the need for replacements. If you need to seal the wood, choose a non-toxic, water-based sealant. This keeps harmful chemicals out of your garden and the environment.
When cutting the wood, try to minimize waste by planning your cuts carefully. Use any leftover pieces for smaller projects or compost them if they’re untreated.
For the soil, use organic potting mix. It’s better for your plants and the planet. If you need to line the boxes, use burlap or recycled plastic instead of new plastic liners.
Finally, consider adding a drip irrigation system. It conserves water by delivering it directly to the plant roots, reducing evaporation and runoff.
Your Cedar Window Boxes Are Ready
You've got your cedar window boxes built and ready to go. Now, just fill them with soil and your favorite plants. Remember, cedar is naturally resistant to rot and insects, so these boxes will last a long time. Regularly check for any wear and give them a fresh coat of sealant every couple of years to keep them looking their best. Enjoy the beauty and charm these boxes bring to your home. They’re not just functional; they add a touch of nature and elegance to your windows. Plus, you did it yourself, which makes them even more special. Happy planting!
What materials do I need to build cedar window boxes?
You’ll need cedar boards, screws, wood glue, a saw, a drill, sandpaper, and paint or stain if you want to finish the wood.
How do I measure for my window boxes?
Measure the width of your window and decide how long you want the box to be. A good rule of thumb is to make it slightly shorter than the window width.
How do I cut the cedar boards?
Use a saw to cut the cedar boards to your desired length. You’ll need four pieces for the sides and two pieces for the bottom and back.
How do I assemble the window box?
Apply wood glue to the edges of the boards, then screw them together. Start with the sides, then attach the bottom and back.
Do I need to drill drainage holes?
Yes, drill several small holes in the bottom of the box to allow water to drain out. This prevents root rot in your plants.
How do I finish the cedar window box?
Sand the box to smooth out any rough edges. You can paint or stain the wood to protect it from the elements and match your home’s exterior.
How do I attach the window box to my house?
Use brackets or screws to secure the box under your window. Make sure it’s level and sturdy to support the weight of the soil and plants.