
Home>Home & Furniture>Doors & Windows>How to Build a Sliding Bookcase Door
Doors & Windows
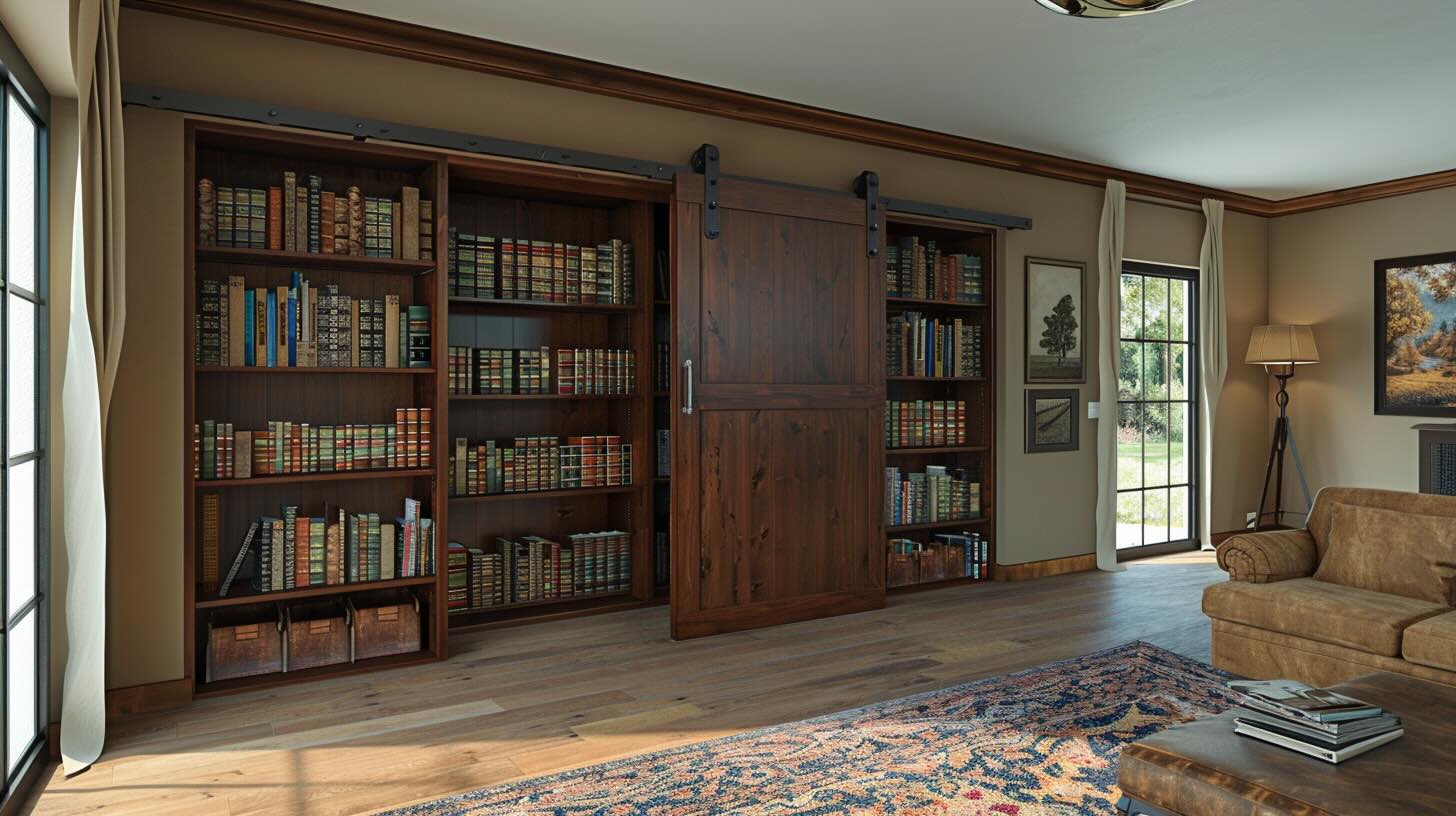
How to Build a Sliding Bookcase Door
Published: September 21, 2024
Learn how to build a sliding bookcase door with our step-by-step guide. Discover materials, tools, and tips for creating a functional and stylish hidden doorway.
(Many of the links in this article redirect to a specific reviewed product. Your purchase of these products through affiliate links helps to generate commission for Twigandthistle.com, at no extra cost. Learn more)
A sliding bookcase door adds a touch of mystery and functionality to any room. Whether hiding a closet, pantry, or secret space, this project combines creativity and practicality. Building one might seem challenging, but with a bit of patience and the right tools, anyone can do it. This guide will walk through the essential steps, from gathering materials to the final touches. Perfect for experienced DIY enthusiasts or beginners looking for a fun project, this sliding bookcase not only maximizes space but also adds a unique feature to your home. Let's get started on creating your hidden masterpiece!
Getting Ready for Your Project
Measure the Space: Use a tape measure to get the height, width, and depth of the doorway. Write down these measurements.
Gather Materials: Collect wood, screws, brackets, sliding door hardware, and paint or stain. Make sure everything matches your measurements.
Safety Gear: Wear safety goggles, gloves, and a dust mask. Protect your eyes, hands, and lungs from dust and debris.
Clear the Area: Move furniture and other items away from the workspace. Ensure you have enough room to work comfortably.
Prepare Tools: Have a drill, screwdriver, saw, level, and sander ready. Keep them within reach to avoid interruptions.
Cut the Wood: Use a saw to cut the wood to the correct sizes for the bookcase frame and shelves. Sand the edges to smooth them out.
Assemble the Frame: Use screws and brackets to put together the bookcase frame. Make sure it’s sturdy and level.
Install Sliding Hardware: Attach the sliding door hardware to the top of the bookcase and the doorway. Follow the instructions that come with the hardware.
Test the Fit: Slide the bookcase door into place to ensure it moves smoothly. Make adjustments if necessary.
Paint or Stain: Apply paint or stain to the bookcase. Let it dry completely before using it.
Final Check: Double-check all screws and brackets. Make sure everything is secure and the bookcase slides easily.
Materials and Tools Needed
Materials:
- Plywood Sheets: Used for the main structure of the bookcase.
- Wood Screws: Secure the plywood pieces together.
- Wood Glue: Provides additional bonding strength.
- Sliding Door Hardware Kit: Includes tracks, rollers, and brackets for the sliding mechanism.
- Paint or Stain: Finishes the bookcase to match your decor.
- Sandpaper: Smooths the wood surfaces.
- Shelf Brackets: Supports the shelves inside the bookcase.
- Handles or Pulls: Makes it easier to slide the door.
Tools:
- Tape Measure: Ensures accurate measurements.
- Circular Saw: Cuts the plywood sheets to size.
- Drill: Makes holes for screws and hardware.
- Screwdriver: Tightens screws.
- Level: Ensures the bookcase and tracks are straight.
- Clamps: Holds pieces together while the glue dries.
- Paintbrush or Roller: Applies paint or stain.
- Stud Finder: Locates wall studs for secure mounting.
Plywood sheets form the bookcase's body. Wood screws and glue hold everything together. Sliding door hardware lets the bookcase move smoothly. Paint or stain gives it a finished look. Sandpaper smooths rough edges. Shelf brackets hold items inside. Handles make sliding easy.
Tape measures ensure everything fits. Circular saws cut wood. Drills make holes. Screwdrivers tighten screws. Levels keep things straight. Clamps hold parts while glue dries. Paintbrushes or rollers apply finishes. Stud finders locate wall studs for secure mounting.
Skill Level and Time Required
Skill Level: Advanced
Time Required: 2-3 days
- Planning and Measuring: 2-3 hours
- Cutting Wood and Assembling Bookcase: 4-6 hours
- Installing Sliding Hardware: 3-4 hours
- Painting or Staining: 4-6 hours (including drying time)
- Final Adjustments and Installation: 2-3 hours
Step-by-Step Instructions
Gather Materials and Tools
- Plywood sheets
- Wood screws
- Wood glue
- Sliding door hardware kit
- Paint or stain
- Sandpaper
- Drill
- Saw
- Measuring tape
- Level
Measure the Doorway
- Measure the height and width of the doorway where the bookcase door will go.
- Add a few inches to the width to ensure the bookcase covers the doorway completely.
Cut the Plywood
- Cut two pieces of plywood to the height and width measured.
- These will be the front and back panels of the bookcase.
Build the Frame
- Cut four pieces of wood for the top, bottom, and sides of the frame.
- Attach these pieces to the back panel using wood screws and glue.
Add Shelves
- Decide the number of shelves you want.
- Cut shelf pieces from plywood.
- Attach shelves to the frame using wood screws and glue.
Attach the Front Panel
- Secure the front panel to the frame and shelves with wood screws and glue.
- Ensure all edges are flush.
Sand and Paint
- Sand the entire bookcase to smooth out rough edges.
- Paint or stain the bookcase as desired.
- Let it dry completely.
Install Sliding Hardware
- Follow the instructions in the sliding door hardware kit.
- Attach the sliding track above the doorway.
- Secure the rollers to the top of the bookcase.
Mount the Bookcase Door
- Lift the bookcase and place the rollers onto the sliding track.
- Ensure the bookcase slides smoothly.
Final Adjustments
- Check that the bookcase door is level.
- Make any necessary adjustments to the hardware.
- Test the sliding mechanism multiple times to ensure it works properly.
Tips and Tricks for Success
Measure twice, cut once. Accurate measurements prevent gaps or misalignment. Use a level to ensure the bookcase and track are straight. Pre-drill holes for screws to avoid splitting wood. Lubricate the track with silicone spray for smooth sliding.
Common mistakes include skipping the stud finder—always mount the track to wall studs for stability. Avoid using cheap materials; they may warp or break. Overloading the bookcase can cause it to sag or derail.
For materials, consider plywood instead of solid wood to reduce weight. Use pocket hole screws for stronger joints. Instead of a traditional track, try barn door hardware for a rustic look.
Estimating the Cost
Materials:
- Plywood: $50-$100 (depends on quality and thickness)
- Wood Screws: $5-$10
- Wood Glue: $5-$10
- Paint or Stain: $15-$30
- Sandpaper: $5
- Sliding Door Hardware Kit: $50-$100
- Handles/Pulls: $10-$20
- Bookshelf Brackets: $10-$20
Tools:
- Circular Saw: $50-$100 (or borrow/rent)
- Drill: $30-$60 (or borrow/rent)
- Screwdriver: $5-$10
- Paintbrushes/Rollers: $5-$10
- Measuring Tape: $5-$10
- Level: $10-$20
Total Estimated Cost: $255-$500
Budget-Friendly Alternatives:
- Use reclaimed wood or MDF instead of high-quality plywood: $20-$50
- Borrow or rent tools from friends or a local tool library: Free or minimal cost
- Opt for basic handles/pulls: $5-$10
- Use leftover paint from other projects: Free
Adjusted Total Cost: $150-$300
Creative Variations and Customizations
Materials: Instead of traditional wood, consider using reclaimed wood for a rustic look or plywood for a budget-friendly option. Metal or glass panels can add a modern touch.
Colors: Paint the bookcase door in bold colors like navy blue or forest green for a statement piece. For a more subtle look, use neutral tones such as white, beige, or gray. Staining the wood can also highlight its natural grain.
Styles: Add molding or trim for a classic appearance. For a minimalist style, keep the design simple with clean lines. Incorporate decorative hardware like vintage handles or sleek, modern pulls.
Shelving: Customize the shelves by varying their heights to accommodate different book sizes or decorative items. Add adjustable shelves for flexibility.
Lighting: Install LED strip lights or recessed lighting within the bookcase to illuminate your books and create ambiance.
Hidden Features: Incorporate a hidden compartment or safe behind the bookcase for added security. Use a magnetic lock or remote control to open the door for a high-tech twist.
Sliding Mechanism: Opt for barn door hardware for a rustic look or concealed tracks for a seamless appearance. Soft-close mechanisms can prevent the door from slamming.
Decorative Elements: Add mirrors to the back of the shelves to create depth. Use wallpaper or fabric panels on the back of the bookcase for a pop of color or pattern.
Integration: Blend the bookcase door with surrounding decor by matching it to existing furniture or wall colors. Use built-in lighting to highlight the bookcase and make it a focal point.
Eco-Friendly Tips
Reclaimed wood can be a great choice for building the frame and shelves. It adds character and reduces waste. Look for old barn wood, pallets, or even wood from old furniture.
Eco-friendly paint or stain is another good option. Choose products with low or no VOCs (volatile organic compounds) to keep indoor air quality high.
Use recycled metal for the sliding mechanism. Old barn door hardware or repurposed metal pieces can work well and add a rustic touch.
Bamboo plywood is a sustainable alternative to traditional plywood. Bamboo grows quickly and is very strong, making it perfect for shelves.
For the back panel, consider using recycled cardboard or corkboard. Both materials are eco-friendly and can be easily cut to size.
Natural fiber ropes or cords can be used for handles or decorative elements. Hemp or jute are strong and biodegradable.
When assembling, use water-based adhesives instead of traditional glues. They are less harmful to the environment and still provide strong bonds.
Finally, LED lighting can be added to the bookcase. LEDs are energy-efficient and have a long lifespan, making them a sustainable choice.
Your Secret Passage Awaits
Building a sliding bookcase door isn't just about adding a cool feature to your home. It's about creating a hidden space that adds both functionality and a touch of mystery. With some basic tools, a bit of patience, and a can-do attitude, you can transform any room. Remember to measure twice, cut once, and always check for level. Don't rush the process; precision is key. Once installed, you'll have a unique feature that not only impresses guests but also provides a practical solution for extra storage or a hidden room. So grab your tools, roll up your sleeves, and get started. Your secret passage is just a few steps away.
How much space do I need for a sliding bookcase door?
You’ll need enough wall space to accommodate the width of the bookcase plus some extra room for the sliding mechanism. Measure the width of the bookcase and add about 6-12 inches.
What materials will I need?
You’ll need wood for the bookcase, sliding door hardware, screws, a drill, saw, measuring tape, level, and paint or stain if you want to finish the wood.
How do I install the sliding mechanism?
First, attach the sliding track to the top of the doorway. Then, secure the rollers to the top of the bookcase. Finally, lift the bookcase and place the rollers onto the track.
Can I use any bookcase for this project?
Not really. The bookcase needs to be sturdy enough to support its own weight and the weight of the books. A flimsy bookcase might not hold up well.
How do I make sure the bookcase slides smoothly?
Make sure the track is level and free of debris. Lubricate the rollers if needed. Adjust the rollers to ensure they’re aligned properly with the track.
Is it possible to lock the sliding bookcase door?
Yes, you can install a locking mechanism like a sliding door lock or a hidden latch to keep the bookcase secure when closed.
How long will this project take?
Depending on your skill level and tools, it could take a weekend. Plan for a day to build the bookcase and another day to install the sliding mechanism.