
Home>Home & Furniture>Doors & Windows>How to Build a Barn Door Entertainment Center
Doors & Windows
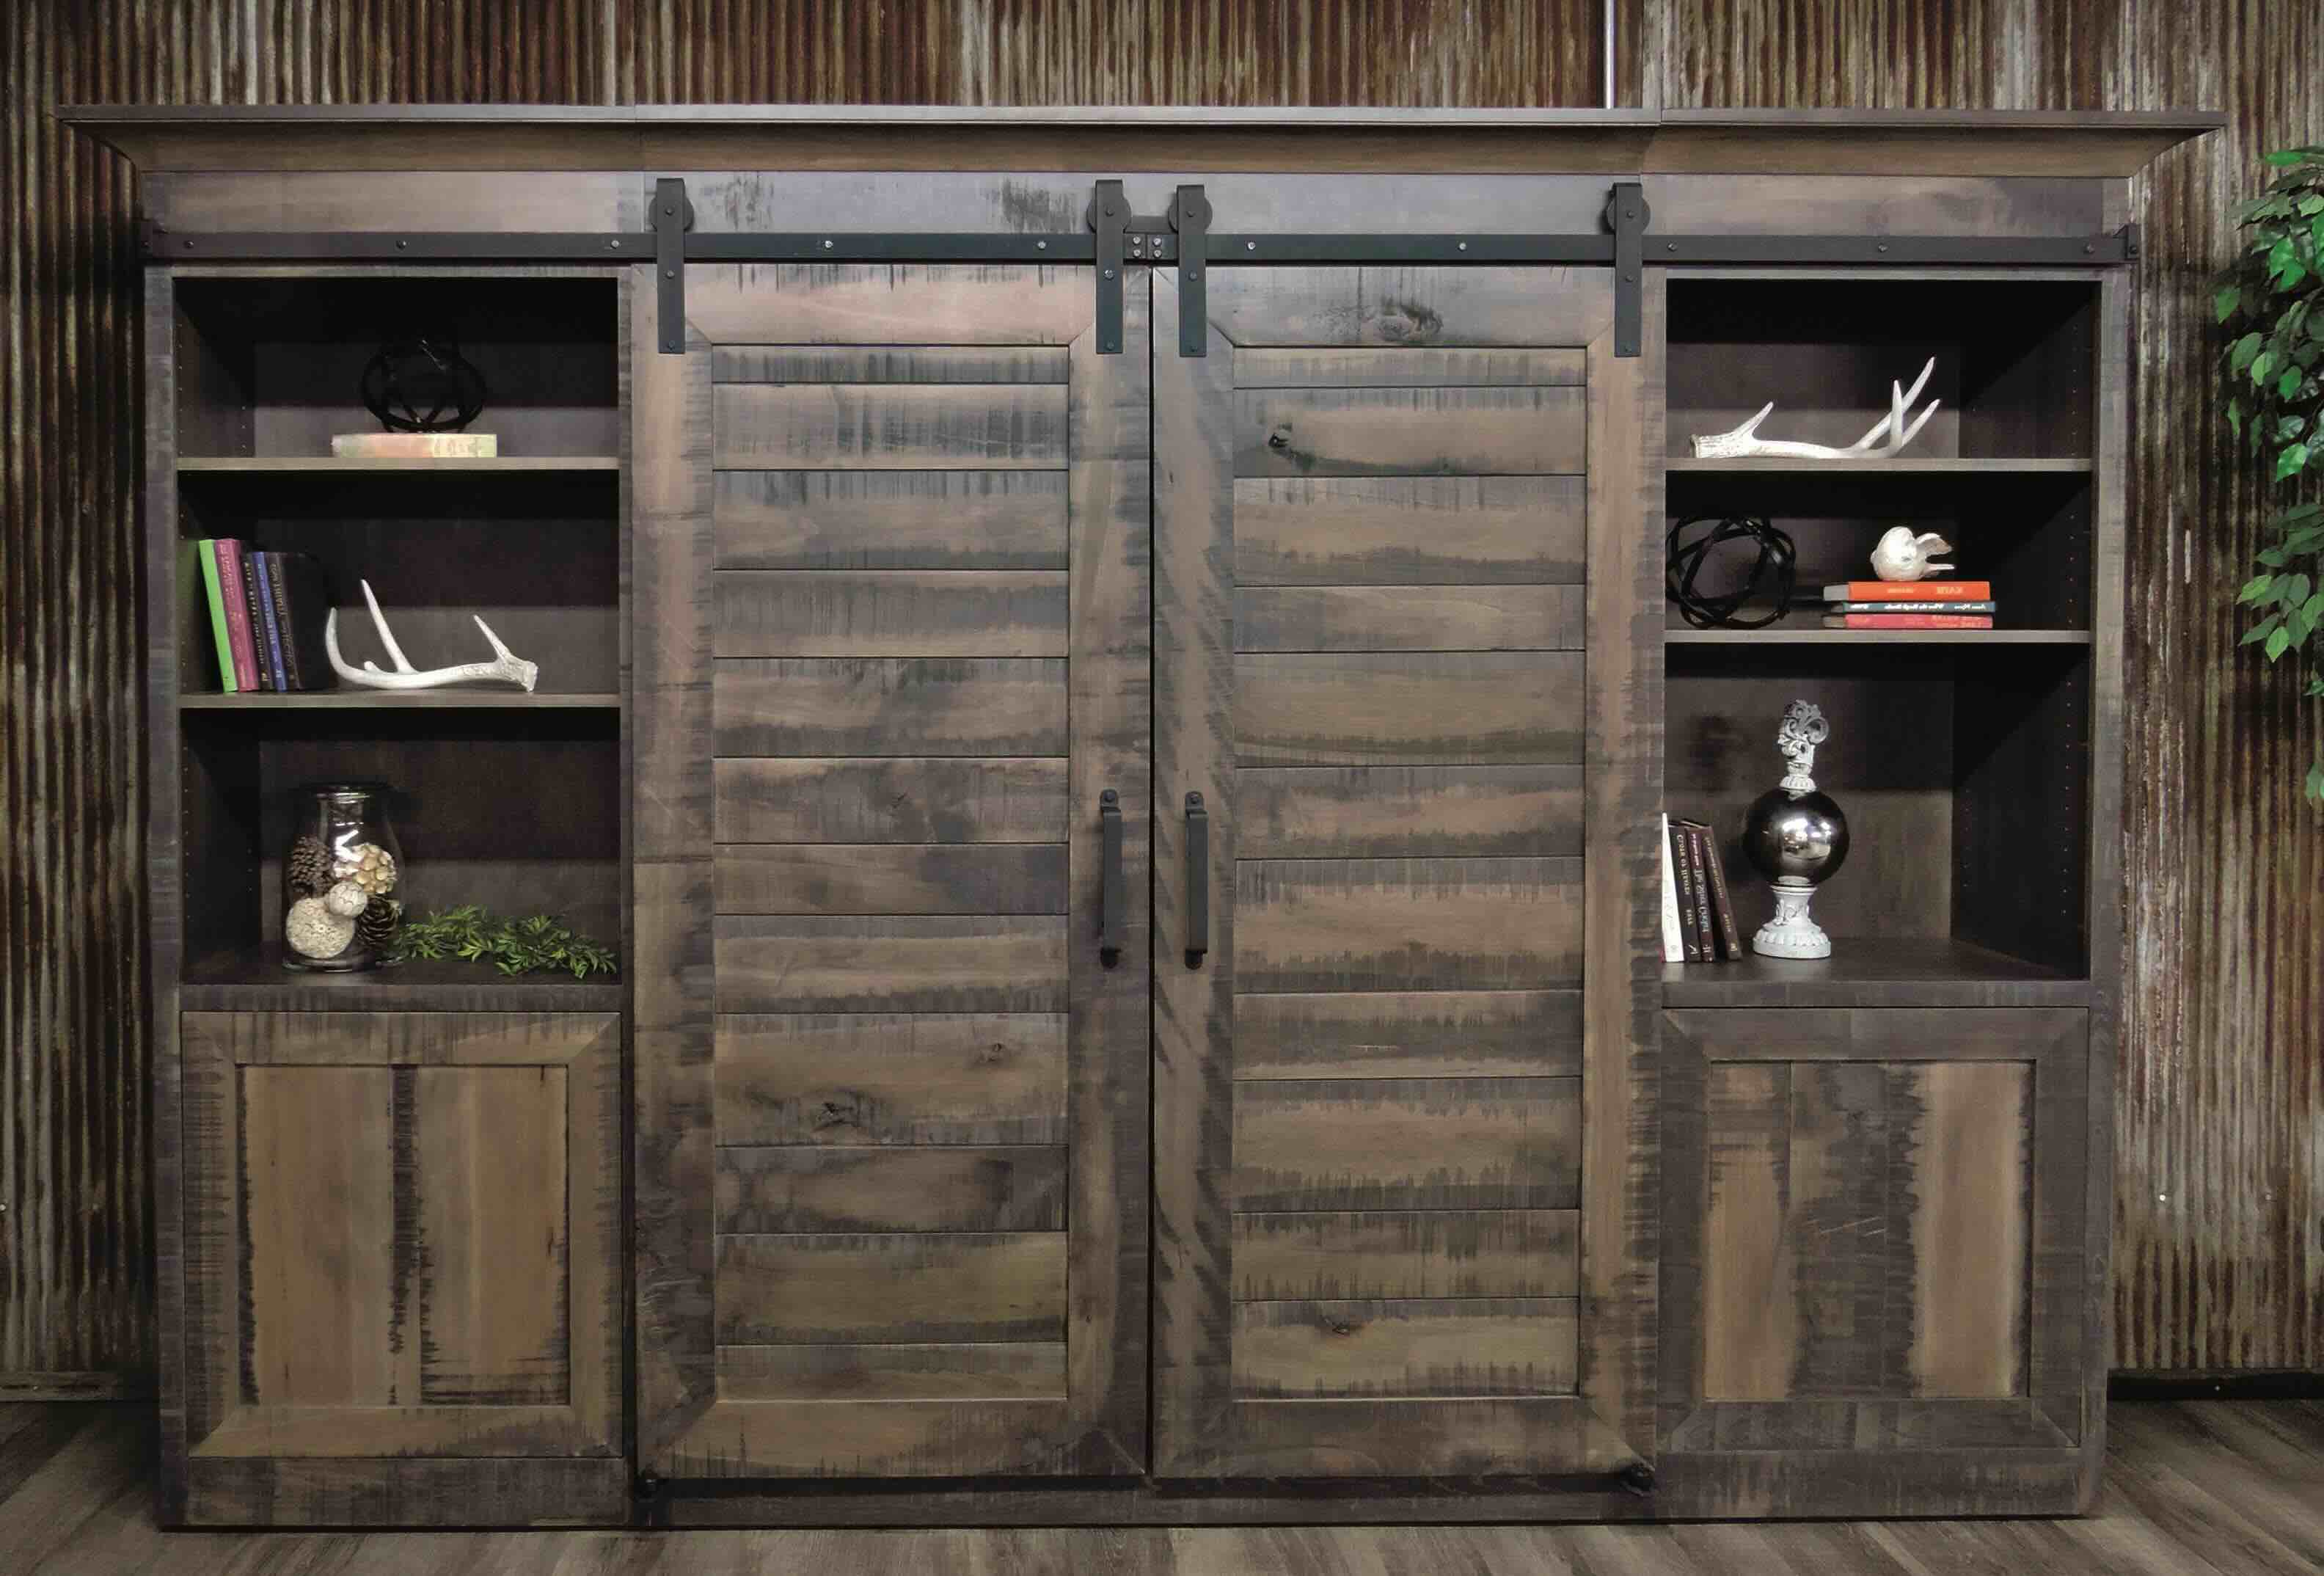
How to Build a Barn Door Entertainment Center
Published: September 6, 2024
Learn how to build a stylish barn door entertainment center with our step-by-step guide. Perfect for adding rustic charm and functionality to your living space.
(Many of the links in this article redirect to a specific reviewed product. Your purchase of these products through affiliate links helps to generate commission for Twigandthistle.com, at no extra cost. Learn more)
Building a barn door entertainment center can add a rustic charm to your living space. This DIY project involves some basic woodworking skills but offers a great way to personalize your home. You'll create sliding doors that can hide your TV and media equipment when not in use. This guide will walk you through the materials needed, step-by-step instructions, and tips for a smooth building process. Whether you’re a seasoned DIY enthusiast or new to woodworking, building a barn door entertainment center is a rewarding project that combines functionality with style. Ready to get started? Let’s dive in!
Getting Ready for Your Project
Gather Materials: Collect wood, screws, hinges, handles, paint, and any other necessary supplies. Make sure everything is within reach.
Measure and Cut: Measure the space where the entertainment center will go. Cut wood pieces to the required dimensions. Double-check measurements to avoid mistakes.
Set Up Workspace: Clear a large, flat area. Lay down a tarp or old sheet to protect the floor. Ensure good lighting and ventilation.
Safety Gear: Wear safety goggles, gloves, and a dust mask. Keep a first aid kit nearby in case of minor injuries.
Organize Tools: Arrange tools like a saw, drill, screwdriver, and measuring tape in an easily accessible manner. Check that all tools are in working order.
Pre-drill Holes: Mark where screws will go and pre-drill holes. This helps prevent wood from splitting.
Sand Wood: Smooth out rough edges with sandpaper. This makes painting or staining easier and safer.
Paint or Stain: Apply paint or stain to wood pieces. Allow them to dry completely before assembly.
Plan Assembly: Lay out all pieces in the order they will be assembled. This helps visualize the final product and ensures nothing is missing.
Check Instructions: Review any plans or blueprints. Make sure you understand each step before starting the build.
Gathering Your Materials and Tools
- Wood Boards: Used for the frame, shelves, and doors. Choose sturdy wood like pine or oak.
- Barn Door Hardware Kit: Includes tracks, rollers, and handles for sliding doors.
- Screws and Nails: Essential for assembling the frame and attaching hardware.
- Wood Glue: Provides extra strength to joints and connections.
- Sandpaper: Smooths rough edges and surfaces before painting or staining.
- Paint or Stain: Adds color and protects the wood. Choose based on your desired finish.
- Measuring Tape: Ensures accurate measurements for cutting wood.
- Saw: Cuts wood to the required sizes. A circular saw or miter saw works best.
- Drill: Makes holes for screws and hardware. Also useful for driving screws.
- Screwdriver: Tightens screws. A power screwdriver can save time.
- Level: Ensures shelves and doors are straight and even.
- Clamps: Holds pieces together while the glue dries.
- Pencil: Marks measurements and cutting lines on wood.
- Safety Gear: Includes gloves, goggles, and a dust mask to protect yourself while working.
Required Skills and Time Commitment
Skill Level: Intermediate
Time Required: 2-3 days
Key Steps:
- Gather Materials: Wood, screws, hinges, sliding door hardware, paint or stain.
- Measure and Cut: Ensure precise measurements for a snug fit.
- Assemble Frame: Securely attach pieces using screws.
- Install Shelves: Place shelves at desired heights.
- Attach Doors: Use sliding door hardware for barn doors.
- Finish: Paint or stain for a polished look.
Detailed Instructions for Building
Gather Materials and Tools
- Wood planks (for the frame and shelves)
- Barn door hardware kit
- Screws, nails, and wood glue
- Sandpaper
- Paint or stain
- Measuring tape
- Saw
- Drill
- Screwdriver
- Level
Measure and Cut Wood
- Measure the space where the entertainment center will go.
- Cut wood planks to the desired length for the frame, shelves, and doors.
Assemble the Frame
- Lay out the wood planks for the frame.
- Attach the planks using screws and wood glue.
- Ensure the frame is square using a level.
Install Shelves
- Measure and mark where the shelves will go inside the frame.
- Attach shelf supports to the frame.
- Place shelves on supports and secure with screws.
Build Barn Doors
- Cut wood planks to size for the barn doors.
- Assemble the doors using wood glue and screws.
- Sand the doors to smooth any rough edges.
Paint or Stain
- Apply paint or stain to the frame, shelves, and doors.
- Allow to dry completely.
Attach Barn Door Hardware
- Follow the instructions in the barn door hardware kit.
- Install the track on the top of the frame.
- Attach rollers to the doors.
- Hang the doors on the track.
Final Adjustments
- Check that doors slide smoothly.
- Make any necessary adjustments to ensure everything is level and secure.
Place Entertainment Center
- Move the completed entertainment center to its designated spot.
- Secure to the wall if needed for stability.
Helpful Tips and Tricks
Measure twice, cut once. This old saying is crucial. Double-check all measurements before cutting wood. Use a level to ensure everything is straight. Crooked shelves or doors can ruin the look.
Pre-drill holes for screws. This prevents wood from splitting. Sand edges of cut wood to avoid splinters and give a smooth finish.
Choose the right wood. Pine is affordable and easy to work with. Oak is more durable but harder to cut. Stain or paint wood before assembly. It’s easier to cover all surfaces this way.
Install sliding door hardware properly. Follow instructions carefully. Misaligned tracks can cause doors to stick. Use a stud finder to secure the entertainment center to the wall. This ensures stability.
Common mistakes to avoid: Don’t rush. Take your time to ensure accuracy. Avoid using nails instead of screws. Screws hold better and are easier to remove if needed. Don’t forget to account for the thickness of the wood when measuring.
Alternatives: Instead of traditional wood, consider reclaimed wood for a rustic look. For a modern twist, use metal accents or hardware. If sliding doors seem tricky, use hinged doors instead. They’re easier to install and still look great.
Estimating the Cost
Materials:
- Wood (Plywood, Pine, or Oak): $100 - $200
- Barn Door Hardware Kit: $50 - $100
- Screws, Nails, and Fasteners: $20 - $30
- Wood Stain or Paint: $15 - $30
- Handles and Pulls: $10 - $20
- Sandpaper: $5 - $10
- Wood Glue: $5 - $10
Tools:
- Circular Saw or Table Saw: $50 - $150 (or rent for $20/day)
- Drill: $40 - $100
- Measuring Tape: $5 - $10
- Level: $10 - $20
- Paintbrushes or Rollers: $5 - $15
- Clamps: $10 - $30
Total Cost: $325 - $725
Budget-Friendly Alternatives:
- Use reclaimed wood or pallet wood: Free or low cost
- Borrow or rent tools from a local hardware store or a friend
- Opt for basic handles and pulls instead of designer ones
Creative Variations and Customizations
Materials: Instead of traditional wood, consider using reclaimed wood for a rustic look or plywood for a budget-friendly option. Metal accents can add an industrial touch.
Colors: Paint the barn doors in bold colors like navy blue or forest green for a modern twist. For a classic look, use stains in shades like walnut or cherry.
Styles: Swap out the barn door hardware for sleek, modern handles or antique-style pulls. Add decorative trim or molding to the edges for an elegant touch.
Shelving: Customize the shelving inside the entertainment center. Use glass shelves for a contemporary feel or floating wooden shelves for a minimalist look.
Back Panel: Replace the back panel with shiplap for a farmhouse vibe or mirrored panels to make the space feel larger.
Lighting: Install LED strip lights inside the unit to highlight your decor or spotlights to focus on specific areas.
Doors: Instead of solid barn doors, use glass-paneled doors to display items inside or louvered doors for a coastal look.
Size: Adjust the size to fit your space. Make it taller for more storage or wider to accommodate a larger TV.
Accessories: Add hooks or baskets on the sides for extra storage. Use decorative hinges or corner brackets to enhance the design.
Finish: For a unique finish, try distressing the wood for a vintage look or adding a high-gloss finish for a modern touch.
Eco-Friendly Tips
Reclaimed wood is a great choice for building a barn door entertainment center. It adds character and reduces waste. Look for old barn wood, pallets, or even discarded furniture. Sand it down to remove splinters and give it a fresh look.
Eco-friendly paint or stain can be used to finish the wood. Choose products with low or no VOCs (volatile organic compounds) to keep indoor air quality high. These paints are better for the environment and your health.
Recycled metal hardware can add a rustic touch. Search for old hinges, handles, and brackets at salvage yards or online marketplaces. This not only saves money but also keeps usable materials out of landfills.
Energy-efficient lighting can be incorporated into the design. Use LED strips or bulbs to illuminate the shelves. They use less electricity and last longer than traditional bulbs.
Natural fiber fabrics for any soft elements, like a curtain or cushion, can be a sustainable choice. Look for organic cotton, linen, or hemp. These materials are biodegradable and often produced with fewer chemicals.
Modular design allows for easy updates or repairs. Build the entertainment center in sections that can be replaced or upgraded individually. This reduces the need for a complete overhaul if one part gets damaged.
Water-based adhesives are another eco-friendly option. They emit fewer harmful fumes compared to solvent-based glues. Use them to assemble the wood pieces securely.
Upcycled accessories can add unique touches. Repurpose old crates for storage or use vintage signs as decor. This adds personality and keeps more items out of the trash.
Local sourcing of materials reduces the carbon footprint. Buy wood, hardware, and other supplies from nearby suppliers to cut down on transportation emissions.
Proper insulation behind the entertainment center can improve energy efficiency. Use eco-friendly insulation materials like recycled denim or cellulose to keep your home warm in winter and cool in summer.
Your DIY Masterpiece Awaits
You've got all the tools and know-how to build a barn door entertainment center. Measure twice, cut once, and don't rush the process. Sanding and painting might seem tedious, but they make a huge difference. Use quality materials for a sturdy, long-lasting piece. Don't forget to double-check your hardware and hinges for smooth sliding doors. If you hit a snag, take a break and come back with fresh eyes. Mistakes happen, but they're part of the learning curve. Your finished product will be a unique addition to your home, showcasing your skills and creativity. Enjoy the journey and the satisfaction of building something with your own hands. Happy building!
How much space do I need for a barn door entertainment center?
You'll need enough room for the entertainment center itself and the sliding doors. Measure your wall and make sure there's enough space for the doors to slide open fully.
What materials do I need?
You’ll need wood planks, barn door hardware, screws, a drill, saw, measuring tape, level, and paint or stain if you want to finish the wood.
Can I use reclaimed wood?
Absolutely! Reclaimed wood adds a rustic charm. Just make sure the wood is sturdy and clean before using it.
How do I install the sliding door hardware?
First, measure and mark where the hardware will go. Drill holes for the mounting brackets, then attach the track. Finally, hang the doors on the track.
Do I need special tools?
Basic tools like a drill, saw, measuring tape, and level should be enough. If you’re cutting wood, a miter saw or circular saw will make the job easier.
How long will this project take?
Depending on your skill level, it could take a weekend. Cutting and assembling the wood might take a day, and installing the hardware another day.
Can I customize the design?
Definitely! You can choose different wood finishes, paint colors, and hardware styles to match your home decor.