
Home>Home & Furniture>Doors & Windows>DIY Deer Blind Window Ideas
Doors & Windows
DIY Deer Blind Window Ideas
Published: August 12, 2024
Discover creative and practical DIY deer blind window ideas to enhance your hunting experience. Learn how to build and install effective windows for your deer blind.
(Many of the links in this article redirect to a specific reviewed product. Your purchase of these products through affiliate links helps to generate commission for Twigandthistle.com, at no extra cost. Learn more)
Creating your own deer blind windows can save money and offer a custom touch to your hunting experience. With a bit of know-how and some basic materials, you can design windows that improve your view while keeping you concealed. This guide will introduce some ideas to get you started, whether you prefer a simple setup or something more advanced. No need for pricey store-bought options when you can build something just as effective yourself. Let's dive into these practical, cost-effective ideas that will enhance your time in the great outdoors.
Getting Ready for Your Project
Gather Materials: Collect plywood, plexiglass, hinges, screws, and weather stripping. Make sure everything is within reach.
Measure and Mark: Measure the window openings on your deer blind. Mark the dimensions on the plywood and plexiglass.
Cut Materials: Use a saw to cut the plywood and plexiglass to the marked dimensions. Wear safety goggles and gloves while cutting.
Smooth Edges: Sand the edges of the cut plywood and plexiglass to avoid splinters or sharp edges.
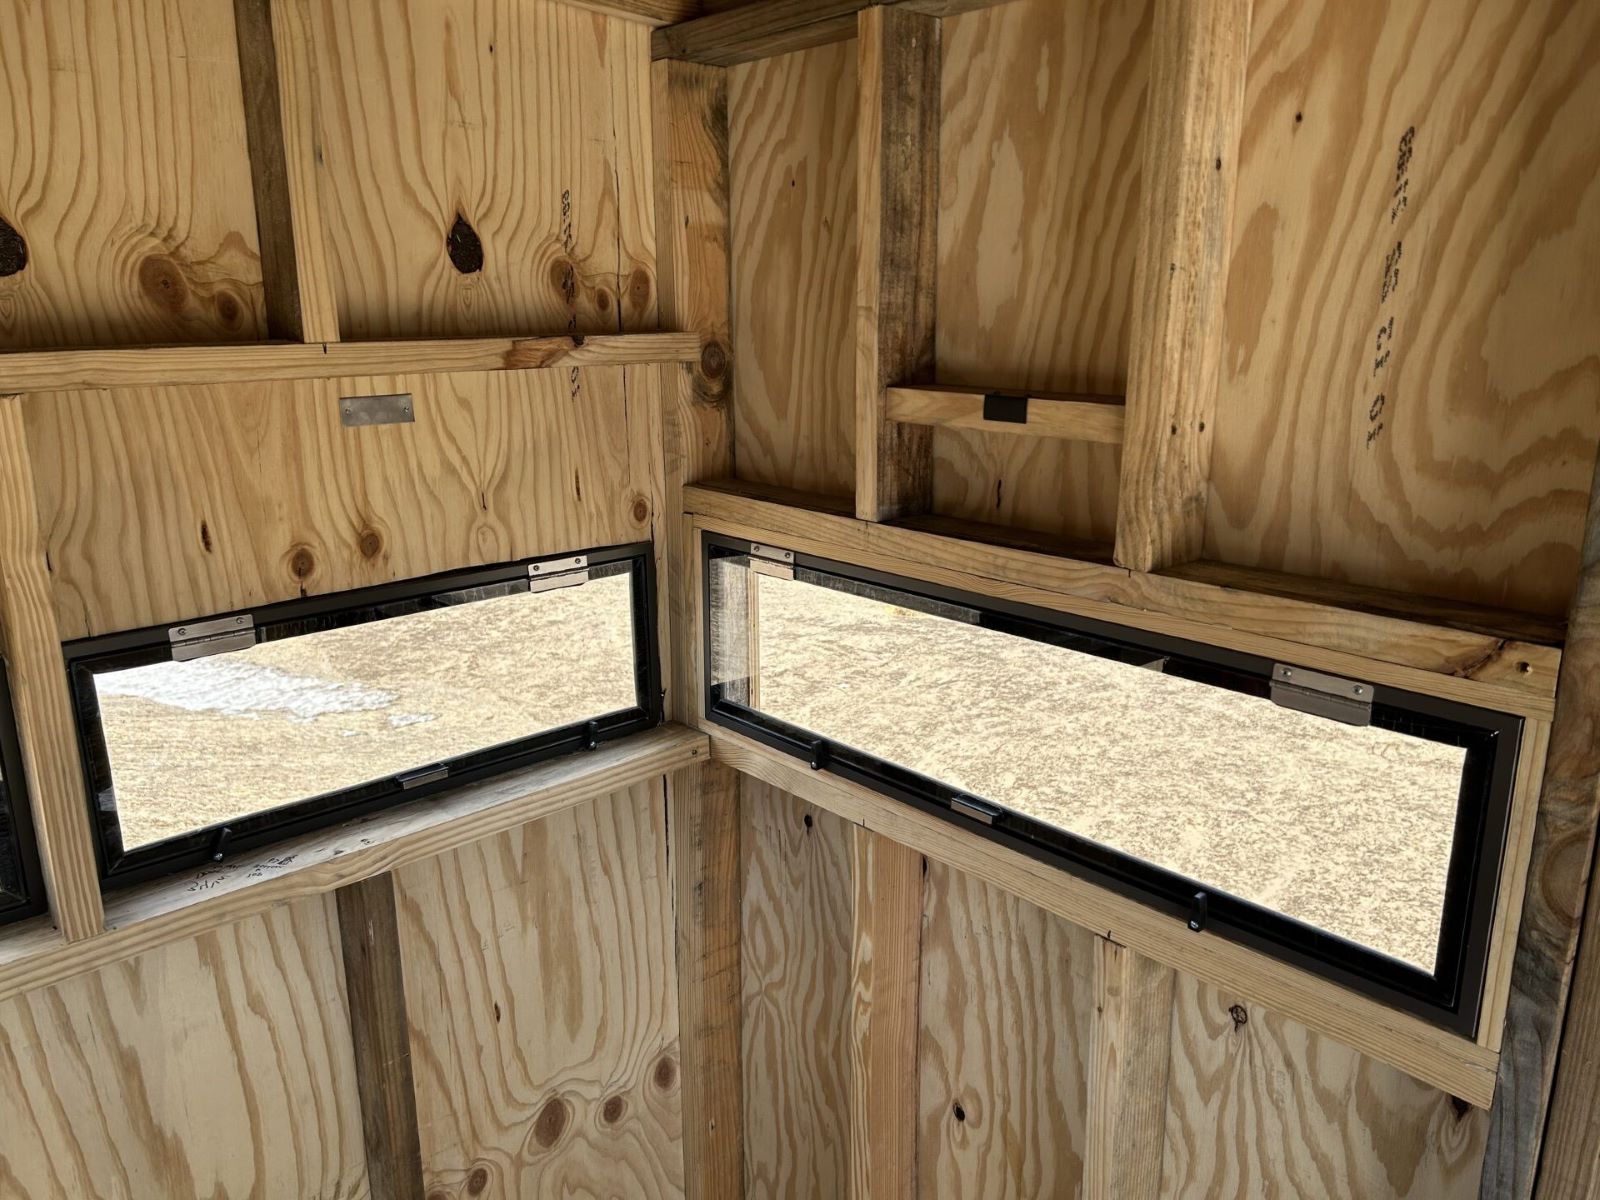
Install Hinges: Attach hinges to the top edge of the plywood. Ensure they are evenly spaced for smooth operation.
Attach Windows: Secure the plywood window to the deer blind using screws. Make sure it swings open and closes properly.
Add Plexiglass: Attach the plexiglass to the inside of the plywood window using screws or adhesive. This will provide a clear view while keeping the elements out.
Seal Gaps: Apply weather stripping around the edges of the window to prevent drafts and moisture from entering.
Test Operation: Open and close the window several times to ensure it functions smoothly. Make any necessary adjustments.
Clean Workspace: Clear away any debris or leftover materials to keep your workspace safe and organized.
Gathering Materials and Tools
- Plywood: Used for the window frame. Choose a sturdy piece to ensure durability.
- Plexiglass: Acts as the windowpane. It's lightweight and shatter-resistant.
- Hinges: Allow the window to open and close. Opt for rust-resistant ones.
- Screws: Secure the hinges and frame. Make sure they are the right length.
- Screwdriver: Needed to drive screws into place. A power drill can also work.
- Measuring Tape: Ensures accurate measurements for cutting materials.
- Saw: Cuts plywood to the desired size. A circular saw or handsaw works well.
- Sandpaper: Smooths rough edges on the plywood. Prevents splinters.
- Paint or Stain: Protects the wood from weather. Choose a color that blends with the surroundings.
- Weatherstripping: Seals gaps around the window. Keeps out drafts and insects.
- Caulk: Fills any remaining gaps. Provides extra weatherproofing.
- Paintbrush: Applies paint or stain evenly. Choose one appropriate for outdoor use.
- Level: Ensures the window is installed straight. Prevents issues with opening and closing.
- Pencil: Marks measurements and cutting lines. Essential for accuracy.
Skill Level and Time Commitment
Skill Level: Intermediate
Time Required: 4-6 hours
- Measure and Cut Openings: 1 hour
- Install Window Frames: 1.5 hours
- Attach Plexiglass or Glass Panels: 1 hour
- Seal and Weatherproof: 1 hour
- Final Adjustments: 30 minutes
Detailed Step-by-Step Guide
Gather Materials:
- Plywood
- Hinges
- Screws
- Plexiglass
- Weatherstripping
- Latch or lock
- Measuring tape
- Saw
- Drill
Measure and Cut Openings:
- Use measuring tape to mark window locations on the deer blind.
- Cut out the marked sections using a saw.
Prepare Window Frames:
- Cut plywood pieces to fit the window openings.
- Attach hinges to one side of each plywood piece.
Install Plexiglass:
- Cut plexiglass to fit the window openings.
- Attach plexiglass to the inside of the plywood frames using screws.
Attach Weatherstripping:
- Apply weatherstripping around the edges of the window openings to seal gaps.
Mount Window Frames:
- Secure the hinged plywood frames to the deer blind using screws.
- Ensure the frames open and close smoothly.
Add Latch or Lock:
- Install a latch or lock on each window frame to keep it securely closed.
Test Windows:
- Open and close each window to ensure they function properly.
- Make any necessary adjustments for a snug fit.
Helpful Tips and Tricks
Use Plexiglass: Plexiglass is lightweight, durable, and easy to cut. It provides clear visibility and can withstand harsh weather.
Hinged Windows: Install hinged windows for easy opening and closing. Use weatherstripping to keep out drafts and moisture.
Camouflage Netting: Attach camouflage netting to the outside of windows. This helps blend the blind into the surroundings while still allowing you to see out.
Sliding Windows: Use sliding windows for quiet operation. Install tracks at the top and bottom for smooth movement.
Magnetic Closures: Use magnets to hold windows shut. This method is silent and quick to open when needed.
Tinted Film: Apply tinted film to windows to reduce glare and visibility from the outside. This helps keep you hidden from deer.
Common Mistakes to Avoid:
Too Large Windows: Large windows can make you more visible to deer. Keep window sizes reasonable to maintain concealment.
Noisy Materials: Avoid using materials that make noise when opening or closing windows. Deer have sensitive hearing and can be easily spooked.
Poor Sealing: Ensure windows are properly sealed to prevent drafts and moisture from entering the blind.
Alternatives for Materials or Methods:
Acrylic Sheets: Use acrylic sheets instead of glass for a lighter, more durable option.
Velcro Strips: Use Velcro strips for easy-to-remove window covers. This allows for quick adjustments without noise.
Burlap Curtains: Hang burlap curtains inside the blind for added concealment. They can be easily moved aside when needed.
Estimating the Cost
Plywood: $20-$30 per sheet (4x8 feet)
Plexiglass: $30-$50 per sheet (24x36 inches)
Hinges: $5-$10 per pair
Weatherstripping: $10-$15 per roll
Screws/Nails: $5-$10 per box
Paint/Sealant: $10-$20 per can
Caulk: $5-$10 per tube
Tools:
- Saw: $50-$100 (or borrow)
- Drill: $30-$60 (or borrow)
- Measuring Tape: $5-$10
- Screwdriver: $5-$15
Total Cost: $175-$340
Budget-Friendly Alternatives:
- Old Windows: Free or cheap from salvage yards
- Plastic Sheeting: $10-$20 instead of plexiglass
- Hand Tools: Borrow from friends or family
Different Variations and Customizations
Plexiglass windows offer a clear view and are lightweight. Tinted glass can reduce glare and provide better concealment. Sliding windows allow for easy opening and closing without making noise. Flip-up windows can be propped open with a stick or latch. Camouflage netting can be used instead of glass for a more natural look. Wooden shutters can be painted to match the surroundings. Magnetic strips can hold fabric or mesh in place for quick adjustments. PVC pipe frames can create a sturdy, weather-resistant window. Velcro can attach fabric covers for easy removal. Hinged panels can open outward for a wider view. Acrylic sheets can be cut to fit any size opening. Reflective film can be applied to glass for added concealment. Burlap can be used as a cover for a rustic look. Weatherstripping can seal gaps to keep out wind and rain. Spray paint can be used to add camouflage patterns to any material. Mesh screens can keep bugs out while allowing airflow. Foam insulation can be added around windows for extra warmth. Latches and locks can secure windows when not in use. DIY kits are available for pre-made window frames. Recycled materials like old windows or doors can be repurposed.
Eco-Friendly Tips
Reclaimed Wood: Use old pallets or barn wood for window frames. This gives a rustic look and reduces waste.
Recycled Glass: Old windows or glass from discarded furniture can be cut to fit your deer blind. This saves money and keeps glass out of landfills.
Bamboo Shades: Bamboo grows quickly and is a sustainable material. Use bamboo shades to cover windows, providing camouflage and shade.
Natural Insulation: Use straw bales or wool for insulation around windows. These materials are eco-friendly and provide good insulation.
Non-Toxic Paint: Choose paints that are free from harmful chemicals. This is better for the environment and your health.
Solar-Powered Lights: Install small solar lights around windows. This provides light without using electricity, making your blind more sustainable.
Recycled Plastic: Use recycled plastic for window shutters. It’s durable and keeps plastic waste out of the environment.
Old Fabrics: Repurpose old curtains or bed sheets for window covers. This reduces fabric waste and gives your blind a cozy feel.
Natural Camouflage: Use branches, leaves, and other natural materials to camouflage your windows. This blends your blind into the environment without synthetic materials.
Rainwater Collection: Set up a system to collect rainwater from the roof of your blind. Use this water for cleaning or other needs, reducing your environmental impact.
Bringing It All Together
Building your own deer blind windows can be a rewarding project. You get to customize everything to fit your needs, from the size and shape to the materials used. Plus, it saves money. Remember to consider visibility, durability, and ease of use when choosing your design. Whether you go with plexiglass, sliding windows, or even hinged designs, each has its own perks. Don’t forget to weatherproof your windows to keep out the elements. A little effort now can mean a lot more comfort and success during hunting season. So grab your tools, get creative, and build something that makes your hunting experience better. Happy building!
What materials work best for deer blind windows?
Plexiglass and polycarbonate are great choices. They're durable, lightweight, and easy to cut.
How do I keep my deer blind windows quiet?
Use foam tape or weather stripping around the edges. This helps reduce noise when opening or closing.
Can I make sliding windows for my deer blind?
Absolutely! Use drawer slides or window tracks. They allow smooth, quiet movement.
How do I prevent fogging on my deer blind windows?
Apply anti-fog spray or use double-pane windows. These methods help keep your view clear.
What's the best way to camouflage my deer blind windows?
Use camouflage netting or paint that matches your surroundings. This helps blend in with the environment.
How can I secure my deer blind windows?
Install locks or latches. This keeps them closed and secure when not in use.
Are there any tips for insulating deer blind windows?
Use insulated curtains or thermal blinds. They help keep the heat in and the cold out.