
Home>Home & Furniture>Doors & Windows>DIY Chicken Run Door Ideas
Doors & Windows
DIY Chicken Run Door Ideas
Published: September 8, 2024
Discover creative and practical DIY chicken run door ideas to enhance your coop. Learn how to build secure, easy-to-use doors that keep your chickens safe and happy.
(Many of the links in this article redirect to a specific reviewed product. Your purchase of these products through affiliate links helps to generate commission for Twigandthistle.com, at no extra cost. Learn more)
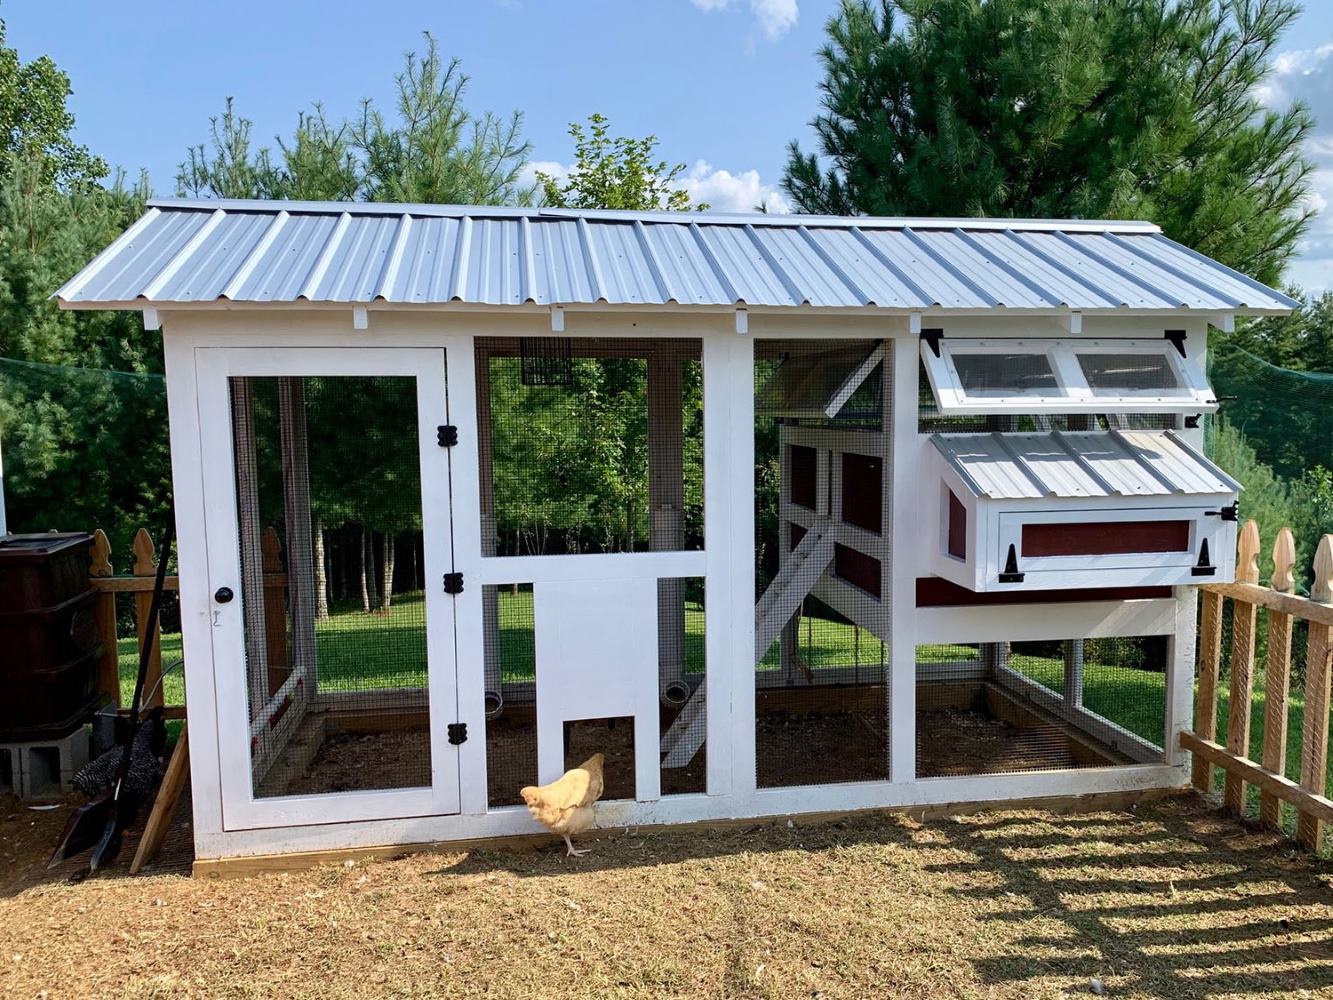
Building a chicken run door yourself offers many creative possibilities. Whether you want to streamline your daily chores or keep things budget-friendly, DIY solutions can be both functional and fun. With a bit of basic carpentry knowledge and some household tools, you can design a door that suits your specific needs. From simple wooden frames to more complex automatic setups, the choices are endless. Crafting your door ensures it fits your space perfectly while giving you a sense of accomplishment. Dive into these ideas for inspiration and turn your chicken run dream into reality.
Getting Ready for Your Project
Gather Materials: Collect wood, hinges, screws, a latch, and chicken wire. Make sure everything is in good condition.
Measure and Cut: Measure the opening for the door. Cut wood pieces to fit these dimensions. Double-check measurements to avoid mistakes.
Safety Gear: Wear gloves, safety goggles, and a dust mask. This protects hands, eyes, and lungs from debris.
Workspace Setup: Clear a flat, stable area to work. Ensure good lighting and ventilation.
Pre-Drill Holes: Pre-drill holes in the wood to prevent splitting. This makes assembly easier.
Assemble Frame: Use screws to attach wood pieces, forming a rectangle. Ensure corners are square.
Attach Chicken Wire: Staple chicken wire to the frame. Make sure it’s tight and secure.
Install Hinges: Attach hinges to one side of the frame. Then, attach the other side to the chicken run.
Add Latch: Install a latch on the opposite side of the hinges. This keeps the door closed.
Test Door: Open and close the door several times. Ensure it moves smoothly and latches securely.
Materials and Tools Needed
Wooden Planks: Used to create the frame and door. Choose sturdy, weather-resistant wood like cedar or treated pine.
Chicken Wire: Keeps chickens in and predators out. Make sure it’s strong and has small enough gaps.
Hinges: Attach the door to the frame. Heavy-duty hinges work best for frequent use.
Latch: Secures the door. A simple hook-and-eye latch or a more secure padlock latch can be used.
Screws and Nails: Fasten the wood and hinges together. Use galvanized screws and nails to prevent rust.
Screwdriver and Hammer: Essential for driving screws and nails. A power drill can make the job faster.
Measuring Tape: Ensures accurate measurements for cutting wood and wire.
Saw: Cuts the wooden planks to size. A handsaw or circular saw works well.
Wire Cutters: Cuts the chicken wire to fit the door frame.
Sandpaper: Smooths rough edges on the wood to prevent splinters.
Pencil and Square: Marks and ensures straight lines for cutting and assembling.
Staple Gun: Attaches the chicken wire to the wooden frame securely.
These materials and tools will help you build a sturdy, functional chicken run door.
Skill Level and Time Required
Skill Level: Intermediate
Time Required: 4-6 hours
- Materials Gathering: 1 hour
- Measuring and Cutting: 1-2 hours
- Assembling Frame: 1 hour
- Attaching Hinges and Latch: 1 hour
- Final Adjustments: 30 minutes
Important Keywords: Intermediate, 4-6 hours, Materials Gathering, Measuring and Cutting, Assembling Frame, Attaching Hinges and Latch, Final Adjustments
Step-by-Step Instructions
Gather Materials:
- Wooden planks (for the frame)
- Chicken wire or hardware cloth
- Hinges
- Latch or lock
- Screws and nails
- Saw
- Drill
- Measuring tape
- Pencil
Measure the Opening:
- Use the measuring tape to determine the height and width of the door opening.
- Write down these measurements.
Cut the Wood:
- Cut the wooden planks to match the height and width of the door opening.
- You will need four pieces: two for the sides, one for the top, and one for the bottom.
Assemble the Frame:
- Lay out the cut wood pieces on a flat surface.
- Connect the pieces using screws and a drill to form a rectangular frame.
Attach Chicken Wire:
- Roll out the chicken wire or hardware cloth over the frame.
- Cut it to size using wire cutters.
- Staple the wire to the wooden frame, ensuring it is tight and secure.
Install Hinges:
- Attach hinges to one side of the frame.
- Position the hinges about 6 inches from the top and bottom edges.
- Use screws to secure the hinges to the frame.
Mount the Door:
- Hold the door frame in the opening.
- Mark where the hinges will attach to the chicken run structure.
- Drill pilot holes and screw the hinges into place.
Add a Latch:
- Attach a latch or lock to the opposite side of the door.
- Ensure it aligns properly with the frame of the chicken run.
- Secure it with screws.
Test the Door:
- Open and close the door to ensure it swings freely.
- Make any necessary adjustments to the hinges or latch.
Finish Up:
- Sand any rough edges on the wood.
- Paint or stain the door if desired for added protection against the elements.
Helpful Tips and Tricks
Measure Twice, Cut Once: Always double-check your measurements before cutting any materials. This saves time and reduces waste.
Use Weather-Resistant Materials: Opt for pressure-treated wood or galvanized metal to withstand outdoor conditions. These materials last longer and require less maintenance.
Install a Secure Latch: Ensure the door has a sturdy latch to keep predators out. A spring-loaded latch or barrel bolt works well.
Hinge Placement: Place hinges on the sturdy side of the frame. This prevents sagging and ensures the door swings properly.
Predator-Proofing: Add a wire mesh skirt around the bottom of the door. This deters digging predators like raccoons and foxes.
Easy Access: Make the door large enough for easy cleaning and egg collection. A 3-foot wide door is usually sufficient.
Common Mistakes to Avoid:
Using Untreated Wood: Untreated wood rots quickly when exposed to the elements. Always use treated wood or seal untreated wood with a weatherproof finish.
Weak Hinges: Flimsy hinges can cause the door to sag or break. Use heavy-duty hinges designed for outdoor use.
Improper Latch Installation: A poorly installed latch can easily be opened by predators. Ensure the latch is securely fastened and difficult for animals to manipulate.
Alternatives for Materials or Methods:
PVC Pipe Frame: Instead of wood, consider using PVC pipes for the frame. PVC is lightweight, weather-resistant, and easy to work with.
Sliding Door: A sliding door can be a space-saving alternative to a swinging door. Use metal tracks and rollers for smooth operation.
Recycled Materials: Use old pallets or reclaimed wood for a cost-effective and eco-friendly option. Just make sure the wood is treated or sealed.
Automatic Door Opener: For convenience, install an automatic door opener. These can be set to open and close at specific times, ensuring your chickens are safe even when you're not around.
Estimating the Cost
Materials:
- Wood (2x4s): $20-$30
- Plywood: $15-$25
- Hinges: $5-$10
- Latch: $5-$10
- Chicken Wire: $10-$20
- Screws/Nails: $5-$10
Tools:
- Saw: $20-$50 (or borrow)
- Drill: $30-$60 (or borrow)
- Measuring Tape: $5-$10
- Screwdriver: $5-$15
- Hammer: $5-$15
Total Cost: $120-$255
Budget-Friendly Alternatives:
- Reclaimed Wood: Free or cheap from pallets
- Old Door Hinges/Latches: Salvage from old furniture
- Borrow Tools: Ask friends or neighbors
Different Variations and Customizations
Materials: Use wood for a rustic look, PVC pipes for a lightweight option, or metal for durability. Reclaimed wood adds character and is eco-friendly.
Colors: Paint the door a bright red or yellow to make it stand out. Use earth tones like brown or green to blend with the surroundings. Consider a white door for a clean, classic appearance.
Styles: Create a barn-style door with cross beams for a traditional feel. Opt for a sliding door to save space. A Dutch door allows you to open the top half while keeping the bottom closed.
Hardware: Use decorative hinges and latches for added charm. Install a spring-loaded hinge for automatic closing. Add a lock for extra security.
Windows: Incorporate a small window with wire mesh for ventilation. Use plexiglass for a clear view while keeping predators out. Add a shutter for adjustable light and airflow.
Decorations: Attach a welcome sign or nameplate. Hang a small flower box for a touch of greenery. Use stencils to paint designs or patterns.
Functionality: Install a self-closing mechanism to ensure the door always shuts. Add a foot pedal for hands-free opening. Use a remote-controlled latch for convenience.
Weatherproofing: Apply a waterproof sealant to protect against rain. Use weatherstripping to keep drafts out. Install a rain guard above the door to divert water.
Eco-Friendly Tips
Reclaimed Wood: Use old pallets or barn wood. Sand them down to remove splinters. This gives a rustic look and saves trees.
Recycled Metal: Old metal sheets or fencing can be repurposed. Cut them to size and attach with screws. Metal lasts long and is sturdy.
Upcycled Windows: An old window can become a door. Add hinges and a latch. This lets you see inside without opening.
Natural Latches: Use branches or twigs as latches. Carve them to fit snugly. This adds a natural touch and reduces waste.
Eco-Friendly Paint: Choose non-toxic, water-based paint. This protects the wood and is safe for chickens.
Bamboo: Strong and sustainable, bamboo can be used for frames. It grows quickly and is eco-friendly.
Reused Hinges: Salvage hinges from old doors or furniture. Clean and oil them. This saves money and resources.
Compostable Materials: Use natural fibers like jute or hemp for handles. These materials are biodegradable.
Solar-Powered Locks: Install a solar-powered automatic door opener. This uses renewable energy and ensures chickens are safe.
Recycled Plastic: Old plastic containers can be cut and used as door panels. This reduces plastic waste and is easy to clean.
Your Chicken Run Door Awaits
Building a chicken run door yourself can be a fun, rewarding project. With just a few tools and some materials, you can create a door that keeps your chickens safe and makes your life easier. Whether you go for a simple wooden frame or a more complex automatic door, the key is to ensure it's sturdy and secure. Don't forget to measure twice and cut once to avoid any mishaps. Also, consider adding a latch or lock for extra security. Once your door is up, you'll have peace of mind knowing your chickens are well-protected. So grab your hammer, gather your supplies, and get started on your DIY chicken run door today. Your chickens will thank you, and you'll feel proud of your handiwork.
How do I build a chicken run door?
Start by measuring the opening where the door will go. Cut a piece of wood or metal to fit. Attach hinges to one side and a latch to the other. Make sure it swings freely and secures tightly.
What materials should I use for a chicken run door?
Wood, metal, or even PVC can work. Just ensure it's sturdy enough to keep predators out and chickens in. Hardware cloth is great for added security.
How do I make the door predator-proof?
Use heavy-duty materials and secure all edges. Add a lock or latch that can't be easily opened by raccoons or other animals. Consider adding a spring to keep it closed.
Can I automate my chicken run door?
Yes, you can install an automatic door opener. These often run on batteries or solar power and can be set to open and close at specific times.
How big should the door be?
The door should be at least 12 inches wide and 18 inches tall. This size allows easy access for your chickens but isn't too big to compromise security.
How do I keep the door from sagging?
Use strong hinges and consider adding a diagonal brace across the door. This helps distribute weight and keeps the door aligned.
What tools will I need?
You'll need a saw, drill, screwdriver, measuring tape, and possibly a wrench. Having a level on hand ensures everything is straight.