
Home>Home & Furniture>Bedroom>How to Make DIY Bedroom Cloud Lights
Bedroom
How to Make DIY Bedroom Cloud Lights
Published: July 19, 2024
Transform your bedroom into a dreamy oasis with DIY cloud lights! Follow our step-by-step guide to create stunning, ethereal lighting that adds a magical touch to your space.
(Many of the links in this article redirect to a specific reviewed product. Your purchase of these products through affiliate links helps to generate commission for Twigandthistle.com, at no extra cost. Learn more)
Transform your bedroom into a dreamy haven with DIY cloud lights! These fluffy, glowing decorations not only add a touch of whimsy but also create a cozy ambiance perfect for relaxation or reading. Making cloud lights at home is surprisingly easy, and you don’t need fancy tools or skills. Gather some basic supplies like paper lanterns, cotton batting, glue, and LED lights. With a bit of creativity and patience, you’ll have stunning cloud lights floating above your bed in no time. Ready to get started? Let’s dive into the steps and materials needed.
Getting Ready for Your Project
Gather Materials: Collect cotton batting, LED string lights, paper lanterns, fishing line, hot glue gun, and scissors.
Safety First: Wear gloves when using the hot glue gun to avoid burns. Ensure the workspace is well-ventilated.
Workspace Setup: Clear a large table or floor space. Lay down newspaper or a drop cloth to catch any glue drips.
Check Lights: Test the LED string lights to make sure they work before starting.
Prepare Lanterns: Assemble paper lanterns according to instructions.
Cut Batting: Cut cotton batting into manageable pieces for easier application.
Plan Layout: Decide where the cloud lights will hang. Measure the area to ensure proper spacing.
Hang Lanterns: Use fishing line to hang paper lanterns from the ceiling at varying heights.
Attach Lights: Wrap LED string lights around the inside frame of each lantern.
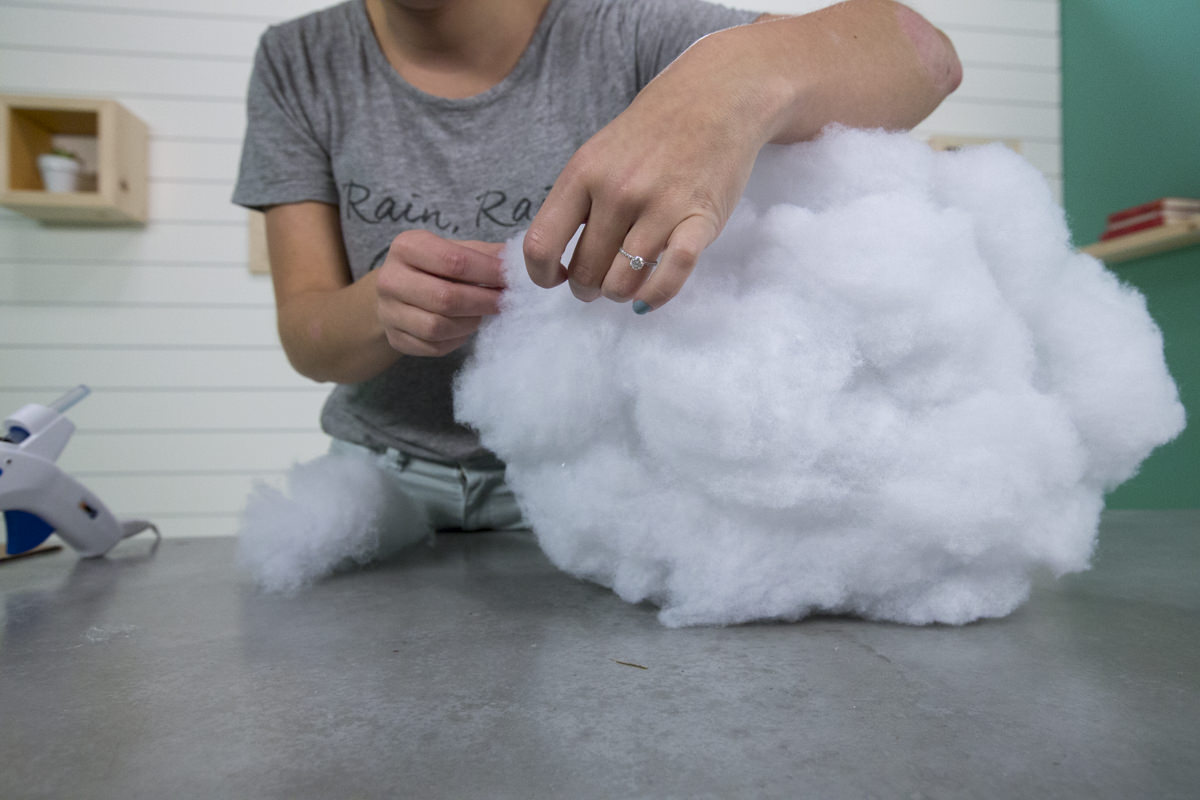
Apply Batting: Use the hot glue gun to attach cotton batting to the outside of the lanterns, creating a fluffy cloud effect.
Final Check: Ensure all lights are securely attached and functioning. Adjust batting as needed for a natural look.
Gather Your Materials and Tools
- Cotton Batting: Soft, fluffy material to create the cloud effect.
- Paper Lanterns: Provide the structure for the clouds.
- LED String Lights: Safe, low-heat lights to illuminate the clouds.
- Fishing Line: Transparent line to hang the clouds from the ceiling.
- Hot Glue Gun: Tool to attach the cotton batting to the paper lanterns.
- Glue Sticks: Used with the hot glue gun for sticking the batting.
- Scissors: Cutting tool for trimming the cotton batting and fishing line.
- Command Hooks: Adhesive hooks to hang the fishing line from the ceiling.
- Batteries: Power source for the LED string lights if they are battery-operated.
- Tape: Helps secure the LED string lights inside the paper lanterns.
Skill Level and Time Commitment
Skill Level: Beginner
Time Required: 2-3 hours
- Gather Materials: 15 minutes
- Prepare Paper Lanterns: 20 minutes
- Attach Cotton Batting: 1 hour
- Install LED Lights: 30 minutes
- Hang Cloud Lights: 15 minutes
Follow These Steps
Gather Materials:
- White paper lanterns (various sizes)
- Polyester fiberfill (stuffing)
- Hot glue gun and glue sticks
- LED string lights
- Fishing line or clear thread
- Scissors
Prepare Lanterns:
- Assemble paper lanterns according to instructions.
- Ensure they are sturdy and ready for decoration.
Attach Fiberfill:
- Heat the hot glue gun.
- Apply a small amount of hot glue to the lantern's surface.
- Press fiberfill onto the glue, holding it in place for a few seconds.
- Continue covering the lantern with fiberfill until it resembles a fluffy cloud.
Insert LED Lights:
- Carefully insert LED string lights into the lantern through the opening.
- Distribute lights evenly inside for a uniform glow.
Secure Lights:
- Use small dots of hot glue to secure the LED string lights inside the lantern.
- Ensure lights are not too close to the paper to avoid overheating.
Hang the Cloud Lights:
- Cut a length of fishing line or clear thread.
- Tie one end to the top of the lantern.
- Attach the other end to the ceiling or desired hanging spot.
Test and Adjust:
- Plug in the LED string lights.
- Adjust the fiberfill and lights as needed for the best appearance.
Repeat for Additional Clouds:
- Follow the same steps for each additional cloud light you want to create.
- Vary sizes and heights for a more dynamic look.
Helpful Tips and Tricks
Use cotton batting for a fluffy, cloud-like look. Attach it to paper lanterns with a hot glue gun. Hang the lanterns with fishing line for a floating effect. Use LED string lights inside the lanterns to avoid heat buildup.
Common mistakes include using regular light bulbs, which can get too hot and pose a fire risk. Avoid using too much glue, as it can make the cotton look clumpy. Don't skip securing the fishing line properly; otherwise, your clouds might fall.
For alternatives, try using polyfill stuffing instead of cotton batting. It’s lightweight and easy to shape. Instead of paper lanterns, use white balloons for a more rounded cloud shape.
Estimating the Cost
Materials:
- Cotton batting: $10 for a large bag
- Paper lanterns: $15 for a pack of 5
- LED string lights: $20 for a 33-foot strand
- Fishing line: $5 for a roll
- Hot glue sticks: $5 for a pack
Tools:
- Hot glue gun: $10
- Scissors: $5
Total Cost: $70
Budget-Friendly Alternatives:
- Cotton balls instead of cotton batting: $5 for a large bag
- Plastic cups instead of paper lanterns: $5 for a pack of 10
- Battery-operated fairy lights instead of LED string lights: $10 for a 10-foot strand
Total Cost with Alternatives: $45
Creative Variations and Customizations
Materials: Instead of cotton batting, use polyester stuffing from old pillows or stuffed animals. For a more eco-friendly option, try recycled fabric scraps.
Colors: Use colored LED lights to create different moods. Blue lights can mimic a stormy sky, while pink or purple lights give a dreamy feel. Spray paint the cotton or fabric with glow-in-the-dark paint for a magical effect at night.
Styles: Create a rainbow cloud by layering different colored cotton or fabric. Add fairy lights for a twinkling star effect. For a more realistic look, use gray and white shades to mimic real clouds.
Mounting: Instead of hanging from the ceiling, attach the cloud lights to a wall as a backdrop. Use command strips for easy removal. Create a floating effect by using clear fishing line to suspend the clouds.
Shapes: Experiment with different cloud shapes. Make a giant cloud for a statement piece or several small clouds for a scattered look. Add raindrop-shaped crystals or beads hanging from the clouds for a rainy day effect.
Textures: Mix in feathers or tulle with the cotton for added texture. Use lace or netting for a more delicate, airy look.
Themes: Customize the clouds to match a theme. For a beach theme, add small seashells or starfish. For a winter wonderland, sprinkle fake snow or glitter on the clouds.
Eco-Friendly Tips
Recycled plastic bottles can form the base structure. Cut them into desired shapes and sizes. Use old cotton balls or recycled pillow stuffing to create the fluffy cloud effect. Attach these materials to the plastic bottles with eco-friendly glue.
For lighting, choose LED fairy lights. They consume less energy and last longer. If possible, use solar-powered lights to make the project even more sustainable.
Instead of buying new materials, repurpose old wire hangers to create the frame. Bend them into cloud shapes and secure them with tape or string.
Hang the cloud lights using recycled fishing line or twine. This reduces waste and gives a rustic look.
Finally, consider using biodegradable spray paint if you want to add color to the clouds. This ensures that any leftover paint won't harm the environment.
Your Cozy Cloud Awaits
Creating DIY bedroom cloud lights is a fun project that adds a magical touch to any room. With some cotton, LED lights, and a bit of creativity, you can transform your space into a dreamy haven. Remember, the key is to layer the cotton evenly and secure the lights properly. Don't rush the process; take your time to get the look just right. Once finished, you'll have a unique, cozy light fixture that’s perfect for relaxing or setting a calming mood. Plus, it's a great conversation starter! So gather your materials, follow the steps, and enjoy your new cloud lights. Happy crafting!
How do I make cloud lights for my bedroom?
You'll need cotton batting, LED string lights, paper lanterns, and fishing line. First, attach the cotton batting to the paper lanterns using hot glue. Then, insert the LED string lights inside the lanterns. Finally, hang the lanterns from the ceiling with fishing line.
What materials are best for creating the cloud effect?
Cotton batting works great for a fluffy, cloud-like appearance. You can find it at craft stores. For the lights, use LED string lights since they don't get hot and are energy-efficient.
Are LED lights safe to use inside the paper lanterns?
Yes, LED lights are safe because they produce very little heat. This makes them perfect for use with paper and cotton materials.
How do I hang the cloud lights from the ceiling?
Use fishing line or clear thread to hang the lanterns. Attach the line to the top of the lantern and secure it to the ceiling with hooks or adhesive strips.
Can I use different colors of LED lights?
Absolutely! You can use white for a classic look or colored LEDs for a fun twist. Some LED strings even come with remote controls to change colors.
How long does it take to make these cloud lights?
It usually takes about 1-2 hours, depending on how many clouds you want to make and how detailed you get with the cotton batting.
Do I need any special tools?
Not really. A hot glue gun, scissors, and something to hang the lights with (like hooks or adhesive strips) are the main tools you'll need.