
Home>Home & Furniture>Bedroom>How to Create a Galaxy Ombre Wall Paint
Bedroom
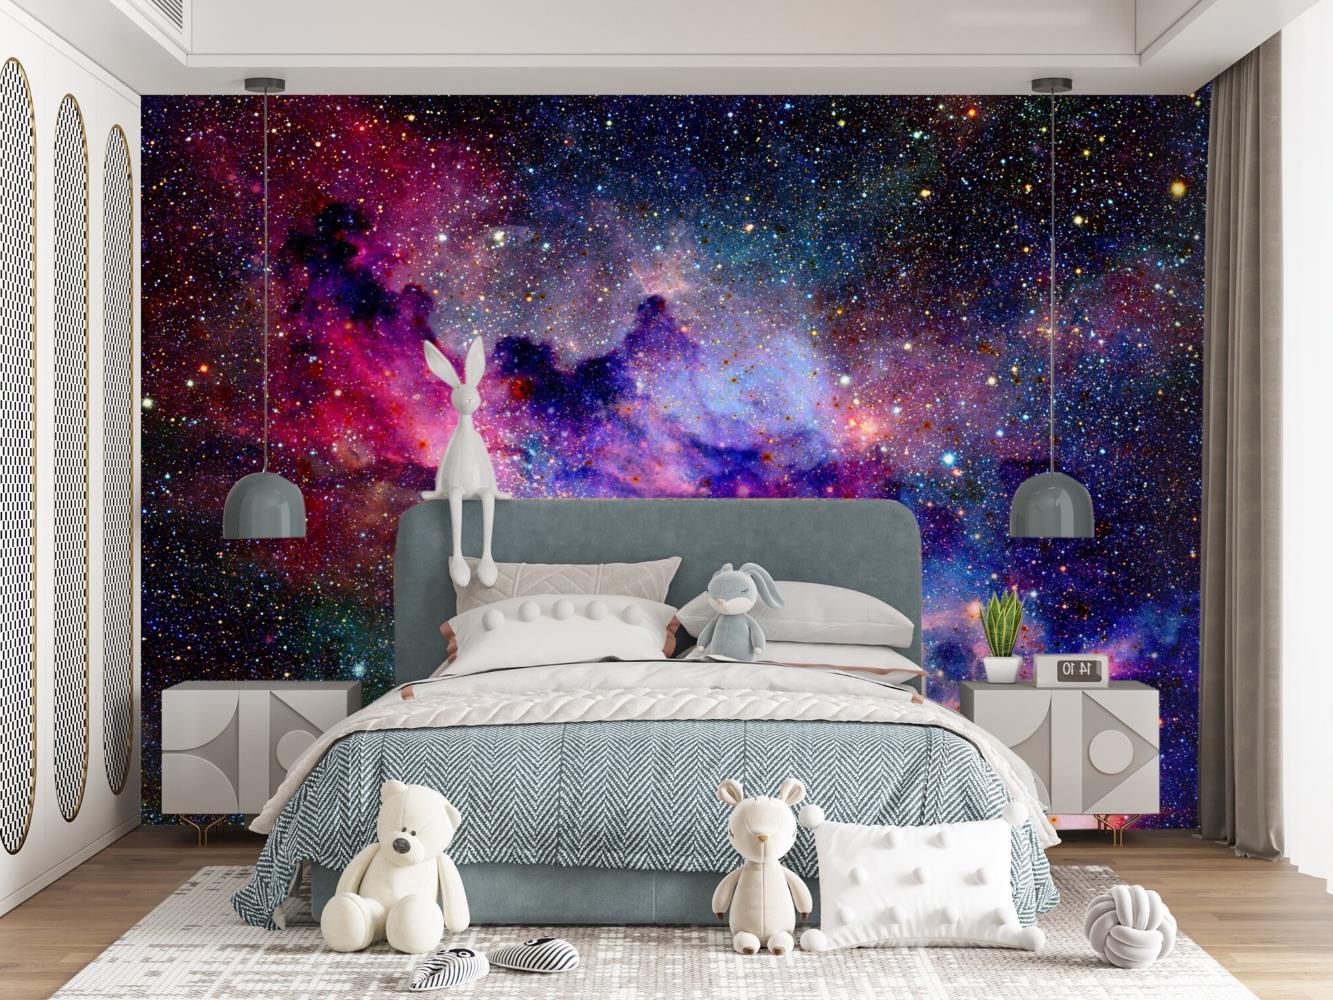
How to Create a Galaxy Ombre Wall Paint
Published: July 21, 2024
Transform your bedroom with a stunning galaxy ombre wall! Learn step-by-step techniques, tips, and tools needed to create a mesmerizing celestial masterpiece.
(Many of the links in this article redirect to a specific reviewed product. Your purchase of these products through affiliate links helps to generate commission for Twigandthistle.com, at no extra cost. Learn more)
Creating a galaxy ombre wall paint can magically transform any room into a stunning space. This DIY project adds charm and a unique touch to your interior design. Whether you're an art enthusiast or just want to try something new, this project is perfect for bringing a piece of the cosmos indoors. With a bit of preparation and the right materials, anyone can achieve this captivating look. Get ready to have fun with colors, sponges, and a little creativity. Let’s begin our journey to make your walls look out of this world!
Getting Ready for Your Project
Gather Supplies: Get paint in various shades (black, dark blue, purple, pink, white), paint rollers, brushes, sponges, painter's tape, drop cloths, and a ladder.
Choose the Wall: Pick a wall that will be the focal point of the room. Make sure it’s clean and smooth.
Protect the Area: Lay down drop cloths to protect the floor. Use painter's tape to cover baseboards, outlets, and any trim.
Ventilation: Ensure the room is well-ventilated. Open windows or use fans to keep fresh air circulating.
Safety Gear: Wear old clothes, gloves, and a mask to protect from paint fumes. Safety goggles can protect your eyes from splashes.
Prime the Wall: Apply a coat of primer to ensure the paint adheres well. Let it dry completely.
Plan the Design: Sketch out your galaxy design on paper. Decide where each color will go and how they will blend.
Mix Paint: Prepare your paint colors. Mix them in separate containers, and have extra for touch-ups.
Test Colors: On a small section of the wall or a piece of cardboard, test your colors to see how they blend.
Start Painting: Begin with the darkest color at the top and work your way down to the lightest. Use sponges and brushes to blend the colors smoothly.
Add Stars: Once the base colors are dry, use a small brush or toothbrush to flick white paint, creating stars.
Clean Up: Remove painter's tape carefully. Clean brushes and rollers immediately to keep them in good condition.
What You Need: Materials and Tools
Paint Colors: Choose at least three shades of blue, purple, and black. These will create the galaxy effect.
Paint Rollers: Use these for applying the base coat and larger sections of color.
Paint Brushes: Smaller brushes help with detail work and blending colors.
Sponges: Great for dabbing and blending paint to achieve a natural ombre effect.
Painter's Tape: Protects edges and trims from stray paint.
Drop Cloths: Keep floors and furniture clean from paint splatters.
Paint Trays: Hold and mix paint colors easily.
Spray Bottle: Filled with water, it helps blend colors smoothly.
Gloves: Protect hands from paint.
Ladder: Reach higher sections of the wall safely.
Chalk or Pencil: Mark sections on the wall for different colors.
Stencils: Optional, but useful for adding star shapes or other details.
Glow-in-the-Dark Paint: Adds a magical touch to your galaxy wall.
Rags: Wipe off excess paint or clean up mistakes.
Fan: Speeds up drying time between layers.
Skill Level and Time Commitment
Skill Level: Intermediate
Time Required: 6-8 hours
Preparation: 1 hour
- Gather materials like paint, brushes, sponges, and painter's tape.
- Cover floors and furniture with drop cloths.
Base Coat: 1 hour
- Apply a dark base coat (black or deep blue) and let it dry.
Ombre Effect: 2-3 hours
- Use sponges to blend lighter colors (purples, blues, pinks) into the base coat.
- Work in sections to ensure smooth transitions.
Galaxy Details: 2 hours
- Add stars using a toothbrush or small brush dipped in white paint.
- Create nebulae with sponges and lighter colors.
Drying Time: 1-2 hours
- Allow the paint to fully dry before removing painter's tape and cleaning up.
Instructions: Step-by-Step Guide
Gather Supplies:
- Paint in dark blue, purple, pink, white, and black
- Paint rollers and brushes
- Sponges
- Painter's tape
- Drop cloths
- Paint tray
Prepare the Wall:
- Move furniture away from the wall.
- Lay down drop cloths to protect the floor.
- Use painter's tape to mask off edges and trim.
Base Coat:
- Paint the entire wall with black paint using a roller.
- Let it dry completely.
First Color Layer:
- Pour dark blue paint into the tray.
- Use a roller to apply dark blue starting from the top of the wall.
- Blend downward about one-third of the way.
Second Color Layer:
- Pour purple paint into the tray.
- Apply purple paint below the dark blue, blending upward into the blue and downward.
Third Color Layer:
- Pour pink paint into the tray.
- Apply pink paint below the purple, blending upward into the purple.
Blend Colors:
- Use a sponge to blend the transitions between colors.
- Dab and swirl the sponge where colors meet to create a smooth gradient.
Add Stars:
- Dip a small brush into white paint.
- Flick the brush to create small white dots resembling stars.
- Add larger stars by dabbing the brush directly onto the wall.
Final Touches:
- Add more white paint to create clusters of stars.
- Use a sponge to lightly dab white paint in areas to create a nebula effect.
Clean Up:
- Remove painter's tape carefully.
- Clean brushes, rollers, and trays.
- Move furniture back into place.
Helpful Tips and Tricks
Choose the right colors: Pick at least three shades of blue, purple, and black. Use metallic or glitter paint for stars.
Prep the wall: Clean it thoroughly. Apply a base coat of the darkest color, usually black or deep blue.
Blend colors: Use a sponge or large brush. Start with the darkest color at the top. Gradually blend lighter shades as you move down.
Add stars: Dip a toothbrush in white paint. Flick it to create small stars. Use a small brush for larger stars.
Seal the paint: Apply a clear sealer to protect your work.
Common mistakes to avoid:
- Using too much water when blending can make colors run.
- Not letting layers dry completely can cause smudging.
- Overloading the brush with paint can lead to uneven blending.
Alternatives:
- Use spray paint for a smoother gradient.
- Stick-on star decals can replace painted stars.
- Glow-in-the-dark paint adds a fun effect.
Estimating the Cost
Paint: You'll need four colors: black, dark blue, purple, and white. Each gallon costs around $30. Total: $120.
Primer: One gallon of primer costs about $20.
Paintbrushes and Rollers: A set costs around $15.
Painter's Tape: One roll costs about $5.
Drop Cloths: Two cloths cost around $10.
Sponges: A pack of sponges for blending costs about $10.
Total Cost: Approximately $180.
Budget-Friendly Alternatives:
- Use sample-sized paint instead of full gallons. Each sample costs around $5. Total for four colors: $20.
- Borrow or reuse paintbrushes and rollers.
- Use old sheets or newspapers as drop cloths.
- Use kitchen sponges instead of buying new ones.
Total Cost with Alternatives: Approximately $55.
Different Ways to Customize
Alternative Materials: Instead of traditional paint, try chalk paint for a matte finish or metallic paint for a shimmering effect. Use glow-in-the-dark paint to make stars pop at night.
Colors: Swap out typical galaxy colors like blues and purples for greens and yellows to create an alien landscape. For a softer look, use pastel shades like light pinks and baby blues.
Styles: Add stencils of planets, stars, or even spaceships for extra detail. Use a sponge instead of a brush for a more textured appearance. Incorporate glitter to mimic stardust.
Techniques: Try a splatter technique with a toothbrush to create tiny stars. Use a dry brush method for a more subtle blend of colors. Experiment with layering different shades to add depth.
Finishes: Seal the wall with a glossy topcoat for a polished look or a matte finish for a more subdued effect.
Eco-Friendly Painting Tips
Eco-friendly materials can make your galaxy ombre wall both stunning and sustainable. Start by using low-VOC (volatile organic compounds) paints. These paints release fewer harmful chemicals into the air, making them better for your health and the environment.
Recycled paint is another great option. Some companies take leftover paint, reprocess it, and sell it at a lower cost. This reduces waste and saves resources.
For the sponges and brushes, consider using natural or recycled materials. Sponges made from natural fibers like cellulose are biodegradable. Brushes with bamboo handles and natural bristles are more eco-friendly than plastic ones.
Reuse old materials whenever possible. If you have leftover paint from another project, mix it to create new shades for your galaxy wall. This not only saves money but also reduces waste.
When creating the stars and nebulae, use biodegradable glitter instead of traditional plastic glitter. Biodegradable glitter is made from plant-based materials and breaks down naturally.
To save on energy, paint during the day using natural light. This reduces the need for artificial lighting, conserving electricity.
Finally, properly dispose of any waste. Take leftover paint to a recycling center and compost any biodegradable materials. This ensures that your project leaves a minimal environmental footprint.
Your Galaxy Awaits
You've got all the tools and steps to create a galaxy ombre wall. Just remember, patience is key. Start with a clean wall, apply your base coat, and let it dry. Then, layer your colors from dark to light, blending as you go. Use a sponge or brush for that starry effect. Don't rush the drying process between layers. Once you're happy with the look, seal it with a clear coat to protect your masterpiece.
This project might seem tricky at first, but with practice, you'll get the hang of it. Plus, you'll have a unique, personalized space that reflects your creativity. So grab your paintbrushes, put on some music, and dive into your DIY galaxy. Happy painting!
How do I choose the right colors for a galaxy ombre wall?
Pick dark blues, purples, and blacks for the base. Add pinks, whites, and light blues for the stars and nebulae. Test small patches first.
What tools do I need?
You'll need paint rollers, sponges, brushes, and spray bottles. Don't forget drop cloths, painter's tape, and paint trays.
How do I prepare the wall?
Clean the wall thoroughly. Patch any holes or cracks. Apply a primer to ensure the paint sticks well.
What’s the best technique for blending colors?
Start with the darkest color at the top. Use a sponge or brush to blend lighter colors downward. Work quickly while the paint is wet.
How do I create stars and nebulae?
Use a toothbrush or small brush to flick white paint for stars. For nebulae, dab light colors with a sponge in random patterns.
How long does it take to dry?
Usually, it takes about 24 hours to dry completely. Make sure each layer is dry before adding the next.
Can I do this alone, or do I need help?
You can do it alone, but having a friend helps, especially for blending and reaching high spots.