
Home>Home & Furniture>Bathroom>How to Install Beadboard in Your Bathroom
Bathroom
How to Install Beadboard in Your Bathroom
Published: July 13, 2024
Learn how to install beadboard in your bathroom with our step-by-step guide. Transform your space with this stylish, easy-to-install wall treatment. Perfect for DIY enthusiasts!
(Many of the links in this article redirect to a specific reviewed product. Your purchase of these products through affiliate links helps to generate commission for Twigandthistle.com, at no extra cost. Learn more)
Thinking about giving your bathroom a fresh, charming look? Installing beadboard might be the perfect DIY project for you. This classic wall treatment adds both elegance and character while being relatively easy to install. Whether you're a seasoned DIYer or just starting out, you can transform your bathroom into a cozy retreat in no time. With a few tools and some patience, you'll have a stunning beadboard wall that not only looks great but also protects your walls from moisture. Ready to get started? Let's dive into the steps and materials you'll need for this exciting home improvement project.
Getting Ready for the Project
Measure the Walls: Use a tape measure to get the exact dimensions of the walls where you plan to install the beadboard. Write down these measurements.
Gather Materials: You will need beadboard panels, a saw, adhesive, nails, a hammer, a level, and a measuring tape. Make sure you have everything before starting.
Prepare the Walls: Clean the walls thoroughly to remove any dirt or grease. If there are any holes or cracks, fill them with spackle and sand them smooth.
Cut the Beadboard: Using your measurements, cut the beadboard panels to fit the height of your walls. A circular saw or jigsaw works well for this task.
Set Up Workspace: Find a flat, stable surface to work on. Lay down a drop cloth to protect the floor from sawdust and adhesive.
Safety Gear: Wear safety goggles and gloves to protect your eyes and hands while cutting and installing the beadboard.
Turn Off Power: If there are any electrical outlets or switches on the wall, turn off the power at the circuit breaker. Remove the outlet covers.
Dry Fit Panels: Before applying adhesive, place the beadboard panels against the wall to ensure they fit properly. Make any necessary adjustments.
Apply Adhesive: Use a construction adhesive to attach the beadboard panels to the wall. Apply the adhesive in a zigzag pattern for better coverage.
Secure with Nails: Once the adhesive is applied, press the beadboard panels firmly against the wall. Use finishing nails to secure the panels in place, especially around the edges.
Check for Level: Use a level to make sure the beadboard panels are straight. Adjust as needed before the adhesive sets.
Reattach Outlet Covers: After the beadboard is installed, cut out spaces for any electrical outlets and reattach the outlet covers.
Caulk and Paint: Fill any gaps between the beadboard panels and the wall with caulk. Once the caulk is dry, paint the beadboard to match your bathroom decor.
Gather Your Materials and Tools
Materials:
- Beadboard Panels: These are the main material for the project. They come in various sizes and styles.
- Trim Molding: Used to cover the edges and seams of the beadboard for a finished look.
- Construction Adhesive: Helps secure the beadboard panels to the wall.
- Finishing Nails: Used to attach the beadboard and trim securely.
- Caulk: Seals gaps between the beadboard and the wall to prevent moisture from getting behind the panels.
- Paint or Primer: Protects the beadboard and gives it a finished appearance.
Tools:
- Tape Measure: Ensures accurate measurements for cutting beadboard and trim.
- Level: Ensures beadboard panels are installed straight.
- Saw: Cuts beadboard panels and trim to the correct size.
- Hammer or Nail Gun: Drives finishing nails into the beadboard and trim.
- Caulk Gun: Applies caulk smoothly and evenly.
- Paintbrush or Roller: Applies paint or primer to the beadboard.
Skill Level and Time Commitment
Skill Level: Intermediate
Time Required: 4-6 hours
- Measure and Cut: 1-2 hours
- Prep the Walls: 30 minutes
- Apply Adhesive: 15 minutes
- Install Beadboard Panels: 1-2 hours
- Add Trim and Molding: 1 hour
- Paint or Finish: 1 hour
Detailed Installation Steps
Gather Materials and Tools
- Beadboard panels
- Measuring tape
- Level
- Saw (circular or jigsaw)
- Construction adhesive
- Finishing nails
- Hammer or nail gun
- Caulk and caulk gun
- Paint or primer
- Paintbrush or roller
Measure the Walls
- Use a measuring tape to find the height and width of each wall.
- Mark these measurements on the beadboard panels.
Cut the Beadboard
- Use a saw to cut the panels to the correct size.
- Ensure cuts are straight and even.
Apply Adhesive
- Spread construction adhesive on the back of the first panel.
- Press the panel firmly against the wall.
Secure with Nails
- Use finishing nails to secure the panel to the wall.
- Place nails along the top, bottom, and sides of the panel.
Repeat for Remaining Panels
- Continue applying adhesive and nailing each panel until the wall is covered.
- Ensure panels fit snugly together.
Fill Gaps and Seams
- Use caulk to fill any gaps between panels.
- Smooth the caulk with a damp finger or caulk tool.
Prime and Paint
- Apply primer to the beadboard if necessary.
- Once dry, paint the beadboard with your chosen color.
- Use a paintbrush or roller for even coverage.
Install Trim
- Measure and cut trim pieces to fit along the top and bottom edges.
- Attach trim using finishing nails.
Final Touches
- Touch up any paint as needed.
- Clean up any excess caulk or adhesive.
Helpful Tips and Tricks
Measure Twice, Cut Once: Always double-check measurements before cutting beadboard panels. This saves time and materials.
Use a Level: Ensure beadboard panels are straight using a level. Crooked panels look unprofessional.
Pre-Paint Panels: Paint beadboard panels before installation. Touch-ups after installation are easier.
Adhesive and Nails: Use construction adhesive and finishing nails. This ensures panels stay secure.
Caulk Gaps: Fill gaps between panels and trim with caulk. This creates a seamless look.
Protect from Moisture: Use moisture-resistant beadboard in bathrooms. Regular beadboard can warp from humidity.
Common Mistakes to Avoid:
Skipping Primer: Always prime beadboard before painting. This prevents paint from peeling.
Ignoring Wall Prep: Clean and smooth walls before installation. Dirt and bumps can affect adhesion.
Incorrect Panel Placement: Start from the center and work outward. This ensures symmetry.
Alternatives for Materials or Methods:
PVC Beadboard: Use PVC beadboard instead of wood. PVC resists moisture better.
Peel-and-Stick Panels: Consider peel-and-stick beadboard for easy installation. This option saves time and effort.
Wainscoting Kits: Use wainscoting kits that include pre-cut panels and trim. Kits simplify the process.
Budgeting for Your Beadboard Installation
Beadboard Panels: $20-$30 per panel. For a small bathroom, you might need around 4-6 panels, totaling $80-$180.
Trim and Molding: $1-$2 per foot. For a 10x10 bathroom, expect to spend $40-$80.
Adhesive: $5-$10 per tube. You might need 2-3 tubes, costing $10-$30.
Nails and Screws: $5-$10 for a pack.
Paint: $20-$40 per gallon. One gallon should be enough.
Caulk: $5-$10 per tube. One tube should suffice.
Tools: If you don't already have them, a saw ($20-$50), measuring tape ($5-$10), level ($10-$20), hammer ($10-$20), and paintbrushes ($5-$15) will be needed.
Total Estimated Cost: $195-$455.
Budget-Friendly Alternatives:
- Use MDF beadboard instead of wood panels, costing $10-$15 per panel.
- Borrow tools from friends or family.
- Look for sales or discounts at local hardware stores.
Creative Variations and Customizations
Materials: Instead of traditional wood beadboard, consider using PVC beadboard. It's water-resistant and perfect for bathrooms. Another option is MDF beadboard, which is budget-friendly but needs a good coat of paint to protect against moisture.
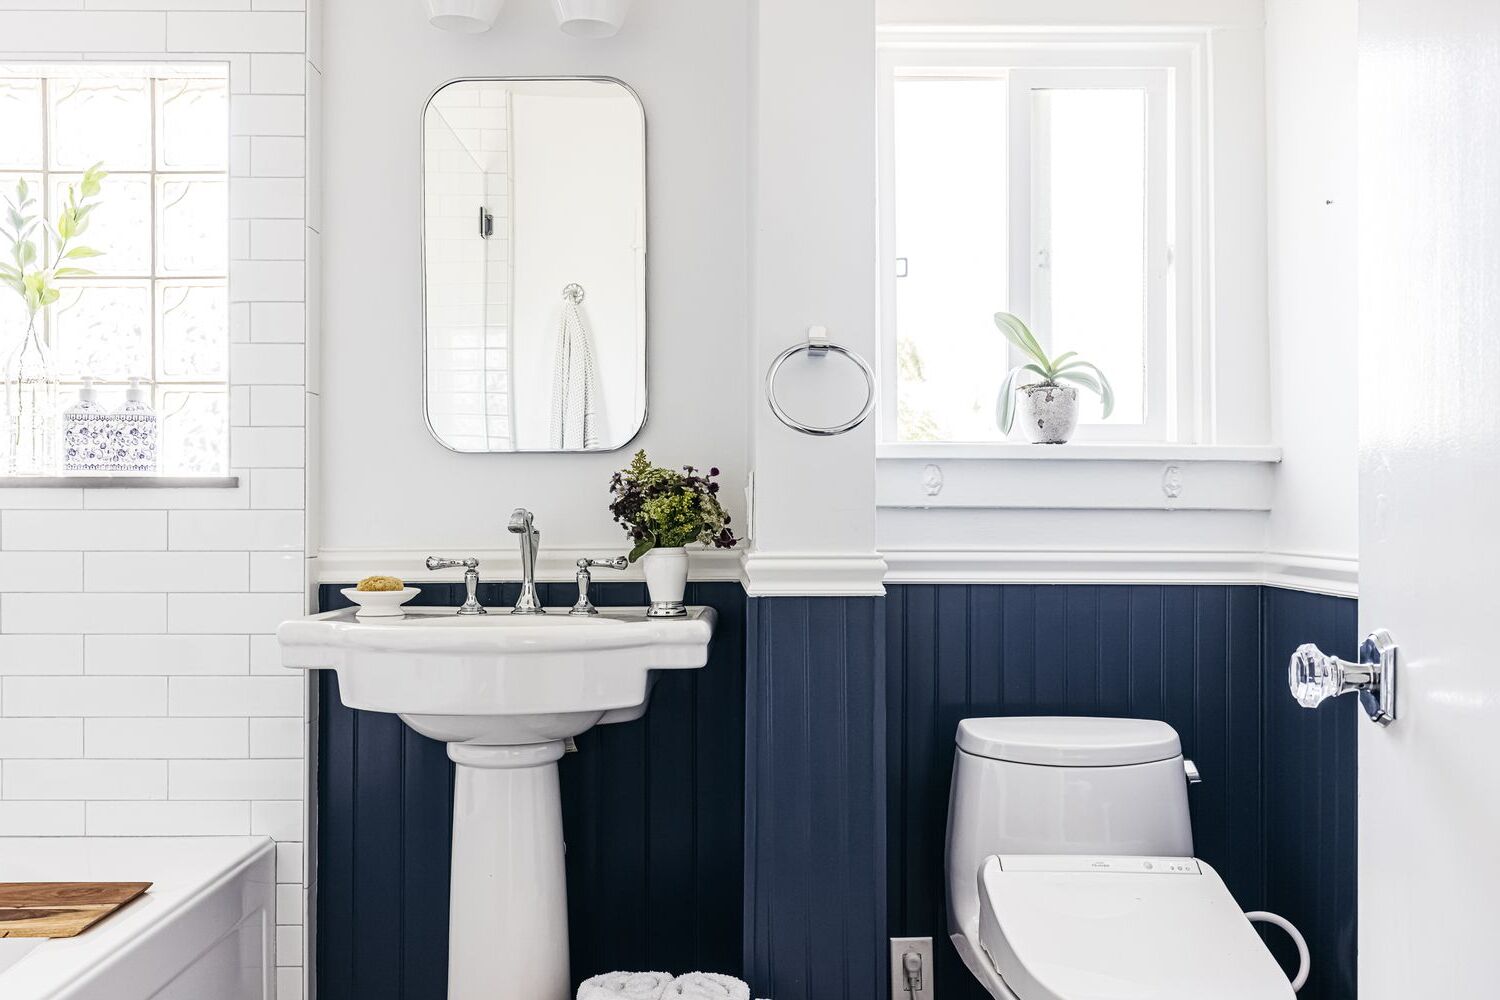
Colors: Classic white is timeless, but you can paint beadboard in any color. Try soft pastels for a calming effect or bold colors like navy or dark green for a dramatic look. For a rustic vibe, use a whitewash technique.
Styles: Traditional beadboard has narrow grooves, but you can choose wider planks for a modern twist. For a more intricate design, consider raised panel beadboard. If you prefer a coastal feel, use shiplap instead of beadboard.
Height: Standard beadboard height is 32-36 inches, but you can customize it. For a more dramatic effect, install it up to the ceiling. Alternatively, use it as a wainscoting halfway up the wall.
Finishes: For a sleek look, use high-gloss paint. For a more relaxed feel, choose a matte or satin finish. You can also distress the beadboard for a vintage appearance.
Trim: Add a chair rail at the top of the beadboard for a polished look. Use baseboard molding at the bottom for a finished edge. For an elegant touch, add crown molding where the beadboard meets the ceiling.
Patterns: Instead of vertical installation, try horizontal beadboard for a unique look. You can also create geometric patterns by cutting and arranging the beadboard in different shapes.
Accessories: Enhance the beadboard with decorative hooks for towels or robes. Install a shelf above the beadboard for extra storage or display space. Use mirrors with beadboard frames to tie the look together.
Eco-Friendly Installation Tips
Beadboard can add charm to your bathroom while being eco-friendly. Start by choosing reclaimed wood or recycled materials for the beadboard. These options reduce waste and give old materials a new life. If you can't find reclaimed wood, look for FSC-certified wood. This certification ensures the wood comes from responsibly managed forests.
Use low-VOC paints or stains to finish the beadboard. These products emit fewer harmful chemicals, making your bathroom air healthier. For adhesives, opt for water-based or non-toxic options. They are safer for both you and the environment.
When cutting the beadboard, save any scraps for future projects or donate them to a local school or community center. This reduces waste and helps others. Install the beadboard using screws instead of nails. Screws make it easier to remove and reuse the beadboard if you decide to remodel later.
Finally, consider adding insulation behind the beadboard. This can improve your bathroom's energy efficiency, reducing heating and cooling costs. Use recycled or natural insulation materials for an extra eco-friendly touch.
Your Bathroom's New Look
Installing beadboard in your bathroom can really change the vibe. It adds a touch of elegance without breaking the bank. By following these steps, you’ve not only saved money but also gained some serious DIY skills. Remember to measure twice, cut once, and always use the right tools. A little patience goes a long way. Now, your bathroom looks fresh, stylish, and uniquely yours. Plus, you’ve got a great story to tell about how you did it yourself. Enjoy the new look and the satisfaction of knowing you made it happen. Keep this momentum going for your next project. Who knows what you’ll tackle next? Maybe a new backsplash in the kitchen or some custom shelving in the living room. The possibilities are endless when you’ve got the confidence and know-how to make it happen. Happy DIY-ing!
What tools do I need to install beadboard in my bathroom?
You'll need a measuring tape, level, saw, nail gun or hammer, adhesive, caulk, and paint or stain.
How do I prepare the walls before installing beadboard?
Clean the walls thoroughly, remove any old wallpaper or paint, and ensure the surface is smooth and dry. If the walls are uneven, you might need to use shims.
Should I paint or stain the beadboard before or after installation?
It's easier to paint or stain the beadboard before installation. This way, you can ensure even coverage and avoid getting paint on your bathroom fixtures.
How do I measure and cut beadboard panels?
Measure the height and width of your walls. Use a saw to cut the beadboard panels to fit these dimensions. Always measure twice to avoid mistakes.
Can I install beadboard over existing tile?
Yes, you can install beadboard over existing tile. Use a strong adhesive and make sure the surface is clean and dry. You might need to use longer nails or screws for added stability.
How do I secure beadboard to the wall?
Apply adhesive to the back of each panel, press it firmly against the wall, and then use a nail gun or hammer to secure it in place. Make sure to nail into the studs for extra support.
What type of beadboard is best for a bathroom?
PVC beadboard is ideal for bathrooms because it's water-resistant and durable. Wood beadboard can also work if it's properly sealed and painted to protect against moisture.