
Home>Home & Furniture>Bathroom>Basement Bathroom Installation Guide
Bathroom
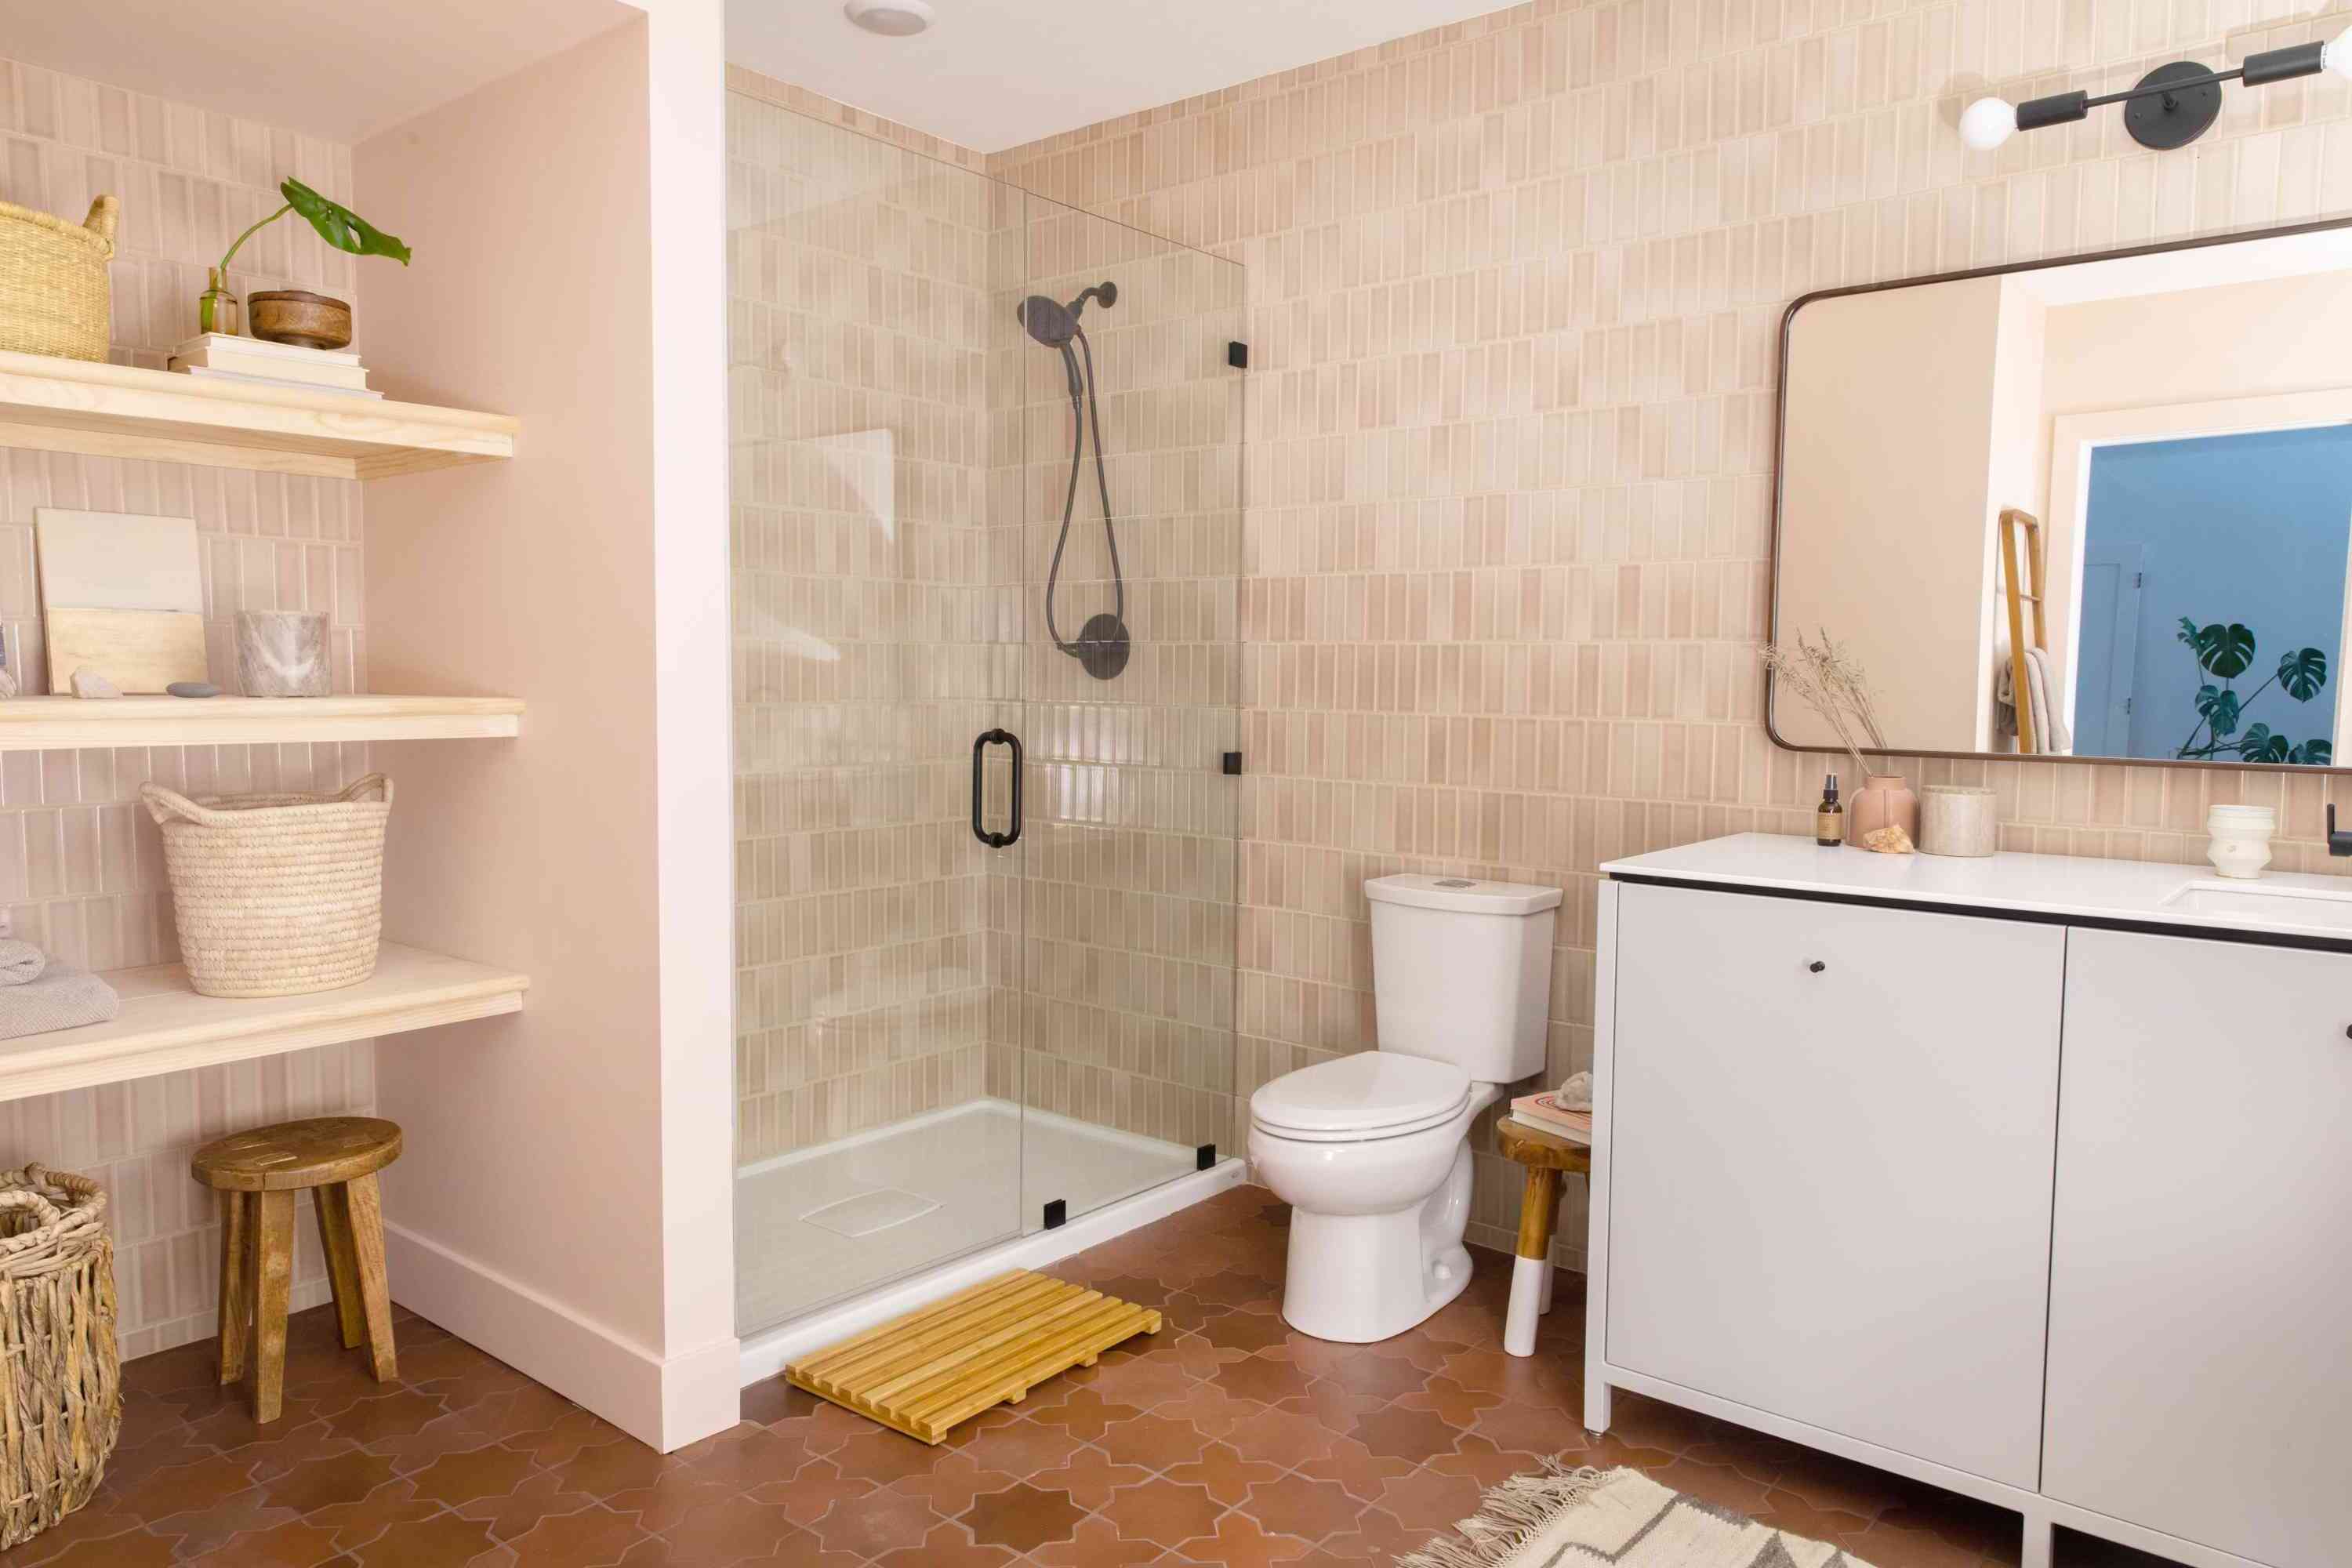
Basement Bathroom Installation Guide
Published: July 10, 2024
Learn how to install a basement bathroom with our comprehensive guide. From planning to plumbing, get expert tips to create a functional and stylish space.
(Many of the links in this article redirect to a specific reviewed product. Your purchase of these products through affiliate links helps to generate commission for Twigandthistle.com, at no extra cost. Learn more)
Thinking about adding a bathroom in your basement? It might seem like a big project, but with the right steps, anyone handy can do it! A basement bathroom adds value to homes and provides convenience. This guide will walk through essential parts of the process, from planning to finishing touches. Whether upgrading your space or making life easier for guests, a new basement bathroom could be the perfect project. Ready to jump in and get started? Let’s break it down into manageable tasks to make this DIY project straightforward and fun.
Getting Ready for Your Project
Plan Your Layout: Measure the space and decide where fixtures like the toilet, sink, and shower will go. Make sure to consider plumbing and electrical needs.
Check Local Codes: Ensure your project meets local building codes. This might require permits or inspections.
Gather Materials: Collect all necessary tools and materials. This includes pipes, fittings, fixtures, and safety gear.
Safety First: Wear protective gear like gloves, goggles, and a dust mask. Make sure the workspace is well-ventilated.
Clear the Area: Remove any clutter or obstacles from the basement. This will give you a clean, safe workspace.
Turn Off Utilities: Shut off water and electricity to the basement. This prevents accidents while working on plumbing and wiring.
Mark Utility Lines: Use spray paint or flags to mark where existing utility lines run. This helps avoid damaging them during construction.
Set Up Lighting: Ensure the workspace is well-lit. Use portable work lights if necessary.
Prepare Drainage: Plan for proper drainage. This might involve installing a sump pump or connecting to existing drainage systems.
Ventilation: Plan for adequate ventilation. This is crucial for preventing mold and ensuring air quality.
Double-Check Measurements: Before cutting or drilling, double-check all measurements. This helps avoid costly mistakes.
Essential Materials and Tools
- PVC Pipes and Fittings: Essential for plumbing. These carry water to and from the bathroom fixtures.
- Toilet: A basic necessity for any bathroom.
- Sink and Faucet: Provides a place to wash hands and face.
- Shower or Bathtub: Offers a place to bathe.
- Drainage System: Includes a sump pump if your basement is below the sewer line.
- Waterproofing Materials: Prevents water damage. Includes waterproof paint and sealants.
- Tile and Grout: Used for flooring and walls. Tiles are easy to clean and water-resistant.
- Drywall: For constructing walls. Use moisture-resistant drywall in bathrooms.
- Insulation: Keeps the bathroom warm. Use moisture-resistant insulation.
- Ventilation Fan: Removes moisture and odors. Prevents mold growth.
- Electrical Wiring and Fixtures: Powers lights, outlets, and other electrical devices.
- Plumbing Tools: Includes pipe cutter, wrench, and plumber’s tape.
- Tile Cutter: Cuts tiles to fit around fixtures and edges.
- Level and Measuring Tape: Ensures everything is straight and properly measured.
- Screwdriver and Screws: For assembling and securing fixtures.
- Caulk and Caulking Gun: Seals gaps around fixtures to prevent leaks.
- Paint and Brushes: For finishing walls and trim. Use moisture-resistant paint.
- Safety Gear: Includes gloves, goggles, and a mask. Protects you during construction.
Required Skills and Time Commitment
Skill Level: Advanced
Time Required: 1-2 weeks
- Planning and Permits: 1-2 days
- Framing and Drywall: 2-3 days
- Plumbing Installation: 3-4 days
- Electrical Work: 1-2 days
- Flooring and Tiling: 2-3 days
- Fixture Installation: 1-2 days
- Finishing Touches: 1 day
Detailed Step-by-Step Guide
Plan the Layout
- Measure the space.
- Decide where the toilet, sink, and shower will go.
- Ensure there is enough room for plumbing.
Check Building Codes
- Research local building codes.
- Obtain necessary permits.
Install Plumbing
- Mark where pipes will go.
- Cut into the concrete floor for drainage pipes.
- Lay the pipes and connect them to the main sewer line.
- Install vent pipes to prevent sewer gases from entering.
Frame the Walls
- Build the wall frames using 2x4 lumber.
- Secure the frames to the floor and ceiling.
Run Electrical Wiring
- Plan where outlets, switches, and lights will be.
- Run electrical wires through the wall frames.
- Install electrical boxes for outlets and switches.
Install Insulation
- Place insulation between wall studs.
- Use moisture-resistant insulation for basement environments.
Hang Drywall
- Cut drywall sheets to fit.
- Screw drywall to wall frames.
- Tape and mud the seams.
Install Flooring
- Choose a moisture-resistant flooring option.
- Lay the flooring according to manufacturer instructions.
Install Fixtures
- Place the toilet, sink, and shower in their designated spots.
- Connect plumbing fixtures to the water supply and drainage pipes.
Paint and Finish
- Prime and paint the walls.
- Install trim and baseboards.
- Add any finishing touches like mirrors or towel racks.
Helpful Tips and Tricks
Plan the Layout: Measure your space carefully. Ensure enough room for fixtures like the toilet, sink, and shower.
Check Plumbing: Locate existing plumbing lines. This can save money and effort. If possible, position your bathroom near these lines.
Use a Sump Pump: Basements often sit below the main sewer line. A sump pump helps move wastewater up and out.
Install a Ventilation Fan: Basements can get damp. A good ventilation fan prevents mold and keeps air fresh.
Choose Waterproof Materials: Use waterproof paint, tiles, and flooring. This helps protect against moisture damage.
Insulate Pipes: Prevent pipes from freezing in colder months. Insulation keeps water flowing smoothly.
Elevate Fixtures: Slightly elevate fixtures like the toilet and sink. This helps with drainage and prevents backflow.
Test for Radon: Basements can have higher radon levels. Test and install a radon mitigation system if needed.
Lighting: Basements can be dark. Use bright, energy-efficient lighting to make the space feel welcoming.
Common Mistakes to Avoid:
- Ignoring Permits: Always get the necessary permits. Skipping this step can lead to fines and complications.
- Poor Ventilation: Not installing a proper ventilation system can lead to mold and mildew.
- Incorrect Slope: Ensure the floor slopes towards the drain. This prevents water pooling.
- Cheap Materials: Using low-quality materials can lead to frequent repairs and higher costs in the long run.
Material Alternatives:
- PVC Pipes: Use PVC instead of metal for plumbing. It’s cheaper and easier to work with.
- Vinyl Flooring: Consider vinyl flooring instead of tiles. It’s waterproof and easier to install.
- LED Lights: Use LED lights for energy efficiency and longer life.
Method Alternatives:
- Prefab Shower Kits: Instead of custom-built showers, use prefab kits. They’re easier to install and often more affordable.
- Drywall Alternatives: Use moisture-resistant drywall or cement board. These materials handle basement conditions better.
Budgeting Your Project
Materials:
- Toilet: $100 - $300
- Sink: $50 - $200
- Shower or Bathtub: $200 - $800
- Plumbing Pipes and Fittings: $100 - $300
- Drywall: $10 per sheet (approx. 10 sheets needed) = $100
- Flooring: $2 - $5 per sq. ft. (approx. 100 sq. ft.) = $200 - $500
- Paint: $30 - $50 per gallon (2 gallons needed) = $60 - $100
- Electrical Wiring and Fixtures: $100 - $300
- Ventilation Fan: $50 - $150
- Miscellaneous Supplies (screws, nails, caulk, etc.): $50 - $100
Tools:
- Power Drill: $50 - $100
- Saw: $30 - $100
- Pipe Wrench: $15 - $30
- Trowel: $10 - $20
- Level: $10 - $20
- Tape Measure: $10 - $20
- Safety Gear (gloves, goggles, mask): $20 - $50
Total Estimated Cost: $1,165 - $3,370
Budget-Friendly Alternatives:
- Toilet: Opt for a basic model around $100
- Sink: Choose a pedestal sink for about $50
- Shower: Consider a shower kit for around $200
- Flooring: Use vinyl tiles at $2 per sq. ft.
- Paint: Buy store-brand paint for $30 per gallon
- Tools: Borrow or rent tools from a local hardware store
Creative Variations and Customizations
Alternative Materials: Instead of standard ceramic tiles, consider using vinyl flooring for a more budget-friendly option. Concrete flooring can give an industrial look. For walls, waterproof wall panels can replace traditional drywall.
Colors: Opt for light colors like soft blues or pale grays to make the space feel larger. Bold colors like navy blue or charcoal can add drama. Accent walls with bright colors like yellow or teal can make the bathroom pop.
Styles: For a modern look, use sleek fixtures and minimalist designs. Rustic styles can be achieved with wood accents and vintage fixtures. Traditional styles might include classic white tiles and elegant fixtures.
Lighting: Use recessed lighting for a clean look. Pendant lights can add style. LED strip lights under cabinets can provide soft, ambient lighting.
Fixtures: Choose floating vanities for a modern touch. Pedestal sinks can save space. Wall-mounted toilets can make cleaning easier.
Storage: Install built-in shelves for a seamless look. Over-the-toilet cabinets can add extra storage. Floating shelves can provide both storage and style.
Shower Options: Consider a walk-in shower with glass doors for a modern feel. Bathtub-shower combos can save space. Curbless showers can make the bathroom more accessible.
Decor: Add plants for a touch of nature. Use mirrors to make the space feel larger. Artwork can add personality. Rugs can add warmth and color.
Ventilation: Install a high-quality exhaust fan to prevent moisture buildup. Windows can provide natural ventilation if possible. Dehumidifiers can help keep the space dry.
Plumbing: Use PEX piping for flexibility and ease of installation. Copper pipes are durable but more expensive. PVC pipes can be a cost-effective option for drainage.
Heating: Consider radiant floor heating for comfort. Heated towel racks can add a touch of luxury. Space heaters can be a temporary solution.
Doors: Use pocket doors to save space. Barn doors can add a rustic touch. Frosted glass doors can provide privacy while letting light in.
Eco-Friendly Tips
Reclaimed Wood: Use reclaimed wood for vanities or shelving. It adds character and reduces the need for new lumber.
Recycled Tiles: Opt for tiles made from recycled glass or ceramic. They look great and help reduce landfill waste.
Low-Flow Fixtures: Install low-flow toilets, faucets, and showerheads. They save water and lower utility bills.
LED Lighting: Choose LED bulbs for lighting. They use less energy and last longer than traditional bulbs.
Eco-Friendly Paint: Use low-VOC or zero-VOC paint. These options are better for indoor air quality and the environment.
Insulation: Properly insulate walls and floors using eco-friendly materials like recycled denim or cellulose. This helps maintain temperature and reduces energy use.
Salvaged Materials: Look for salvaged sinks, bathtubs, or mirrors. These items can often be found at architectural salvage yards or online marketplaces.
Natural Ventilation: If possible, incorporate windows or vents to allow natural airflow. This reduces the need for electric ventilation systems.
Sustainable Flooring: Consider bamboo or cork flooring. Both are renewable resources and add a unique touch to the bathroom.
Composting Toilet: For a truly eco-friendly option, think about installing a composting toilet. It uses little to no water and turns waste into compost.
Your DIY Adventure Awaits
You've got the know-how to tackle that basement bathroom project. From planning the layout to installing plumbing, each step brings you closer to a functional, stylish space. Remember, patience and attention to detail are your best friends here. Don't rush; measure twice, cut once. If you hit a snag, don't hesitate to consult a pro or look up additional resources. Your hard work will pay off with a bathroom that adds value to your home and convenience to your life. So grab your tools, roll up your sleeves, and get started. Your basement bathroom isn't just a dream anymore—it's a weekend project waiting to happen. Happy building!
How do I know if my basement is suitable for a bathroom?
Check for sufficient ceiling height, proper drainage, and ventilation. You’ll also need to ensure the foundation is in good shape and there’s access to plumbing.
What kind of toilet should I install in a basement bathroom?
Consider a macerating toilet or an upflush system. These are designed to handle waste efficiently when the bathroom is below the main sewer line.
Do I need a permit to install a basement bathroom?
Yes, you’ll likely need a building permit. Check with your local building department for specific requirements and inspections.
How do I handle moisture and mold issues in a basement bathroom?
Use waterproof materials like vinyl flooring and cement board. Install a ventilation fan to reduce humidity and prevent mold growth.
Can I install a shower in my basement bathroom?
Absolutely! Just ensure you have proper drainage and waterproofing. A curbless shower can be a good option to avoid raising the floor.
What’s the best way to light a basement bathroom?
Use LED lights for energy efficiency. Recessed lighting works well for low ceilings, and consider adding a vanity light for better illumination.
How much will it cost to install a basement bathroom?
Costs can vary widely, but expect to spend between $10,000 and $15,000. This includes plumbing, electrical work, and fixtures.