
Home>Create & Decorate>DIY & Crafts>How To Build A Hog Wire Fence
DIY & Crafts
How To Build A Hog Wire Fence
Published: May 30, 2024

Senior Editor in Create & Decorate, Kathryn combines traditional craftsmanship with contemporary trends. Her background in textile design and commitment to sustainable crafts inspire both content and community.
Learn how to build a hog wire fence with our step-by-step DIY guide. Perfect for your next DIY & Crafts project. Start today!
(Many of the links in this article redirect to a specific reviewed product. Your purchase of these products through affiliate links helps to generate commission for Twigandthistle.com, at no extra cost. Learn more)
Introduction
So, you're thinking about building a hog wire fence. Whether you're looking to corral some livestock, keep out unwanted critters, or simply add a rustic touch to your property, a hog wire fence can be a practical and visually appealing addition to your home. But where do you start? How do you go about building one? Well, you've come to the right place. In this guide, we'll walk you through the step-by-step process of building your very own hog wire fence. From planning and preparation to adding the finishing touches, we've got you covered. Let's roll up our sleeves and get started!
Planning and Preparation
Before you start building your hog wire fence, it's essential to do some careful planning and preparation. Here's what you need to do:
-
Determine the Purpose: First and foremost, decide why you need the fence. Are you trying to keep your pets in, or are you trying to keep wildlife out? Understanding the purpose will help you determine the height and strength of the fence.
-
Check Local Regulations: Before you start digging post holes, check with your local authorities about any regulations or permits required for building a fence. You don't want to run into any legal issues down the road.
-
Sketch Out the Layout: Grab a pen and paper and sketch out the layout of your fence. This will help you visualize the project and determine the amount of materials you'll need.
-
Gather Tools and Equipment: Make sure you have all the necessary tools and equipment for the job. This may include a post hole digger, level, wire cutters, and a sturdy pair of gloves.
-
Calculate Materials: Once you have the layout, calculate the amount of wire panels, posts, and other materials needed for the project. It's always a good idea to buy a little extra to account for any mistakes or miscalculations.
By taking the time to plan and prepare, you'll set yourself up for a smoother and more successful fence-building experience.
Gathering Materials
Now that you've got your plan in place, it's time to gather the materials you'll need to bring your hog wire fence to life. Here's what you'll need:
-
Hog Wire Panels: These will be the main component of your fence. Measure the perimeter of your fence to determine how many panels you'll need.
-
Wooden Posts: You'll need sturdy wooden posts to support the wire panels. Make sure the posts are treated or naturally resistant to rot, as they will be in contact with the ground.
-
Concrete: For securing the posts in the ground, you'll need concrete mix. This will provide stability and longevity to your fence.
-
Fasteners: You'll need nails or screws to attach the wire panels to the wooden posts. Make sure they are suitable for outdoor use to prevent rusting.
-
Gate Hardware: If you plan to include gates in your fence, you'll need hardware such as hinges and latches. Make sure they are durable and capable of withstanding frequent use.
-
Tools: Gather the necessary tools, including a post hole digger, shovel, level, wire cutters, and a hammer. Having the right tools on hand will make the construction process much smoother.
-
Safety Gear: Don't forget to prioritize safety. Equip yourself with gloves, safety glasses, and any other protective gear necessary for the job.
By ensuring you have all the required materials and tools, you'll be well-prepared to tackle the construction of your hog wire fence.
Setting the Posts
Setting the posts is a crucial step in building a sturdy and reliable hog wire fence. Here's how to do it:
-
Mark the Post Locations: Using stakes and string, mark the locations where the wooden posts will be placed. Make sure the spacing between the posts is consistent to ensure the stability of the fence.
-
Dig the Holes: With a post hole digger, start digging the holes for the posts. The depth of the holes will depend on the height of your fence and the local frost line. As a general rule, aim for a depth that allows for at least one-third of the post to be underground.
-
Insert the Posts: Once the holes are dug, place the wooden posts in the holes. Use a level to ensure that each post is perfectly vertical. This step is crucial for the overall stability and appearance of the fence.
-
Secure with Concrete: After the posts are positioned correctly, it's time to secure them in place with concrete. Pour the concrete mix into the holes around the posts, making sure to slope the concrete away from the post to prevent water from pooling. Allow the concrete to set according to the manufacturer's instructions.
-
Double-Check Alignment: Once the concrete has set, double-check the alignment and vertical position of each post. Any adjustments should be made before proceeding to the next phase of the construction.
By following these steps, you'll ensure that your fence posts are securely anchored and ready to support the wire panels of your hog wire fence.
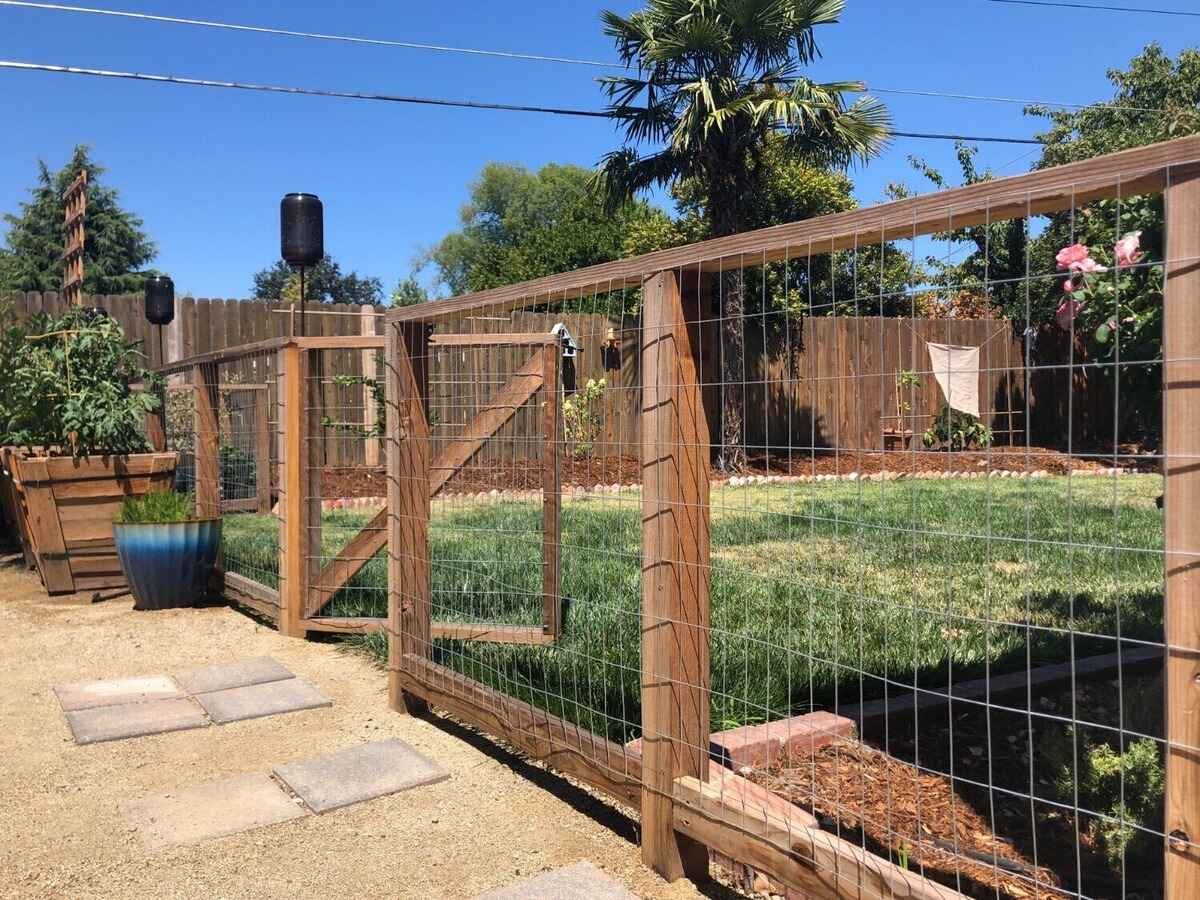
Attaching the Wire Panels
With the posts securely in place, it's time to attach the hog wire panels to create the main body of your fence. Here's how to do it:
-
Measure and Cut: Begin by measuring the distance between two adjacent posts to determine the length of wire panel needed. Use a wire cutter to trim the panel to the appropriate size. It's essential to wear gloves during this process to protect your hands from the sharp edges of the wire.
-
Position the First Panel: Starting at one end of the fence, position the first wire panel against the wooden posts. Use fasteners such as nails or screws to secure the panel to the posts. Ensure that the panel is level and properly aligned before attaching it.
-
Overlap and Secure: If your fence requires multiple panels to cover the entire length, overlap the edges of the adjacent panels by a few inches. This overlapping will provide stability and prevent gaps in the fence. Secure the overlapping sections together using wire ties or specialized fasteners designed for wire fencing.
-
Continue the Process: Move on to the next section of the fence and repeat the process of measuring, cutting, and attaching the wire panels. Use a level to ensure that each panel is installed evenly and maintains a consistent height throughout the fence.
-
Addressing Sloped Terrain: If your property has sloped terrain, you may need to adjust the panels to accommodate the changes in elevation. In such cases, you can angle the panels to follow the natural slope of the land, ensuring that the fence remains secure and visually appealing.
-
Gate Openings: If your fence includes gate openings, measure and cut the wire panels accordingly to create the appropriate opening. Install the panels around the gate posts, ensuring that they are securely attached and aligned with the rest of the fence.
By following these steps, you'll be able to effectively attach the wire panels to the wooden posts, creating a durable and visually appealing hog wire fence for your property.
Adding Gates and Finishing Touches
Adding gates to your hog wire fence provides convenient access to your property while enhancing its functionality and aesthetic appeal. Here's how to incorporate gates and add those final touches to complete your fence:
-
Select Gate Style: Choose a gate style that complements the overall design of your fence. Whether it's a simple, utilitarian gate or a decorative one, ensure it aligns with the fence's visual theme.
-
Measure and Install Gate Posts: Determine the location of the gate and install sturdy gate posts to support it. The posts should be set securely in the ground and aligned with the rest of the fence.
-
Attach Hinges and Latch: Once the gate posts are in place, attach heavy-duty hinges to the gate and secure them to the gate posts. Ensure the hinges are level and allow the gate to swing freely. Install a reliable latch or lock to keep the gate securely closed when not in use.
-
Customize Gate Opening: If your gate opening requires a custom-sized wire panel, measure and cut the panel to fit the opening. Attach the panel to the gate posts using appropriate fasteners, ensuring it aligns seamlessly with the rest of the fence.
-
Add Decorative Elements: Consider adding decorative elements such as finials, post caps, or trim pieces to enhance the visual appeal of your fence. These finishing touches can elevate the overall look of the fence and give it a polished appearance.
-
Apply Protective Finish: If you're using wooden posts, consider applying a protective finish to prolong their lifespan and maintain the fence's appearance. Stain or paint the posts to match the overall aesthetic of the fence while providing protection against the elements.
-
Inspect and Secure: Once the gates and finishing touches are in place, thoroughly inspect the entire fence. Ensure all fasteners are secure, the wire panels are properly aligned, and the gates open and close smoothly. Make any necessary adjustments to guarantee the fence's structural integrity.
By following these steps, you can seamlessly integrate gates into your hog wire fence and add those final touches that elevate its functionality and visual appeal.
Conclusion
Congratulations! You've successfully completed the construction of your hog wire fence. By following the step-by-step process outlined in this guide, you've not only added a practical barrier to your property but also enhanced its visual appeal. Your careful planning and preparation, along with the meticulous execution of setting the posts, attaching the wire panels, and adding gates and finishing touches, have resulted in a sturdy and reliable fence that serves its intended purpose.
As you stand back and admire your handiwork, take pride in the fact that you've tackled a significant DIY project and brought your vision to life. Your new hog wire fence not only provides security and containment but also adds a touch of rustic charm to your property. Remember to perform routine maintenance to ensure the longevity of your fence, such as inspecting for loose fasteners, addressing any signs of wear, and preserving the wood components.
Now that you've mastered the art of building a hog wire fence, perhaps you'll find yourself inspired to take on more DIY projects around your home. Whether it's constructing raised garden beds, building a pergola, or creating custom outdoor furniture, your newfound skills and confidence can lead to a world of creative possibilities. Embrace the satisfaction of a job well done and revel in the transformation you've brought to your outdoor space. Happy fencing!