
Home>Create & Decorate>DIY & Crafts>How To Build A Dugout Shelter
DIY & Crafts
How To Build A Dugout Shelter
Published: June 18, 2024

Senior Editor in Create & Decorate, Kathryn combines traditional craftsmanship with contemporary trends. Her background in textile design and commitment to sustainable crafts inspire both content and community.
Learn how to build a DIY dugout shelter with our step-by-step guide. Perfect for outdoor enthusiasts and survivalists. Get started with our expert tips!
(Many of the links in this article redirect to a specific reviewed product. Your purchase of these products through affiliate links helps to generate commission for Twigandthistle.com, at no extra cost. Learn more)
Introduction
So, you're thinking about building a dugout shelter, huh? Well, you've come to the right place! Whether you're preparing for a camping trip, looking for a unique DIY project, or wanting to create a safe space in case of emergencies, building a dugout shelter can be a rewarding and practical endeavor. In this guide, we'll walk you through the step-by-step process of constructing your very own dugout shelter. From choosing the right location to furnishing the interior, we've got you covered. Let's roll up our sleeves and get digging!
Choosing the Right Location
When it comes to building a dugout shelter, choosing the right location is crucial for its longevity and functionality. Here are some key factors to consider when selecting the perfect spot for your shelter:
-
Elevation: Opt for a location that is not prone to flooding. Higher ground can help prevent water from seeping into the shelter during heavy rains.
-
Soil Type: The type of soil in the area can impact the ease of digging and the stability of the shelter. Sandy or loamy soil is generally easier to excavate than dense clay soil.
-
Drainage: Ensure that the chosen location has proper drainage to prevent water accumulation inside the shelter.
-
Accessibility: Consider how easily accessible the location is for you to transport materials and equipment needed for construction.
-
Privacy and Security: If the shelter is intended for long-term use, privacy and security should be taken into account. Choose a location that offers some level of seclusion and protection.
By carefully considering these factors, you can select a location that sets the foundation for a sturdy and reliable dugout shelter.
Gathering Materials
Now that you've scoped out the perfect location for your dugout shelter, it's time to gather the necessary materials to bring your project to life. Here's a rundown of the essential items you'll need:
-
Shovel and Digging Tools: A sturdy shovel, pickaxe, and digging spade will be your best friends during the excavation process. Look for tools with durable handles and sharp edges to make the digging more manageable.
-
Supportive Materials: Depending on the size and depth of your shelter, you may need wooden beams, metal rods, or other supportive materials to reinforce the structure and prevent collapses.
-
Waterproofing Supplies: To keep your shelter dry and protected from the elements, consider investing in waterproofing materials such as tarpaulin, plastic sheeting, or specialized waterproof coatings.
-
Ventilation Pipes: Proper ventilation is crucial for air circulation inside the shelter. Ventilation pipes or tubes will help maintain air quality and prevent the buildup of moisture and stale air.
-
Entryway Materials: Whether it's a simple hatch or a more elaborate door, you'll need materials to create a secure and functional entryway for your shelter.
-
Furnishing and Storage: If you plan to use the shelter for extended periods, think about the furnishings and storage solutions you'll need. This may include shelves, sleeping platforms, or seating arrangements.
By gathering these materials in advance, you'll be well-prepared to tackle each phase of the construction process and ensure that your dugout shelter meets your needs and expectations.
Digging the Shelter
Now comes the physically demanding yet crucial phase of the project – digging the shelter. This step requires patience, precision, and a good amount of elbow grease. Here's a step-by-step guide to help you navigate through the excavation process:
-
Marking the Layout: Begin by marking the layout of your shelter on the ground using stakes and string. This will give you a clear visual guide and help maintain the desired dimensions as you dig.
-
Excavation: Armed with your trusty shovel and digging tools, start excavating the marked area. Begin by removing the topsoil and gradually work your way deeper into the ground. Be mindful of the soil composition and any potential obstacles such as rocks or roots.
-
Creating Headroom: As you dig deeper, consider the headroom you'll need inside the shelter. Depending on the intended use, aim for a comfortable height that allows occupants to move and sit without feeling cramped.
-
Sloping the Walls: To enhance stability and prevent collapses, it's essential to slope the walls of the shelter. This means digging at an inward angle as you descend, creating a trapezoidal or wedge-shaped profile for the walls.
-
Removing Debris: Throughout the excavation process, periodically remove soil and debris from the shelter to maintain a clean and organized workspace. This will also make it easier to assess the progress and make any necessary adjustments.
-
Measuring Depth: Continuously measure the depth of the shelter to ensure it aligns with your initial plan. This will help you avoid over-excavation and maintain control over the dimensions of the shelter.
-
Safety Precautions: Prioritize safety during the digging process. Avoid working in the shelter alone, especially during deep excavation, and consider using support structures or shoring systems to prevent cave-ins.
By following these steps and taking the time to dig methodically and safely, you'll lay the groundwork for a sturdy and well-crafted dugout shelter. Remember, the effort put into this phase will directly impact the overall quality and durability of the finished structure.
Reinforcing and Waterproofing
Once the excavation is complete, it's time to focus on reinforcing and waterproofing the shelter to ensure its structural integrity and protection from the elements. Here's a detailed breakdown of the essential steps for this phase:
-
Reinforcing the Walls: Use wooden beams, metal rods, or wire mesh to reinforce the walls of the shelter. These materials will add strength and stability, reducing the risk of collapses or shifting soil. Secure the reinforcements firmly in place, ensuring they form a supportive framework for the structure.
-
Applying Waterproofing Materials: To prevent water seepage and moisture buildup, apply waterproofing materials to the interior walls and floor of the shelter. Options include waterproof coatings, sealants, or layers of tarpaulin or plastic sheeting. Pay special attention to areas where the walls meet the floor to create a seamless barrier against water intrusion.
-
Drainage Considerations: Incorporate a simple drainage system to redirect any water that may enter the shelter. This can be achieved by creating a slight slope in the floor towards a designated drainage point, allowing water to flow out of the shelter. Additionally, consider adding a layer of gravel or small stones at the base to facilitate drainage and minimize standing water.
-
Sealing Joints and Gaps: Inspect the walls and floor for any gaps, cracks, or joints that could compromise the waterproofing. Seal these areas using appropriate caulking or sealant to create a tight seal. Pay attention to corners and intersections where water infiltration is more likely to occur.
-
Elevating the Entryway: If possible, elevate the entryway slightly above the ground level to prevent water from flowing into the shelter during heavy rains. This can be achieved by creating a small step or using a raised platform at the entrance.
By reinforcing the structure and implementing effective waterproofing measures, you'll significantly enhance the durability and resilience of your dugout shelter. These steps are crucial for creating a secure and habitable space that can withstand various weather conditions and provide long-term protection.
Adding Ventilation and Entryway
Proper ventilation is essential for maintaining air quality and circulation within the dugout shelter. Without adequate ventilation, the shelter can become stuffy and prone to moisture buildup, leading to potential health hazards and discomfort. Here's how to ensure effective ventilation and create a functional entryway for your shelter:
-
Ventilation Openings: Begin by creating ventilation openings in the walls of the shelter. These openings can be small windows or air vents strategically positioned to allow fresh air to enter and stale air to exit. Consider covering the openings with mesh or screens to prevent insects and debris from entering the shelter.
-
Ventilation Pipes or Tubes: For improved airflow, consider installing ventilation pipes or tubes that extend from the interior of the shelter to the surface. These pipes can be angled to capture air from higher ground and channel it into the shelter, promoting natural ventilation.
-
Entryway Design: When designing the entryway, prioritize functionality and security. If the shelter is intended for emergency use, ensure that the entryway is easily accessible and can be opened from both the inside and outside. A simple hatch or door can provide the necessary security while allowing for convenient entry and exit.
-
Rain Protection: To prevent rainwater from entering the shelter through the entryway, consider adding a small overhang or awning above the entrance. This will help deflect water away from the opening and keep the interior dry during inclement weather.
-
Insect Screening: Install insect screens or mesh over the entryway to prevent bugs and pests from entering the shelter. This is especially important in outdoor settings where insects may pose a nuisance or health risk.
By incorporating these ventilation and entryway features, you'll create a comfortable and secure environment within the dugout shelter. Proper airflow and a well-designed entryway are essential for ensuring the habitability and functionality of the shelter, whether it's used for short-term camping trips or as a long-term emergency refuge.
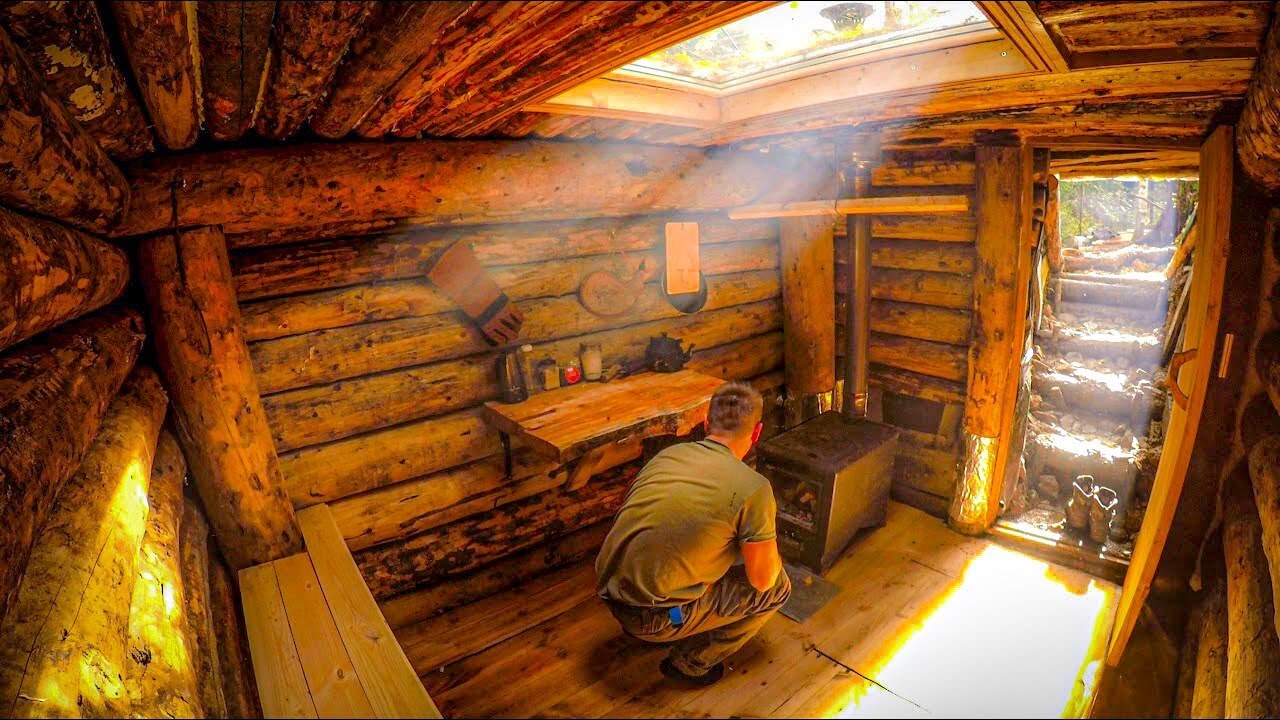
Furnishing the Dugout Shelter
Furnishing the interior of your dugout shelter is where you can truly transform it into a comfortable and functional living space. Whether you're planning to use the shelter for short-term stays or as a long-term refuge, thoughtful furnishing can make a significant difference in its usability. Here are some key considerations and ideas for furnishing your dugout shelter:
-
Sleeping Arrangements: Depending on the size of the shelter, consider installing sleeping platforms or elevated beds to provide a comfortable and elevated sleeping area. Utilize sturdy wooden planks or metal frames to create stable platforms that can accommodate sleeping pads or mattresses.
-
Storage Solutions: Maximizing storage space is essential, especially for long-term use. Install shelves or storage compartments along the walls to keep belongings organized and off the ground. Utilize hanging organizers or hooks to store smaller items and keep the interior clutter-free.
-
Seating and Relaxation: If space allows, incorporate seating options such as benches, stools, or collapsible chairs. Consider creating a designated relaxation area with cushions or bean bags to provide a comfortable space for reading, resting, or socializing.
-
Lighting: Proper lighting is crucial for creating a welcoming atmosphere. Install battery-powered LED lights or solar-powered lamps to illuminate the interior during the evenings. Consider using adjustable lighting options to cater to different activities and moods.
-
Cooking and Dining: If the shelter will be used for extended stays, consider setting up a small cooking area with a portable stove or compact cooking equipment. Create a designated dining space with a foldable table and seating to facilitate meal times.
-
Personalization: Add personal touches to the interior by hanging artwork, photographs, or decorative items. Incorporate elements that reflect your style and create a sense of homeliness within the shelter.
-
Emergency Supplies: Dedicate a section of the shelter for storing essential emergency supplies such as first aid kits, emergency food rations, and communication devices. Ensure that these items are easily accessible in case of unforeseen circumstances.
By carefully planning and furnishing the interior of your dugout shelter, you can create a space that is not only functional but also comfortable and inviting. Tailoring the furnishings to your specific needs and preferences will enhance the overall experience of using the shelter, whether it's for recreational camping or as a preparedness measure for emergencies.
Conclusion
In conclusion, building a dugout shelter can be a fulfilling and practical endeavor, providing a secure and versatile space for various purposes. By carefully selecting the location, gathering the necessary materials, and following the step-by-step construction process, you can create a durable and habitable shelter. From reinforcing and waterproofing the structure to adding ventilation and furnishing the interior, each phase contributes to the functionality and comfort of the shelter. Whether it's for camping adventures, emergency preparedness, or simply exploring a unique DIY project, a well-built dugout shelter offers a sense of self-reliance and resilience. Embrace the creativity and resourcefulness involved in constructing your own shelter, and enjoy the satisfaction of having a personalized retreat that stands the test of time.