
Home>Home & Furniture>Garage & Basement>How to Repair Basement Wall Cracks
Garage & Basement
How to Repair Basement Wall Cracks
Published: August 30, 2024
Learn how to repair basement wall cracks with our step-by-step guide. Ensure a dry, stable foundation by addressing common issues and preventing future damage.
(Many of the links in this article redirect to a specific reviewed product. Your purchase of these products through affiliate links helps to generate commission for Twigandthistle.com, at no extra cost. Learn more)
Dealing with cracks in your basement walls might seem overwhelming, but with some basic tools and a bit of patience, you can tackle this DIY project. Cracks can result from natural settling, water pressure, or temperature changes. Ignoring them could lead to larger problems like water damage or structural issues. By learning how to repair these cracks, you can maintain the integrity of your home and save money on potential repairs. Follow these simple steps to ensure your basement remains dry and safe. It's easier than you think to give your basement walls a new lease on life!
Getting Ready for the Repair
Inspect the Cracks: Check the cracks to determine their size and cause. Small hairline cracks might just need sealing, while larger ones could indicate structural issues.
Gather Materials: Get epoxy or polyurethane injection kits, a wire brush, a chisel, safety goggles, gloves, and a dust mask.
Clear the Area: Move any furniture or items away from the wall. Ensure you have enough space to work comfortably.
Clean the Cracks: Use a wire brush to remove any loose debris or dirt from the cracks. This helps the filler adhere better.
Chisel Out Loose Material: Use a chisel to remove any loose concrete around the crack. This creates a clean surface for the repair material.
Set Up a Ventilated Workspace: Make sure the area is well-ventilated. Open windows or use fans to circulate air, especially when working with chemicals.
Wear Safety Gear: Put on safety goggles, gloves, and a dust mask to protect yourself from dust and chemicals.
Mix the Epoxy or Polyurethane: Follow the instructions on the kit to mix the repair material. Make sure to do this in a well-ventilated area.
Apply the Filler: Use the injection kit to fill the cracks with epoxy or polyurethane. Start from the bottom and work your way up.
Allow to Cure: Let the filler cure as per the manufacturer's instructions. This usually takes a few hours to a day.
Inspect the Repair: Once cured, check the repair to ensure the cracks are fully sealed. If needed, apply a second layer.
Clean Up: Dispose of any leftover materials and clean your tools. Make sure the area is tidy and safe.
What You Need: Materials and Tools
Concrete Patch: This is a special mixture used to fill and seal cracks in concrete walls. It helps prevent water from seeping through.
Epoxy Injection Kit: Contains epoxy resin and hardener. This kit is used to fill and bond cracks from the inside, making the wall stronger.
Wire Brush: Used to clean the crack area by removing loose debris and dirt. This ensures the patch or epoxy sticks well.
Chisel and Hammer: These tools help widen the crack slightly, making it easier to fill and ensuring a better bond.
Caulking Gun: Needed to apply the epoxy or concrete patch smoothly into the crack.
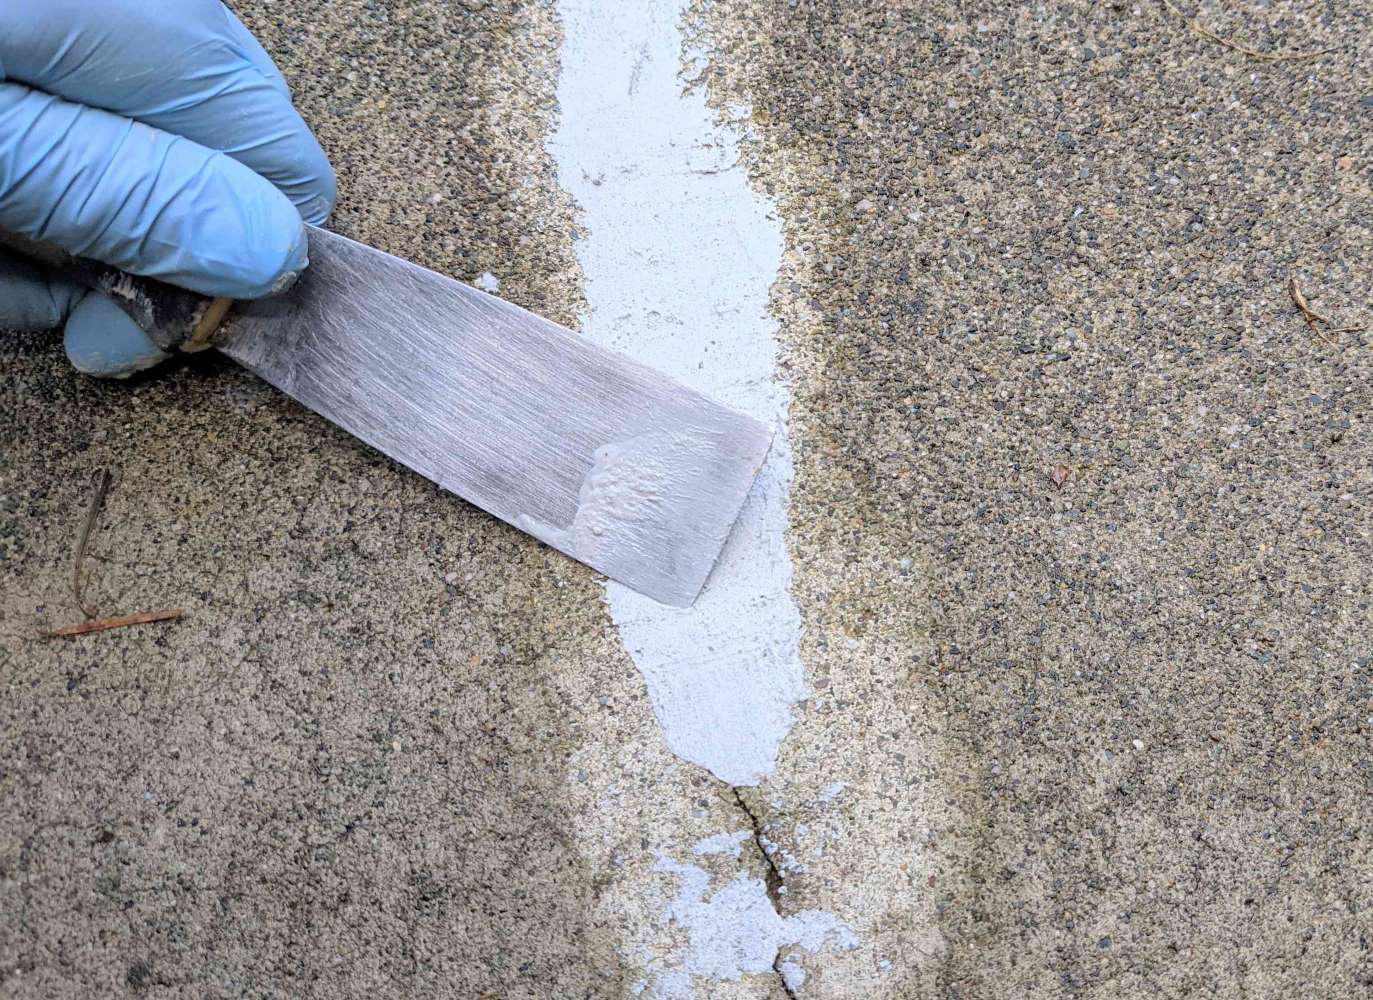
Putty Knife: Used to spread and smooth the concrete patch over the crack.
Safety Gear: Includes gloves, safety glasses, and a mask to protect from dust and chemicals.
Bucket and Water: For cleaning tools and mixing the concrete patch if needed.
Shop Vacuum: Helps clean up dust and debris from the crack area before applying the patch or epoxy.
Sealant: Applied over the patched area to provide an extra layer of protection against moisture.
Skill Level and Time Commitment
Skill Level: Intermediate
Time Required: 3-5 hours
- Clean the Crack: 30 minutes
- Apply Epoxy or Polyurethane Foam: 1 hour
- Allow to Cure: 2-3 hours
- Finish and Paint: 1 hour
Instructions: Fixing Basement Wall Cracks
Inspect the Crack
- Clean the area around the crack.
- Use a flashlight to see the full extent of the damage.
Clean the Crack
- Use a wire brush to remove loose debris.
- Vacuum the crack to clear out dust and small particles.
Widen the Crack
- Use a chisel and hammer to widen the crack slightly.
- This helps the filler material adhere better.
Apply Concrete Bonding Adhesive
- Brush on the adhesive inside the crack.
- Let it dry according to the product instructions.
Mix Hydraulic Cement
- Follow the instructions on the package.
- Mix until you get a thick, putty-like consistency.
Fill the Crack
- Press the hydraulic cement into the crack using a putty knife.
- Smooth the surface to match the surrounding wall.
Let it Cure
- Allow the cement to dry completely.
- This usually takes about 24 hours.
Seal the Wall
- Apply a waterproof masonry sealer over the repaired area.
- Use a paintbrush or roller for even coverage.
Monitor the Repair
- Check the repaired area periodically.
- Look for any signs of new cracks or moisture.
Helpful Tips and Tricks
Clean the crack thoroughly before starting. Use a wire brush to remove dirt and loose material. This helps the repair material stick better.
Use epoxy or polyurethane foam for filling. Epoxy is strong and durable, while polyurethane foam expands to fill gaps. Both work well, but choose based on your needs.
Apply in layers if the crack is deep. Fill a bit, let it dry, then add more. This prevents sagging and ensures a solid repair.
Seal the outside of the wall too. Waterproofing paint or sealant on the exterior can prevent water from getting in and causing more damage.
Common mistakes to avoid:
- Skipping the cleaning step. Dirt and debris can prevent the filler from sticking properly.
- Using the wrong filler. Not all fillers are suitable for all types of cracks. Epoxy is best for structural cracks, while polyurethane foam is better for non-structural ones.
- Ignoring moisture issues. If water is causing the cracks, fix the water problem first. Otherwise, the cracks will come back.
Alternatives for materials or methods:
- Hydraulic cement can be used instead of epoxy or foam. It expands as it dries, filling the crack tightly.
- Concrete patching compound is another option. It's easy to apply and works well for small cracks.
- Professional injection kits are available for those who prefer a more advanced solution. These kits often come with everything needed for a thorough repair.
Estimating the Cost
Concrete Patch: $20 for a 10-pound bucket.
Epoxy Injection Kit: $50 for a basic kit.
Wire Brush: $5.
Putty Knife: $7.
Caulking Gun: $10.
Hydraulic Cement: $15 for a 10-pound bucket.
Safety Gear: $10 for gloves and goggles.
Total Cost: Around $117.
Budget-Friendly Alternatives:
Concrete Patch: Use a smaller 5-pound bucket for $10.
Epoxy Injection Kit: Opt for a smaller kit for $30.
Wire Brush: Use an old toothbrush for free.
Putty Knife: Use a plastic one for $3.
Caulking Gun: Borrow from a friend or neighbor.
Hydraulic Cement: Use a smaller 5-pound bucket for $8.
Safety Gear: Use old gloves and sunglasses.
Total Cost with Alternatives: Around $61.
Different Approaches and Customizations
Materials: Instead of standard concrete or epoxy, try using hydraulic cement. It expands as it dries, filling cracks more effectively. Polyurethane foam is another option, especially for larger gaps. It’s flexible and can handle slight movements in the wall.
Colors: If you want to blend the repair with the existing wall, use tinted sealants or paints. You can mix concrete dye into the repair material to match the wall color. For a more decorative look, consider using textured paint or wallpaper over the repaired area.
Styles: For a more polished finish, apply a skim coat of plaster over the repaired cracks. This gives the wall a smooth, uniform look. If you prefer a rustic style, leave the repair slightly rough and paint it with a distressed finish. Adding molding or trim around the repaired area can also create a framed effect, making the repair look intentional and stylish.
Eco-Friendly Repair Tips
Eco-friendly materials can help repair basement wall cracks while being kind to the planet. Recycled concrete is a great option. It uses old concrete pieces, reducing waste. Fly ash can replace some cement in concrete mixes. This byproduct of coal burning helps reduce the carbon footprint.
Natural hydraulic lime is another choice. It’s breathable and flexible, making it ideal for older homes. Reclaimed wood can be used for forms or supports during repairs. It gives old wood a new life instead of sending it to landfills.
For methods, consider using low-VOC (volatile organic compounds) sealants. These are less harmful to indoor air quality. Permeable coatings allow walls to breathe, reducing moisture buildup. This can prevent future cracks.
Reusing materials from other projects can save money and resources. Old bricks, stones, or even metal can be repurposed. Recycling broken concrete into smaller pieces can create a strong base for new repairs.
Eco-friendly insulation like sheep wool or cotton can be added to walls after repairs. These materials are sustainable and improve energy efficiency. Plant-based foam is another option, offering good insulation without harmful chemicals.
Using solar-powered tools can also reduce your carbon footprint. They harness the sun’s energy, making your repair work more sustainable. Hand tools are another eco-friendly choice, requiring no electricity at all.
By choosing sustainable options, you can repair basement wall cracks effectively while helping the environment.
Keep Your Basement Dry and Safe
Fixing basement wall cracks isn't just about aesthetics; it's about preventing water damage and maintaining your home's structural integrity. Start by identifying the type of crack, then choose the right repair method. Use epoxy injections for small cracks and hydraulic cement for larger ones. Don't forget to seal the exterior to keep moisture out. Regularly check your basement for new cracks and address them promptly. This proactive approach saves you from bigger headaches down the road. So, grab your tools, roll up your sleeves, and tackle those cracks head-on. Your basement will thank you!
How do I identify cracks in my basement walls?
Look for visible lines or gaps in the concrete or masonry. Water stains, efflorescence (white powdery residue), and damp spots can also indicate cracks.
What causes basement wall cracks?
Soil pressure, settling foundations, water damage, and temperature changes are common culprits. Tree roots and poor drainage can also contribute.
Are all basement wall cracks serious?
Not necessarily. Hairline cracks are often harmless, but wider cracks or those that leak water should be addressed. Horizontal cracks can be more serious than vertical ones.
Can I fix basement wall cracks myself?
Absolutely! Epoxy injections and polyurethane foam are great for small cracks. For larger issues, you might need hydraulic cement or carbon fiber straps.
What tools and materials do I need?
You’ll need epoxy or polyurethane kits, a caulking gun, wire brush, chisel, safety goggles, and gloves. For bigger repairs, hydraulic cement and carbon fiber straps might be necessary.
How do I prevent future cracks?
Ensure proper drainage around your home, keep gutters clean, and grade soil away from the foundation. Waterproofing your basement walls can also help.
When should I call a professional?
If cracks are wider than 1/4 inch, horizontal, or leaking water, it’s best to get a professional assessment. Structural issues often require expert intervention.