
Home>Home & Furniture>Garage & Basement>DIY Guide: Insulating Your Garage
Garage & Basement
DIY Guide: Insulating Your Garage
Published: September 28, 2024
Learn how to insulate your garage with our comprehensive DIY guide. Improve energy efficiency, reduce noise, and create a comfortable space with easy-to-follow steps.
(Many of the links in this article redirect to a specific reviewed product. Your purchase of these products through affiliate links helps to generate commission for Twigandthistle.com, at no extra cost. Learn more)
Is your garage too hot in summer and too cold in winter? Insulating it can make a huge difference. Not only does it help regulate the temperature, but it also reduces noise and can make your garage more energy-efficient. This guide will walk you through the steps needed to insulate your garage effectively. Whether you use it as a workshop, storage space, or extra room, insulation can provide comfort year-round. No need for professional help; you can tackle this project on your own with some basic tools and materials. Let’s get started on making your garage a more comfortable space.
Getting Ready for the Project
Gather Materials: Collect insulation rolls or panels, utility knife, measuring tape, staple gun, safety goggles, gloves, and a dust mask.
Clear the Area: Remove any items from the garage walls and floor. Ensure you have enough space to move around.
Inspect for Damage: Check walls for any cracks or holes. Repair these before starting insulation to ensure effectiveness.
Measure the Space: Measure the height and width of the walls and ceiling. This helps in cutting insulation to the right size.
Safety First: Wear safety goggles, gloves, and a dust mask to protect yourself from insulation fibers.
Turn Off Power: Switch off electricity to the garage to avoid any accidents while working near outlets or wiring.
Prepare the Workspace: Lay down a tarp or old sheet to catch any debris. This makes cleanup easier.
Ventilation: Ensure the garage is well-ventilated. Open windows or use fans to keep air circulating.
Plan the Layout: Decide where to start and how you will proceed. This helps in working systematically and efficiently.
What You Need: Materials and Tools
Insulation Material: Choose between fiberglass batts, foam board, or spray foam. Fiberglass batts are cost-effective and easy to install. Foam boards provide high insulation value with minimal thickness. Spray foam offers excellent coverage but can be more expensive.
Utility Knife: Essential for cutting insulation material to fit between studs and around obstacles. A sharp blade ensures clean cuts.
Measuring Tape: Accurate measurements are crucial for fitting insulation properly. A sturdy tape measure helps ensure precision.
Staple Gun: Needed for securing fiberglass batts to wooden studs. Staples keep the insulation in place and prevent sagging.
Protective Gear: Includes gloves, safety glasses, and a dust mask. Insulation materials can irritate skin, eyes, and lungs.
Foam Sealant: Used to fill gaps and cracks around windows, doors, and other openings. Expanding foam sealant provides an airtight seal.
Caulk Gun: Necessary for applying caulk around edges and seams. Ensures a tight seal to prevent air leaks.
Drywall: Covers the insulation and provides a finished look. Drywall sheets are screwed into place over the insulated walls.
Drywall Screws: Secure drywall to studs. Screws provide a strong hold and are easy to install with a drill.
Drill: Used for driving screws into drywall and studs. A cordless drill offers flexibility and ease of use.
Drywall Tape and Mud: Covers seams between drywall sheets. Tape and mud create a smooth, finished surface.
Putty Knife: Applies drywall mud to seams and screw holes. A wide blade ensures even application.
Sandpaper: Smooths dried drywall mud for a polished finish. Fine-grit sandpaper works best for this task.
Ladder: Needed for reaching high areas. A sturdy ladder ensures safety while working at height.
Work Light: Provides adequate lighting in the garage. Good lighting is essential for seeing details and working safely.
Skill Level and Time Commitment
Skill Level: Intermediate
Estimated Time Required: 1-2 days
Preparation: 2-3 hours
- Gather materials (insulation, utility knife, adhesive, etc.)
- Clear the garage space
Installing Insulation: 6-8 hours
- Measure and cut insulation
- Attach insulation to walls and ceiling
Sealing Gaps: 2-3 hours
- Use caulk or foam to seal gaps around windows, doors, and outlets
Finishing Touches: 2-3 hours
- Install drywall or paneling over insulation
- Clean up workspace
How to Insulate Your Garage: Step-by-Step
Gather Materials:
- Insulation rolls or panels
- Utility knife
- Measuring tape
- Staple gun
- Safety goggles
- Work gloves
Measure the Walls:
- Use the measuring tape to find the height and width of each wall.
- Write down measurements to ensure accurate cuts.
Cut Insulation:
- Lay out insulation rolls or panels.
- Cut pieces to fit wall measurements using the utility knife.
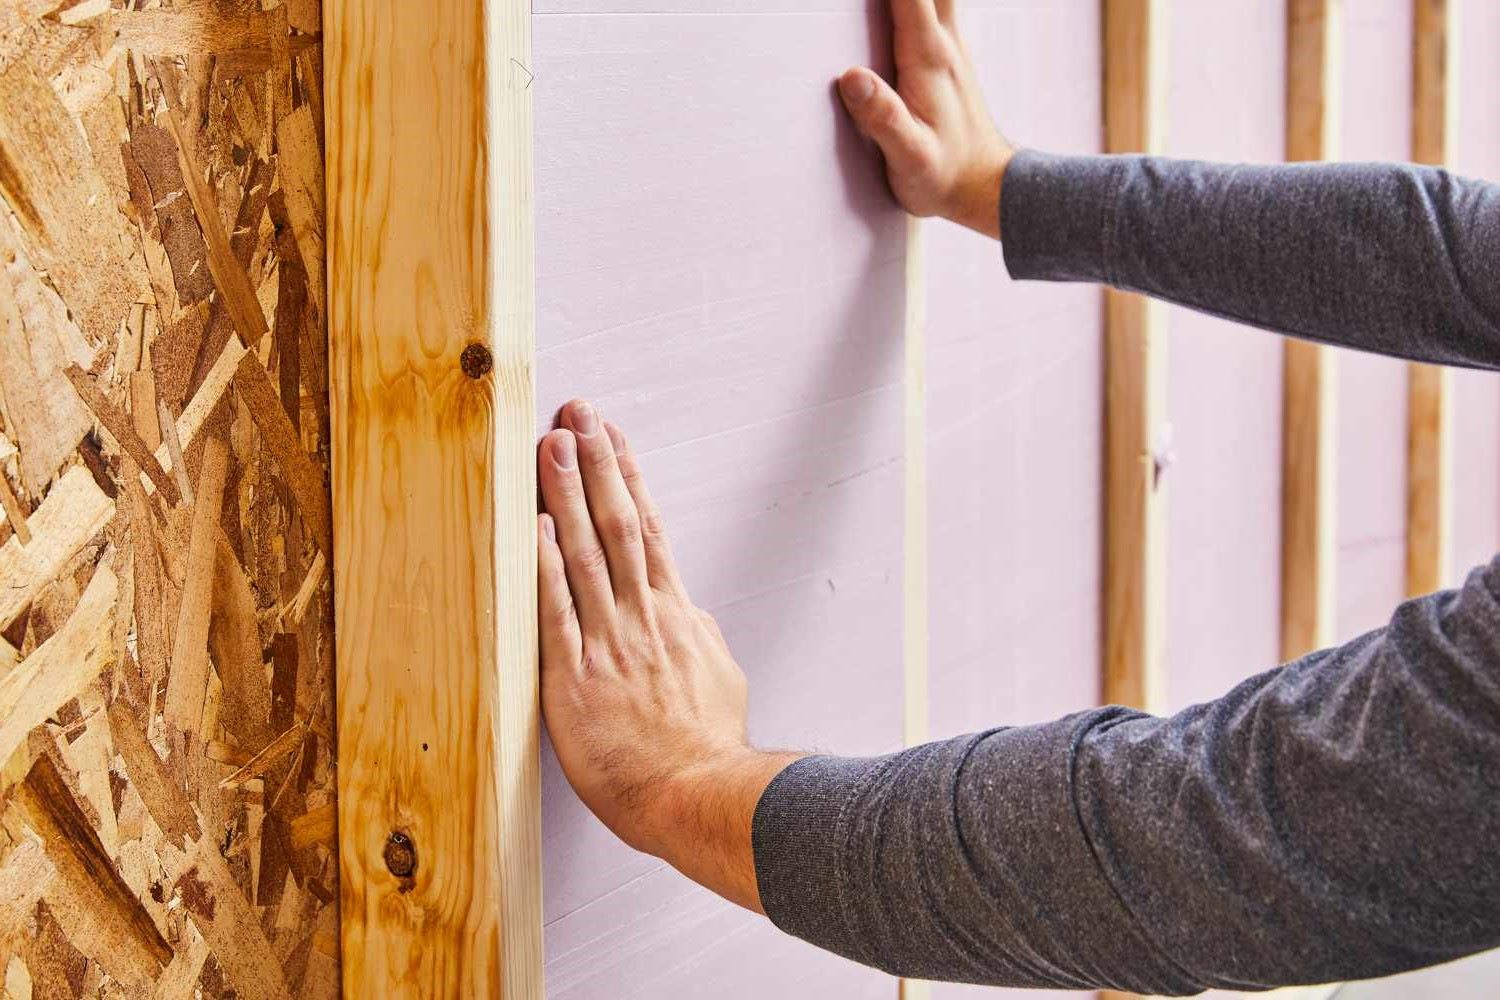
Install Insulation:
- Place insulation between wall studs.
- Ensure a snug fit without compressing the material.
Secure Insulation:
- Use the staple gun to attach insulation to wall studs.
- Staple every 6-8 inches along the edges.
Insulate the Garage Door:
- Measure door panels.
- Cut insulation to fit each panel.
- Attach using adhesive or double-sided tape.
Seal Gaps:
- Check for gaps around windows, doors, and outlets.
- Fill gaps with spray foam or caulk to prevent drafts.
Clean Up:
- Remove any debris or leftover materials.
- Dispose of waste properly.
Inspect Work:
- Ensure all areas are covered and secured.
- Make adjustments if necessary.
Helpful Tips and Tricks
Measure twice, cut once. Always double-check measurements before cutting insulation material. This saves time and reduces waste.
Use a utility knife. A sharp utility knife makes cutting insulation easier and more precise. Dull blades can tear the material.
Seal gaps and cracks. Use caulk or spray foam to seal any gaps or cracks in walls, ceilings, and around windows. This prevents drafts and improves insulation efficiency.
Wear protective gear. Insulation materials can irritate skin and lungs. Wear gloves, long sleeves, and a mask to protect yourself.
Install a vapor barrier. A vapor barrier helps prevent moisture buildup, which can cause mold. Place it on the warm side of the insulation.
Use foam board for doors. Garage doors often let in cold air. Attach foam board insulation to the inside of the door to improve insulation.
Consider radiant barriers. Radiant barriers reflect heat away from the garage. They are especially useful in hot climates.
Common mistakes to avoid:
Skipping the vapor barrier. This can lead to moisture problems and mold growth.
Not sealing gaps. Even small gaps can let in drafts, reducing insulation effectiveness.
Using the wrong type of insulation. Different areas of the garage may require different types of insulation. Research what works best for your specific needs.
Alternatives for materials or methods:
Reflective insulation. Instead of traditional fiberglass, use reflective insulation. It’s easier to install and works well in hot climates.
Spray foam insulation. Though more expensive, spray foam provides excellent coverage and seals gaps effectively.
Recycled denim insulation. An eco-friendly option, recycled denim is safe to handle and provides good insulation.
Insulated garage doors. If attaching foam board seems too complicated, consider purchasing a pre-insulated garage door.
Estimating the Cost
Insulating your garage can be a great way to save on energy costs. Here's a rough estimate of what you'll need:
Insulation Material:
- Fiberglass Batts: $0.50 - $1 per square foot
- Foam Board: $1.50 - $3 per square foot
- Spray Foam: $1 - $2 per square foot
Vapor Barrier: $0.10 - $0.20 per square foot
Drywall: $10 - $15 per sheet (4x8 feet)
Drywall Screws: $5 - $10 per box
Joint Compound: $10 - $15 per bucket
Drywall Tape: $3 - $5 per roll
Utility Knife: $5 - $10
Measuring Tape: $5 - $15
Staple Gun: $10 - $20
Staples: $3 - $5 per pack
Safety Gear:
- Gloves: $5 - $10
- Goggles: $5 - $15
- Dust Mask: $1 - $5 each
Budget-friendly alternatives:
- Use recycled insulation materials, which can be cheaper.
- Borrow or rent tools like a staple gun or utility knife from friends or neighbors.
- Look for sales or discounts at local hardware stores.
Total cost can range from $200 to $500 depending on the size of your garage and the materials chosen.
Different Ways to Customize
Materials: Instead of fiberglass, try spray foam for better coverage. Use rigid foam boards for a cleaner look. Consider reflective insulation to keep heat out during summer.
Colors: Paint the insulation with heat-resistant paint. Choose light colors to reflect light and make the garage brighter. Use dark colors for a cozy feel.
Styles: Add wood paneling over insulation for a rustic look. Use drywall for a smooth, finished appearance. Install pegboards for added storage and functionality.
Alternative Methods: Use weatherstripping around doors and windows. Hang insulated curtains for extra warmth. Install a radiant barrier on the ceiling to reflect heat.
Eco-Friendly Options: Choose recycled denim insulation for a green option. Use sheep’s wool for natural insulation. Try cork panels for a sustainable choice.
Eco-Friendly Insulation Tips
Recycled denim insulation is a great option. Made from old jeans, it’s safe to handle and effective. Cork panels are another eco-friendly choice. They come from renewable cork trees and provide excellent insulation. Sheep’s wool is natural, biodegradable, and has great insulating properties.
Use reclaimed wood for framing. It’s sturdy and gives old wood a new purpose. Cellulose insulation made from recycled paper is also effective. It’s treated to resist fire and pests.
Reflective barriers can help too. They reflect heat away in summer and keep warmth in during winter. Use eco-friendly sealants to close gaps. Look for ones with low VOCs (volatile organic compounds).
Reuse old materials whenever possible. Old blankets or rugs can add extra insulation. Recycling materials reduces waste and saves money.
Solar-powered fans can help regulate temperature without using electricity. They’re easy to install and eco-friendly. LED lighting is energy-efficient and lasts longer.
Consider natural ventilation. Vents or windows can improve airflow and reduce the need for artificial cooling. Green roofs or walls can also help insulate and reduce heat.
Compostable materials like straw bales can be used for insulation. They’re cheap and effective. Natural clay plaster can add an extra layer of insulation and is eco-friendly.
Bamboo is another sustainable material. It grows quickly and can be used for various construction needs. Hempcrete, made from hemp fibers, is strong and provides good insulation.
Plant-based foam is a greener alternative to traditional foam insulation. It’s made from renewable resources and works just as well. Recycled glass wool is another option. It’s made from recycled glass and provides excellent insulation.
Eco-friendly paints can be used to finish your project. Look for ones with low VOCs to keep the air clean. Natural fiber carpets can add warmth and are biodegradable.
Energy-efficient windows can help keep your garage insulated. Look for double or triple-pane windows. Weather stripping around doors and windows can prevent drafts.
Solar panels can provide energy for your garage. They’re a long-term investment that pays off. Rainwater harvesting systems can be used for cleaning or gardening needs.
Permeable pavers can help manage water runoff and reduce flooding. They’re made from recycled materials and are eco-friendly. Green insulation options are plentiful and effective. Choose what works best for your needs.
Your Cozy Garage Awaits
Insulating your garage isn't just about comfort; it's about energy efficiency and protecting your belongings. By using fiberglass batts, foam boards, or spray foam, you can tackle this project with confidence. Remember to seal gaps and cracks to prevent drafts. Don't forget the garage door; it's a major source of heat loss. Adding weatherstripping and insulation panels can make a big difference. With a bit of effort, you'll transform your garage into a more usable space year-round. So grab your tools, follow the steps, and enjoy the benefits of a well-insulated garage. Happy DIY-ing!
How do I know if my garage needs insulation?
If your garage feels like an oven in summer or a freezer in winter, it probably needs insulation. Also, if you notice drafts or high energy bills, that's a sign.
What materials are best for insulating a garage?
Fiberglass batts, rigid foam boards, and spray foam are popular choices. Each has its pros and cons, so pick one based on your budget and needs.
Can I insulate my garage door?
Absolutely! You can use foam board, reflective insulation, or even fiberglass. Just make sure it fits well and doesn't interfere with the door's operation.
Do I need special tools to insulate my garage?
Not really. Basic tools like a utility knife, measuring tape, staple gun, and safety gear should do the trick. For spray foam, you'll need the specific applicator.
How long does it take to insulate a garage?
It depends on the size and your experience. A weekend should be enough for most DIYers. Just take your time and follow the instructions carefully.
Will insulating my garage reduce noise?
Yes, it can help. Insulation acts as a sound barrier, reducing noise from outside and making your garage quieter.
Is insulating a garage expensive?
Costs vary based on materials and garage size. Fiberglass is usually the cheapest, while spray foam can be pricier. However, the energy savings can offset the initial cost over time.